The chill in the air, the vibrant fall colors, and the scent of spiced lattes are clear indications that Halloween is right around the corner. And with this haunting season comes the tradition of pumpkin carving. This year, I decided to venture beyond the conventional jack-o-lantern face and carve a sinuous, slithering snake into my pumpkin. If you’re looking for a unique carving idea, follow along to create your own snake-inspired pumpkin.
A Step-by-Step Guide
Step 1: Choosing the Right Pumpkin
Wandering through the pumpkin patch, I looked for a pumpkin that was smooth and relatively free from blemishes. A medium to large-sized pumpkin seemed perfect to accommodate the curving body of a snake.
Step 2: Preparing the Workspace
Back at home, I cleared a spot on my kitchen counter, laying down newspaper to catch any mess. I also gathered all the tools I’d need: a sharp carving knife, a large spoon, a small paring knife, a marker, and a bowl for the pumpkin guts.
Step 3: The Top Cut
With my sharp carving knife, I sliced off the top of the pumpkin, angling the blade slightly inward so the lid wouldn’t fall inside. As I lifted the top, the familiar scent of fresh pumpkin greeted me.
Step 4: Scooping the Insides
This step is a workout! I used the large spoon to scoop out the seeds and stringy pulp. After several minutes, I had a clean, hollow pumpkin and a bowl filled with potential pumpkin seeds for roasting.
Step 5: Drawing the Design
I envisioned my snake winding its way around the pumpkin. Using the marker, I started by drawing the snake’s head, ensuring the eye was prominent. Then I let the body slither and curve around, occasionally looping over itself.
Step 6: Carving the Snake
Starting with the snake’s head, I used the small paring knife to trace along the marker lines, slowly cutting out the design. The key here was patience. The intricate turns of the snake’s body required slow and deliberate cuts.
Step 7: Finishing Touches
Once the snake design was fully carved, I wiped off any marker remnants with a damp cloth. To make the snake stand out even more, I carved some background details—like leaves or rocks—to give the impression of the snake moving through a scene.
Step 8: Lighting It Up
The final touch? Lighting a tea-light candle and placing it inside the pumpkin. The flickering flame brought my snake to life, casting eerie shadows that danced and slithered on the walls.
Step 9: Displaying Your Masterpiece
With immense pride, I set my snake-carved pumpkin on my porch. Positioned among other traditional jack-o-lanterns, it truly stood out as a unique and captivating piece of Halloween art.
Carving a snake pumpkin was a delightful departure from the norm. Not only was the process fun and challenging, but the end result was a piece that sparked conversations and admiration from neighbors and trick-or-treaters alike. So, if you’reconsidering a different carving theme this year, give the snake pumpkin a shot. Embrace the slither!
Tips
- Start by selecting a pumpkin that is the right size and shape for your snake design. Look for a pumpkin that is long and slender, with a smooth surface.
- Use a sharp knife to cut off the top of the pumpkin. Make sure to cut at an angle so that the lid will fit back on securely.
- Scoop out the seeds and pulp from the inside of the pumpkin.
- Draw a simple outline of a snake on the pumpkin with a marker. Make sure to leave enough room for the details.
- Use a small, sharp knife to carve out the details of the snake. Start with the eyes and then work your way down the body.
- Once you’ve finished carving, rub the pumpkin with petroleum jelly to help preserve it.
- Place the pumpkin in a cool, dry place away from direct sunlight. This will help it last longer.
- If you want to make your snake pumpkin last even longer, spray it with a clear sealant. This will help protect it from the elements.
- Finally, enjoy your spooky snake pumpkin!
Creative Ideas
- Carve a spooky snake winding its way around your pumpkin. Add some extra details like eyes and a forked tongue to make it look extra creepy.
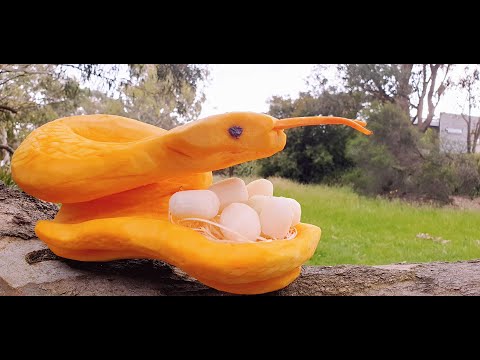
- Carve a snake with its mouth open, and when your guests come close, they’ll find a surprise inside!
- Carve a snake with a spell written on its body. You can use a stencil to make sure the words are legible.
- Carve a snake with a long, winding tail. You can even add some extra details like scales or a pattern to make it look more realistic.
- Carve a snake with a message written on its body. You can use a stencil to make sure the words are legible.
- Carve a snake with a crown on its head. You can add some extra details like jewels or a pattern to make it look more regal.
- Carve a snake with a spellbook in its mouth. You can add some extra details like a wand or a potion bottle to make it look extra magical.
- Carve a snake with a potion bottle in its mouth. You can add some extra details like a cauldron or a spellbook to make it look extra magical.
- Carve a snake with a map in its mouth. You can add some extra details like a compass or a treasure chest to make it look extra adventurous.
- Carve a snake with a treasure chest in its mouth. You can add some extra details like coins or jewels to make it look extra exciting.
The Best Tools for Carving
Carving a snake pumpkin is a fun and creative way to get into the Halloween spirit! To make sure your snake pumpkin looks its best, you’ll need the right tools. Here are the best tools for carving a snake pumpkin:
- Pumpkin Carving Kit: A pumpkin carving kit is a must-have for any pumpkin carver. It comes with all the tools you need to carve your snake pumpkin, including a saw, a scooper, and a variety of carving tools.
- X-Acto Knife: An X-Acto knife is perfect for carving intricate details into your snake pumpkin. It’s sharp and precise, so you can create the perfect snake design.
- Drill: A drill is great for creating holes in your pumpkin. This will help you create the scales on your snake pumpkin.
- Paintbrush: A paintbrush is great for adding details to your snake pumpkin. You can use it to paint on eyes, a tongue, or any other details you want to add.
With these tools, you’ll be able to create a spooky and creative snake pumpkin that will be the envy of your neighborhood!
How to Make a Snake Pumpkin Carving That Will Last for Years
Are you looking for a way to make your Halloween decorations stand out this year? Why not try your hand at carving a snake pumpkin? This fun and creative project is sure to be a hit with your family and friends, and it will last for years to come!
To get started, you’ll need a large pumpkin, a sharp knife, a spoon, and a few other tools. First, cut off the top of the pumpkin and scoop out the insides. Then, draw a snake design onto the pumpkin with a marker. Make sure to leave enough room for the eyes and mouth.

Next, use the knife to carefully carve out the design. Be sure to go slowly and take your time. Once you’ve finished carving, use the spoon to scoop out any remaining pumpkin flesh.
Now it’s time to add the finishing touches. Use a marker to draw eyes and a mouth onto the snake. You can also use paint or glitter to make the design even more eye-catching.
Finally, place a candle inside the pumpkin and light it up. Your snake pumpkin carving is now complete! This unique decoration will be sure to impress your guests and will last for years to come. So get carving and have a spooktacular Halloween!

Conclusion
Snake pumpkin carving is a fun and creative way to celebrate fall. It is a great activity for families to do together, and it can be a great way to get into the Halloween spirit. With a few simple tools and some creativity, you can create a unique and spooky pumpkin that will be sure to impress your friends and family. Whether you choose to carve a traditional snake design or something more creative, you can be sure that your pumpkin will be the talk of the town.


