Crocheting a circle is a great way to start your journey into the world of crochet. It is a simple and versatile shape that can be used to make a variety of items, from hats and bags to blankets and scarves.
In this tutorial, you will learn how to crochet a circle using basic stitches and techniques. You will also learn how to increase and decrease the size of your circle, as well as how to join the ends together. With a few simple steps, you will be able to create a beautiful and unique circle that you can use for any project.
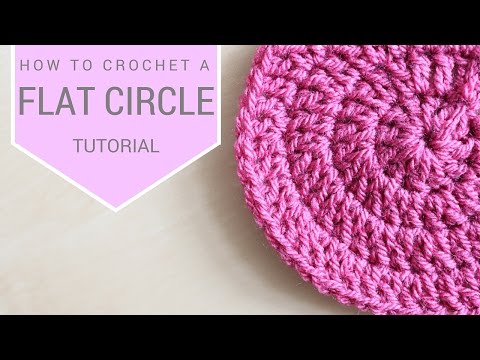
Step-by-Step Guide to Crocheting a Perfect Circle
Welcome to the wonderful world of crocheting! Today, we’re going to learn how to crochet a perfect circle. It’s a great skill to have, and it’s surprisingly easy to do. So, let’s get started!
Step 1: Gather your supplies. You’ll need a crochet hook, some yarn, and a pair of scissors.
Step 2: Start by making a slip knot. To do this, make a loop with the yarn and then pull the end of the yarn through the loop. Pull the end of the yarn to tighten the knot.
Step 3: Now, make a chain of stitches. To do this, wrap the yarn around the hook and pull it through the loop on the hook. Keep repeating this until you have the desired number of stitches.
Step 4: Now, it’s time to start crocheting in the round. To do this, insert the hook into the first stitch of the chain and then wrap the yarn around the hook. Pull the yarn through the stitch and then through the loop on the hook.
Step 5: Keep repeating this process until you have gone all the way around the chain. When you reach the end, you should have a perfect circle!
Step 6: Finally, tie off the end of the yarn and cut off any excess.
And there you have it! You’ve just crocheted a perfect circle. Congratulations! Now, you can use this skill to make all sorts of fun projects. Have fun!
How to Crochet a Circle Using Different Stitches
Crocheting a circle is a great way to make a variety of projects, from hats to blankets and more! With just a few simple stitches, you can create a beautiful circle that will be the perfect foundation for your project. Here’s how to crochet a circle using different stitches.
First, you’ll need to decide which stitch you’d like to use. You can choose from single crochet, half double crochet, double crochet, or treble crochet. Each stitch will give your circle a different look, so experiment to find the one that’s right for you.

Next, you’ll need to work your chosen stitch into the ring. For single crochet, work one stitch into each chain. For half double crochet, work two stitches into each chain. For double crochet, work three stitches into each chain. And for treble crochet, work four stitches into each chain.
Once you’ve worked your stitches into the ring, it’s time to start increasing. To do this, work two stitches into the same stitch from the previous round. Continue to do this until you’ve reached the desired size of your circle.
Finally, join the last round with a slip stitch and fasten off. Congratulations! You’ve just crocheted a beautiful circle using different stitches. Now you’re ready to start your project!
Tips for Crocheting a Perfectly Round Circle
Crocheting a perfectly round circle can be a challenge, but with a few tips and tricks, you can create a beautiful, even circle in no time!
- Start with the right number of stitches. The number of stitches you start with will determine the size of your circle. For a small circle, start with 8 stitches, for a medium circle, start with 12 stitches, and for a large circle, start with 16 stitches.
- Increase evenly. As you work your way around the circle, make sure to increase your stitches evenly. This will help keep your circle even and round.
- Use a stitch marker. Place a stitch marker at the beginning of each round to help you keep track of where you are in the pattern. This will help you make sure you’re increasing evenly and that your circle is staying round.
- Don’t pull too tight. When you’re crocheting, make sure to keep your tension loose. If you pull too tight, your circle will become distorted and won’t be perfectly round.
- Take your time. Crocheting a perfectly round circle takes patience and practice. Don’t rush it and take your time to make sure you’re doing it right.
With these tips, you’ll be able to crochet a perfectly round circle in no time! Have fun and happy crocheting!

How to Crochet a Circle with a Single Color
Crocheting a circle is a great way to make a cozy blanket, a stylish hat, or a beautiful bag! It’s also a great way to practice your crochet skills. With just one color of yarn, you can create a beautiful circle that will be the perfect addition to your project. Here’s how to do it:
- Start by making a slip knot and chaining four stitches.
- Join the chain into a circle by slip stitching into the first chain.
- Chain two stitches and then make a single crochet stitch into the same stitch.
- Make two single crochet stitches into each stitch around the circle.
- When you reach the end of the round, join the last stitch to the first stitch with a slip stitch.
- Chain two stitches and then make two single crochet stitches into each stitch around the circle.
- When you reach the end of the round, join the last stitch to the first stitch with a slip stitch.
- Repeat steps 6 and 7 until your circle is the desired size.
And there you have it! With just one color of yarn, you can create a beautiful circle that will be the perfect addition to your project. Have fun crocheting!
Creative Ways to Use Crocheted Circles in Your Projects
- Create a cozy blanket by crocheting circles together in a patchwork pattern. The circles can be different sizes and colors to create a unique and eye-catching design.
- Make a fun and colorful rug by crocheting circles together in a circular pattern. This is a great way to add a pop of color to any room.
- Create a unique pillow by crocheting circles together in a starburst pattern. This is a great way to add a touch of whimsy to any room.
- Make a stylish bag by crocheting circles together in a basketweave pattern. This is a great way to add a touch of sophistication to any outfit.
- Create a beautiful wall hanging by crocheting circles together in a mandala pattern. This is a great way to add a touch of beauty to any room.
- Make a unique hat by crocheting circles together in a spiral pattern. This is a great way to add a touch of fun to any outfit.
- Create a cozy scarf by crocheting circles together in a chevron pattern. This is a great way to add a touch of warmth to any outfit.

Q&A
1. What materials do I need to crochet a circle?
You will need a crochet hook, yarn, scissors, and a yarn needle.
2. How do I start crocheting a circle?
Start by making a slip knot and then chain a number of stitches that is divisible by two. Then, join the chain with a slip stitch to form a ring.
3. How do I crochet the first round of a circle?
To crochet the first round of a circle, make a single crochet stitch in each chain stitch around the ring. Join the round with a slip stitch.
4. How do I increase the size of my circle?
To increase the size of your circle, make two single crochet stitches in each stitch around the ring. Join the round with a slip stitch.
5. How do I finish my circle?
To finish your circle, fasten off the yarn and weave in the ends with a yarn needle.
Conclusion
Crocheting a circle is a great way to start your journey into the world of crochet. With a few basic stitches and a bit of practice, you can create a beautiful and unique circle that can be used for a variety of projects. Whether you are looking to make a hat, a blanket, or a scarf, crocheting a circle is a great way to get started. With a little bit of patience and practice, you can create a beautiful and unique circle that will be the perfect addition to any project.