I still remember the afternoon I found a vintage pillowcase in my grandmother’s attic, mesmerized by the raised, bumpy texture of the floral centers that seemed to pop right off the fabric. That was my first encounter with the French knot, a humble little stitch that looked impossible to decode at age ten.
Today, it is my absolute favorite way to add dimension and tactile life to any embroidery piece, turning flat images into something you just have to touch.
- My Journey with French Knot Embroidery
- What This Craft Really Entails
- Essential Materials and Tools
- Key Techniques and Skills
- Skill Level and Time Investment
- Advantages and Challenges
- Real Project Applications
- The Learning Experience
- Comparison with Similar Crafts
- Common Questions from Fellow Crafters
- My Personal Results and Insights
- Final Thoughts and My Recommendation
My Journey with French Knot Embroidery
Embroidery has been my constant companion for over twenty years, but I have to be honest: the French knot was my “white whale” for the first few months of my practice. I vividly recall sitting on my porch one summer, tangling inches of expensive silk floss into a hopeless bird’s nest, convinced my hands were simply too clumsy for this level of detail.

What This Craft Really Entails
French knot embroidery is technically a surface embroidery stitch used to create a small, tight knot that sits proudly on top of the fabric. While it is often taught as a singular component of a larger pattern, entire artworks can be created using nothing but this technique, a style sometimes referred to as “pointillism with thread.”
Historically, this stitch has roots in ancient Chinese needlework, specifically the blind knot or Peking knot, though the variation we use in the West became a staple in traditional stumpwork and whitework. It is a technique that bridges the gap between 2D drawing and 3D relief sculpture.
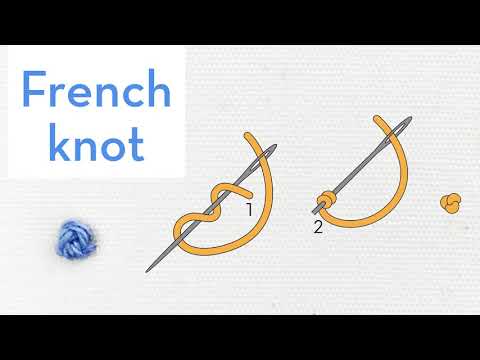
The core skill involves winding the thread around the needle—usually once or twice—and re-inserting the needle incredibly close to the exit point. It sounds simple, but have you ever wondered why your knots sometimes disappear completely to the back of the fabric? That is the delicate dance of tension and spacing.
This craft is akin to sculpting with clay, but on a miniature, softer scale. You are building mass and texture where there was none. It suits the intermediate stitcher best, though a patient beginner can certainly master it with the right tools. It requires more manual dexterity than a running stitch but offers a payoff that flat stitches simply cannot match.
Unlike satin stitch or cross-stitch, which rely on geometric precision and flat coverage, French knots are organic and forgiving. If one knot is slightly larger than its neighbor, it simply adds to the natural texture of the piece. This makes it perfect for rendering organic subjects like moss, sheep’s wool, or flower pollen.
However, it is distinct from the Colonial knot, which is a figure-eight wrap. Many stitchers confuse the two. The French knot is rounder and taller, while the Colonial knot is sturdier and flatter. Choosing between them is often a matter of personal preference and the specific look you want to achieve.
Mastering this craft entails learning to control your thread with your non-dominant hand. You act as the tension regulator. Without this two-handed coordination, the thread twists upon itself before the knot forms, leading to the dreaded “wormy” look that plagues many novices.

Essential Materials and Tools
| Item Category | Specifications |
|---|---|
| Primary Fabric | Tightly woven cotton or linen (avoid stretchy knits without stabilizer) |
| Needles | Milliners needles (size 3-7) are critical; the eye is the same width as the shaft |
| Thread | Six-strand cotton embroidery floss, pearl cotton, or crewel wool |
| Hoop | Wooden or plastic tension hoop, 4 to 8 inches diameter |
| Stabilizer | Iron-on backing (optional) to prevent puckering in dense areas |
| Magnification | Clip-on light or magnifying glass for fine detail work |
| Approximate Start Cost | $15 – $25 USD for a complete high-quality starter kit |
Key Techniques and Skills
- The Single Wrap: The standard method for a neat, petite knot.
- The Double Wrap: Creates a larger, bolder knot but increases the risk of tangling.
- Tension Control: Holding the working thread taut with the non-dominant hand.
- Needle Placement: Re-inserting the needle one thread over from the exit hole, not the same hole.
- The Plunge: The smooth downward pull of the needle through the wrapped thread.
- Anchor Stitches: Securing the thread on the back to prevent knots from loosening.
- Gradated Shading: Using mixed thread colors in adjacent knots to create depth.
- Bullion Knots: An advanced variation involving many wraps for a tubular shape.
- Filling: Packing knots densely to cover an area completely (texture filling).
- Thread Stripping: Separating floss strands to reduce twisting before stitching.
Skill Level and Time Investment
| Skill Level | Time Investment | Key Milestones |
|---|---|---|
| Beginner | 2-3 Hours | Learning the hand motion; consistent success rate of 50% |
| Intermediate | 10-15 Hours | Uniform knot size; ability to control tension automatically |
| Advanced | 50+ Hours | “Painting” with knots; complex shading; speed proficiency |
| Mastery | Ongoing | Intuitive understanding of thread behavior; perfect backs |
| Challenge | High | Building muscle memory to prevent hand cramping |
Advantages and Challenges
Advantages:
- It adds incredible texture and tactile interest that draws the eye immediately.
- Great for using up “scrap” lengths of thread that are too short for other stitches.
- Very therapeutic and rhythmic once the muscle memory is established.
- Forgiving of minor imperfections; a cluster of knots hides individual mistakes.
- Versatile application; works for eyes, flowers, stars, and typography.
- Minimal equipment needed compared to machine embroidery or quilting.
Challenges:
- High potential for thread tangling and “air knots” if tension slips.
- Time-consuming; filling a small circle can take an hour or more.
- Physically demanding on the hands and wrists due to repetitive twisting.
- Uses significantly more thread than flat stitches like backstitch.
- Difficult to remove or pick out if a mistake is made without damaging fabric.
Real Project Applications
One of the most satisfying ways to use French knots is in botanical embroidery. I often design patterns where the petals are satin stitched, but the centers are an explosion of yellow and brown French knots. This contrast between smooth and bumpy textures makes the flowers look realistic enough to smell.
Another application I love is creating “fleece” for animal portraits. I once stitched a portrait of a sheep for a nursery gift where the entire coat was made of hundreds of cream-colored French knots using thick wool thread. The result was soft, fuzzy, and incredibly durable, perfect for a tactile sensory piece for a child’s room.
Landscapes benefit hugely from this technique as well. You can use tight, small knots in variegated green floss to mimic distant bushes or treetops. By varying the number of strands—using six strands for foreground bushes and one strand for distant trees—you create a natural sense of depth and perspective.
Have you ever considered using knots for lettering? Instead of a standard outline, you can fill block letters with densely packed knots. I recently finished a monogram on a tote bag that measured three inches high. It required five skeins of floss, but the result looked like a chenille patch.
For the holidays, French knots are perfect for mimicking snow. On a dark blue fabric, scattered white knots of varying sizes (single and double wraps) create a magical snowfall effect. It is a simple addition that transforms a plain background into a winter scene.
In terms of measurable outcomes, a dense one-inch square of French knots typically takes me about 45 minutes to stitch and consumes roughly one-third of a standard embroidery skein. It is not a quick process, but the structural integrity it adds to the fabric is significant.
The Learning Experience
When you first start, expect your knots to look a bit like tadpoles. This is entirely normal. The most common mistake beginners make is pulling the needle through too quickly, which causes the loop to snag before it tightens against the fabric. It requires a “slow is smooth, smooth is fast” mentality.
I struggled initially with needle selection. I was using standard embroidery sharps, which have a bulging eye. The wraps would get stuck over the eye, and I would have to yank the needle through, often distorting my fabric. Switching to a Milliners needle, which is uniform in thickness, was a total game-changer for me.
Learning resources are abundant, but video tutorials are superior to books for this specific stitch. You need to see the motion of the hands in real-time. I highly recommend searching for slow-motion tutorials. Seeing the exact moment the stitcher tightens the thread makes it click mentally.
The community support for embroidery is wonderful. Instagram and Reddit have massive sub-communities dedicated to hoop art. Sharing a picture of your “knot progress” is a great way to get specific advice on tension. There is a deep satisfaction in posting a photo of a finished piece where thousands of tiny knots come together to form a cohesive image.
Comparison with Similar Crafts
| Aspect | French Knot | Colonial Knot | Seed Beads | Punch Needle |
|---|---|---|---|---|
| Ease of Learning | Moderate | Moderate-Hard | Easy | Easy |
| Durability | High | Very High | Medium (thread break risk) | Medium (can snag) |
| Texture Profile | Round, tall, soft | Flat, tight, figure-8 | Hard, shiny, glass | Loop pile, carpet-like |
| Material Cost | Low (thread only) | Low (thread only) | Medium (beads + specialized needle) | Medium (yarn + specific tool) |
Common Questions from Fellow Crafters
Q: Why does my knot keep pulling through to the back of the fabric?
A: You are likely re-inserting the needle into the exact same hole you came up from. Move over just one or two fabric threads to give the knot something to anchor against.
Q: How many times should I wrap the thread around the needle?
A: Standard practice is one or two wraps. Anything more than three becomes unstable and floppy; if you need a bigger knot, use thicker thread or more strands, don’t add more wraps.
Q: Can I wash a garment with French knot embroidery?
A: Yes, but turn the garment inside out and wash on a delicate cycle or by hand. The knots can snag on zippers or buttons from other clothes.
Q: Why are my knots loose and floppy?
A: You let go of the thread tension too early. Hold that working thread taut against the fabric until the needle is almost completely pulled through.
Q: Is it better to use a hoop or hold the fabric in hand?
A: A hoop is non-negotiable for me. You need the fabric drum-tight to plunge the needle through the resistance of the wraps without puckering the material.
Q: What is the difference between a French knot and a Peking knot?
A: A Peking knot creates a ring-like appearance and is often much smaller and flatter, used traditionally in dense rows in Chinese embroidery.
My Personal Results and Insights
| Project Type | Outcome |
|---|---|
| Floral Sampler (6″ hoop) | Completed in 1 week; high satisfaction; excellent way to practice consistency. |
| Full Fill Landscape | Took 2 months; high material cost (15 skeins); stunning result but physically tiring. |
| Denim Jacket Embellishment | Moderate durability; some knots snagged after 6 months of wear; requires hand washing. |
| Greeting Cards (Paper) | Difficult; knots tear the paper easily if tension is too high; low success rate. |
| Monogram Napkins | Perfect gift project; quick completion (2 hours per napkin); adds high perceived value. |
| Abstract Texture Art | Creative freedom; unexpected benefit was the meditative state induced by repetition. |
Final Thoughts and My Recommendation
After years of stabbing fabric and tangling thread, I can confidently say that learning the French knot is one of the most rewarding milestones in embroidery. It marks the transition from simply “coloring with thread” to creating genuine textile art with depth and dimension. It is not just a stitch; it is a texture builder.
I highly recommend this technique for anyone who has mastered the basics of backstitch and satin stitch and is looking for a challenge. It is perfect for the patient crafter who enjoys the rhythmic, repetitive nature of handwork. If you are someone who wants instant results, you might find the slow pace of filling areas with knots frustrating.
However, do not let the fear of tangles stop you. The texture you can achieve—the mossy floors, the sheep’s wool, the center of a sunflower—is worth every moment of practice. It requires dedication to get the tension right, but once your hands learn the rhythm, it becomes almost like a meditation. The French knot transforms a flat piece of cloth into a story you can feel with your fingertips.


