The Simpsons is one of the most beloved animated television shows of all time, and it’s no surprise that fans of the show love to show their appreciation by carving pumpkins in the likeness of their favorite characters. From Homer to Marge, Bart to Lisa, and even the beloved family dog, Santa’s Little Helper, Simpsons pumpkin carving is a fun and creative way to celebrate the show. Whether you’re a novice or an experienced carver, you can create a unique and memorable pumpkin that will be sure to impress your friends and family. So grab your carving tools and get ready to create a Simpsons masterpiece!
- My Step-By-Step Guide to Carving a Simpsons Pumpkin
- 1. Choosing the Perfect Pumpkin:
- 2. Tools of the Trade:
- 3. Design Time:
- 4. Let’s Carve:
- 5. Illuminating Homer:
- 6. The Big Reveal:
- The Best Simpsons Characters to Carve into a Pumpkin
- The Ultimate Guide to Carving a Bart Simpson Pumpkin
- Tips for Carving a Perfect Marge Simpson Pumpkin
- Conclusion
My Step-By-Step Guide to Carving a Simpsons Pumpkin
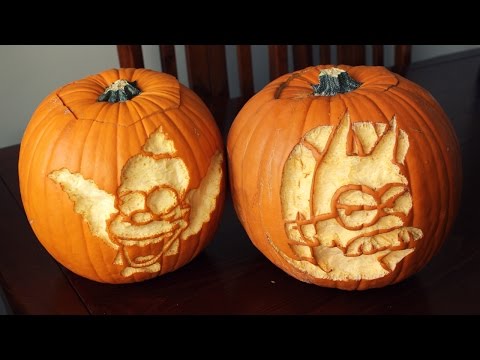
Ah, fall. The season of cozy sweaters, pumpkin spice lattes, and – you guessed it – pumpkin carving! This year, I decided to pay homage to one of my all-time favorite TV shows: The Simpsons. If you’ve ever wondered how to carve a pumpkin featuring the iconic face of Homer, Bart, or any of the other beloved characters, here’s a step-by-step guide based on my own experience.
1. Choosing the Perfect Pumpkin:
I began my Simpsons-themed pumpkin journey by choosing the right canvas: the pumpkin. I looked for one that was smooth, with a flat bottom and devoid of too many blemishes. The size and shape of your pumpkin will depend on which Simpsons character you choose, but I went for a medium-sized, round one for Homer’s circular face.
2. Tools of the Trade:
For a successful carving, it’s crucial to have the right tools. I used:
- A sharp knife for cutting the top off
- A large spoon for scooping out the insides
- A small paring knife or pumpkin carving tool for detailed work
- A marker or pencil for drawing the design
3. Design Time:
Before diving into carving, I sketched out Homer’s face on a piece of paper. If drawing isn’t your forte, there are plenty of Simpsons templates online. Once I was satisfied with my sketch, I used a marker to trace the design onto the pumpkin. Remember, it doesn’t have to be perfect; the charm is in the handmade look!
4. Let’s Carve:
With the design in place, I carefully used my sharp knife to cut a circle around the pumpkin’s stem to create a lid. Angling the knife slightly inward ensures the lid won’t fall through. Scooping out the pumpkin’s insides was a nostalgic experience, and I made sure to save the seeds for roasting!
Now, the real fun began. Using my smaller carving tool, I meticulously followed the lines of my design, starting with the bigger sections (like the outline of the face and eyes) and working my way down to the smaller details like the pupils and nose. Remember to take your time, especially with the more intricate areas.
5. Illuminating Homer:
After brushing away any leftover pumpkin bits, I placed a small candle inside the hollowed-out pumpkin. I opted for a LED candle because it’s safer and lasts longer, but a traditional candle works too. Just be sure to monitor it if you’re using real flame.
6. The Big Reveal:
With the candle lit, I dimmed the lights and placed the lid back on my pumpkin. There, glowing in the dim room, was Homer Simpson’s face, shining brightly and instantly recognizable. A wave of pride washed over me.
Carving a Simpsons pumpkin was both fun and rewarding. It brought a piece of my favorite show into my favorite season and was a surefire way to get some compliments from neighbors and friends. If you’re looking for a unique carving idea this Halloween, give Springfield’s finest a try. Remember, it’s not just about the end result; it’s about the journey and the memories you make along the way. D’oh! And happy carving!
The Best Simpsons Characters to Carve into a Pumpkin
- Homer Simpson: The beloved patriarch of the Simpson family, Homer is the perfect character to carve into a pumpkin. With his signature bald head, round glasses, and big smile, Homer is sure to bring a smile to everyone’s face.
- Bart Simpson: The mischievous son of the Simpson family, Bart is the perfect character to carve into a pumpkin. With his spiky hair, blue shorts, and mischievous grin, Bart is sure to bring a bit of Halloween mischief to your pumpkin carving.
- Krusty the Clown: Krusty is the perfect character to carve into a pumpkin. With his signature red hair, white face paint, and big smile, Krusty is sure to bring a bit of fun and laughter to your pumpkin carving.
- Mr. Burns: The evil billionaire of Springfield, Mr. Burns is the perfect character to carve into a pumpkin. With his bald head, monocle, and sinister smirk, Mr. Burns is sure to bring a bit of Halloween horror to your pumpkin carving.
- Maggie Simpson: The youngest member of the Simpson family, Maggie is the perfect character to carve into a pumpkin. With her pacifier, blue dress, and big eyes, Maggie is sure to bring a bit of cuteness to your pumpkin carving.
The Ultimate Guide to Carving a Bart Simpson Pumpkin
Are you ready to carve a Bart Simpson pumpkin this Halloween? It’s time to get creative and have some fun! With a few simple steps, you can create a spooky and cheerful pumpkin that will be the envy of your neighborhood. Here’s your ultimate guide to carving a Bart Simpson pumpkin.
Step 1: Gather Your Supplies
Before you get started, make sure you have all the supplies you need. You’ll need a pumpkin, a carving knife, a marker, a spoon, and a stencil of Bart Simpson.
Step 2: Prepare the Pumpkin
Cut the top off the pumpkin and scoop out the insides. Make sure to remove all the seeds and stringy bits.
Step 3: Trace the Stencil
Place the stencil on the pumpkin and trace it with a marker. Make sure to press firmly so the lines are clear.
Step 4: Carve the Pumpkin
Using the carving knife, carefully cut along the lines you traced. Be sure to take your time and be careful not to cut yourself.
Step 5: Add the Finishing Touches
Once you’ve finished carving, use the spoon to add texture to the pumpkin. You can also add eyes, a nose, and a mouth to make it look more like Bart Simpson.
And there you have it! Your very own Bart Simpson pumpkin. Now all you have to do is put it on display and enjoy the spooky and cheerful atmosphere it brings to your home. Happy Halloween!
Tips for Carving a Perfect Marge Simpson Pumpkin
- Start by drawing a simple outline of Marge Simpson’s face on the pumpkin. Use a marker or a pencil to draw the outline of her eyes, nose, and mouth.
- Carefully carve out the outline of Marge’s face. Use a sharp knife and take your time to make sure the lines are even and the shape is perfect.
- Once the outline is complete, use a small saw to carve out the eyes, nose, and mouth. Make sure to leave enough space between the eyes and nose so that Marge’s face looks realistic.
- To give Marge’s face more dimension, use a small drill to create small holes around the eyes, nose, and mouth.
- Finally, use a small brush to paint the pumpkin with a bright blue color. This will give Marge’s face a vibrant and cheerful look.
With these tips, you’ll be able to carve a perfect Marge Simpson pumpkin in no time!

Conclusion
The Simpsons pumpkin carving is a great way to show your love for the show and have some fun with your family. It’s a great way to get creative and have some fun with your carving skills. Whether you’re a beginner or an expert, you can find a design that suits your skill level and have a great time carving your own Simpsons pumpkin. With a little bit of creativity and some patience, you can create a unique and memorable pumpkin that will be sure to impress your friends and family.


