The alchemy of turning simple oils and alkali into a luxurious, cleansing bar has fascinated me for over a decade. There is a profound satisfaction in using a daily essential that you crafted with your own two hands, knowing exactly what touches your skin. My kitchen often smells of lavender and shea butter, a testament to this addictive and practical art form.
- My Journey with Soap Making
- What This Craft Really Entails
- Essential Materials and Tools
- Key Techniques and Skills
- Skill Level and Time Investment
- Advantages and Challenges
- Real Project Applications
- The Learning Experience
- Comparison with Similar Crafts
- Common Questions from Fellow Crafters
- My Personal Results and Insights
- Final Thoughts and My Recommendation
My Journey with Soap Making
I still remember standing in my kitchen years ago, wearing oversized rubber gloves and staring at a pitcher of lye solution with a mixture of terror and excitement. I had spent weeks reading about the chemistry, terrified I would accidentally make a volcano instead of a beauty product. My first batch was a simple olive oil castile soap that looked underwhelmingly beige.
There is no magic quite like slicing into a fresh loaf of soap to reveal the design hidden inside, a moment that feels like opening a present you made for yourself.
However, after waiting the agonizing six weeks for it to cure, that first shower changed everything for me. The lather was rich and creamy, completely unlike the drying commercial bars I was used to using. I realized then that soap making wasn’t just about cleaning; it was about customization and care.
I once ruined an entire batch of expensive oils by using a “rose” fragrance that wasn’t designed for soap making. It seized the batter instantly, turning it into a solid brick in the pot before I could even pour it. That hard lesson taught me to respect the materials and the science behind the art.
What This Craft Really Entails
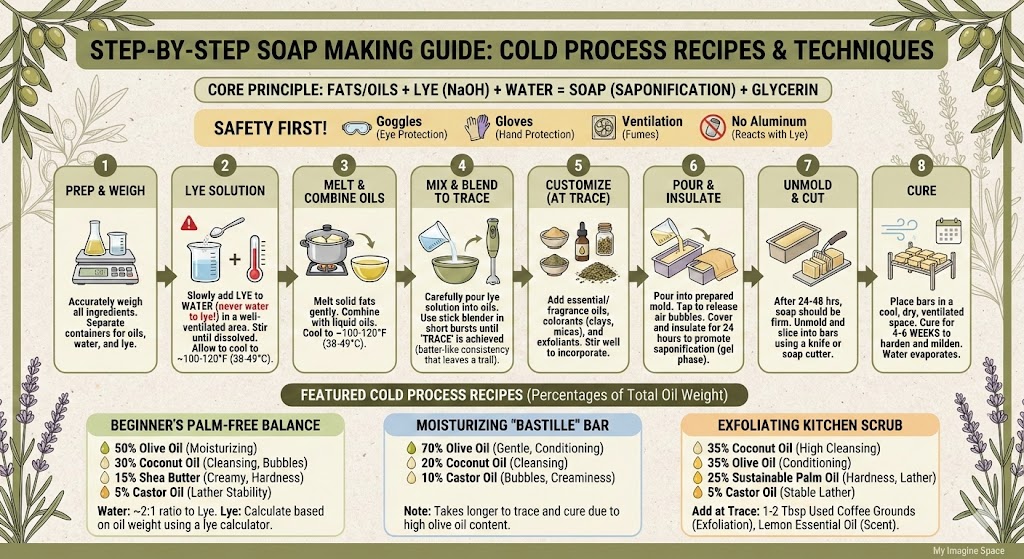
Soap making, specifically the cold process method, is the perfect marriage of high school chemistry and creative design. It involves emulsifying oils (acids) with a lye solution (base) to create a chemical reaction called saponification. Once this reaction is complete, no lye remains, leaving only soap and glycerin.
While many people start with “Melt and Pour” bases—which is premade soap you simply reshape—making soap from scratch allows you to control the fatty acid profile. You decide how bubbly, creamy, or cleansing the final bar will be. It is distinct from other fiber arts or crafts because it requires strict adherence to safety and measurements.
Saponification is the exothermic chemical reaction that occurs when fats or oils come into contact with lye, transforming them into soap and glycerin.
This craft is suited for adults who can follow precise instructions and handle caustic materials safely. It appeals to bakers who love weighing ingredients and artists who love playing with color palettes. The precision required is non-negotiable, but the artistic design on the top of a soap loaf offers endless freedom.
Have you ever wondered why handmade soap feels so different from the stuff at the grocery store? Commercial bars often have the natural glycerin removed for use in lotions, whereas handmade soap retains this moisturizing byproduct. It is less of a detergent and more of a skin treatment.
Essential Materials and Tools
To start making soap recipes from scratch, you cannot rely on standard kitchen guesswork. The tools must be dedicated solely to soap making to avoid any cross-contamination with food.
| Item Category | Specifications |
|---|---|
| Safety Gear | Heavy-duty rubber gloves, wrap-around safety goggles, long sleeves. |
| Measuring Tools | Digital kitchen scale (grams/ounces), infrared thermometer. |
| Mixing Equipment | Immersion stick blender (stainless steel), heat-resistant plastic pitchers (PP #5). |
| Molds | Silicone loaf molds, wooden loaf cutters, or individual cavity molds. |
| Base Oils | Olive oil, coconut oil, sustainable palm oil, shea butter, castor oil. |
| The Alkali | Sodium Hydroxide (Lye) beads or flakes, 100% pure with no additives. |
You must always add the lye to the water, never the other way around, or you risk a dangerous volcanic eruption of caustic liquid.
Key Techniques and Skills
Mastering soap making requires learning a specific vocabulary of physical cues. Here are the core techniques you will develop as you progress.
- Lye Safety Handling: Mixing lye requires good ventilation and confident, careful pouring to avoid splashes or inhaling fumes.
- Recipe Formulation: Using a “lye calculator” to determine the exact amount of sodium hydroxide needed for your specific blend of oils.
- Recognizing Trace: Identifying the moment the emulsion is stable; “light trace” is for swirling colors, while “thick trace” supports heavy embeds.
- Temperature Control: Managing the heat of both your oils and lye water so they are within 10 degrees of each other when combined.
- Swirling Techniques: Using tools like hangers or chopsticks to manipulate colored batter inside the mold for artistic effects.
- Insulating: Wrapping the mold in towels to force the soap through “gel phase,” which makes colors pop and the bar harder.
- Beveling and Planing: Trimming the sharp edges of the finished bars for a professional, smooth hand-feel.
- Curing: Storing soap in a dry, airy place for weeks to allow excess water to evaporate and the crystal structure to harden.
Always run every single recipe through a trusted online lye calculator before you begin, even if you found the recipe in a published book.
Skill Level and Time Investment
Soap making is unique because the active work time is short, but the waiting time is long. It teaches patience in a way few other crafts do.
| Skill Level | Time Investment | Key Milestones |
|---|---|---|
| Beginner | 1-2 hours active work | Learning safety, mixing a single-color batch, cutting the first loaf. |
| Intermediate | 2-3 hours active work | Mastering swirls, using milk or beer instead of water, formulating own recipes. |
| Advanced | 3+ hours active work | Complex landscape designs, piping soap frosting, transparency techniques. |
| Curing Phase | 4 to 6 weeks (Passive) | The critical waiting period where the soap becomes mild and long-lasting. |
Advantages and Challenges
Like any craft that involves chemistry and raw materials, there are incredible highs and some frustrating lows. Here is what I have gathered from my community of soapers.
- Total Control: You choose every ingredient, eliminating allergens or synthetic detergents that irritate sensitive skin.
- Creative Outlet: The design possibilities are infinite, from simple rustic bars to intricate landscape paintings in soap.
- Cost Effective Long-term: Once you have the equipment, a loaf of high-quality soap costs a fraction of boutique prices.
- Sustainability: You can eliminate plastic waste by making naked bars and using eco-friendly oils.
- Giftability: Everyone uses soap, making it the universally perfect gift for holidays and birthdays.
- Therapeutic Focus: The requirement for total concentration during the lye phase clears the mind of other worries.
- Safety Risks: Lye creates chemical burns if handled poorly, requiring constant vigilance and a pet-free zone.
- Initial Investment: Buying molds, stick blenders, and bulk oils creates a moderate upfront cost barrier.
- Storage Space: Curing racks take up space, and you need a dedicated area with good airflow.
- The “Ugly Phase”: Soda ash (a white powder) can form on top of soap, ruining the aesthetic if not managed.
Real Project Applications
One of my favorite go-to projects is a “Bastille” soap, which is a recipe high in olive oil with a small percentage of coconut oil for bubbles. It creates a gentle, rock-hard bar that is perfect for facial cleansing. I often make these in large batches to give as wedding favors.
Another practical application is laundry soap or dish soap. By formulating a recipe with 100% coconut oil with a 0% superfat, you create a bar with incredibly high cleansing power. It cuts through grease on dishes better than anything I have bought in a bottle.
There is nothing quite like the feeling of grating your own homemade laundry bar to make powdered detergent that smells like fresh lemon and eucalyptus.
For the holidays, I love making “confetti soap.” This is a zero-waste project where you chop up the scraps and end-pieces from previous batches and embed them into a fresh batter of white soap. It creates a stunning, terrazzo-style look that makes every slice unique.
Have you ever considered that a bar of soap could be a piece of seasonal decor? I create pumpkin-spice scented layers in October and peppermint swirls in December. These projects allow me to capture the essence of the season in a tangible, usable way.

The Learning Experience
Most people start by watching videos, which is helpful, but nothing replaces doing it. Beginners often struggle with “false trace,” where the soap looks thick but hasn’t actually emulsified. This leads to the oil and water separating in the mold, a heartbreaking result for a first attempt.
I remember my breakthrough moment came when I stopped trying to rush the temperature cooling process. I used to put my lye water in the fridge to cool it down fast, but it caused the shea butter in my oils to grainy. Learning to let things come to room temperature naturally improved my texture immensely.
Never use aluminum pots or utensils for soap making; the lye reacts with the metal to produce dangerous hydrogen gas and will ruin your pot.
The community is incredibly supportive, but opinions on recipes vary wildly. You will find that some soapers swear by palm oil while others strictly avoid it. Finding your own ethical and textural preferences is part of the journey.
Comparison with Similar Crafts
People often confuse soap making with other bath-body crafts, but the processes are quite distinct.
| Aspect | Cold Process Soap | Candle Making | Bath Bombs |
|---|---|---|---|
| Primary Reaction | Chemical (Saponification) | Physical (Melting/Cooling) | Chemical (Acid/Base fizz) |
| Precision Needed | High (Safety critical) | Medium (Wick testing) | High (Humidity sensitive) |
| Cure Time | 4-6 Weeks | 1-2 Weeks | 24 Hours |
| Equipment Cost | Moderate ($100-$150) | Moderate ($100-$150) | Low ($30-$50) |
Common Questions from Fellow Crafters
Q: Can I substitute oils in a recipe if I run out of one?
A: No, you cannot just swap oils because every oil requires a different amount of lye to saponify. You must recalculate the recipe using a lye calculator every time you change an ingredient.
Q: Why does my soap have a white dusty powder on top?
A: That is called soda ash. It is harmless and happens when the unsaponified lye reacts with carbon dioxide in the air. You can steam it off or wash it off the first time you use the bar.
Q: Is lye soap safe for my skin?
A: Yes! Once saponification is complete, there is absolutely no lye left in the final bar. All real soap is made with lye; without it, you just have a bucket of oil.
Q: How long does handmade soap last in the shower?
A: It depends on the recipe and cure time. A well-cured bar kept on a draining soap dish can last 3-4 weeks with daily use. If it sits in a puddle of water, it will dissolve quickly due to the natural glycerin.
Q: Can I use food coloring to dye my soap?
A: Generally, no. Food coloring often morphs into strange colors or fades instantly in the high-pH environment of raw soap. Cosmetic-grade micas or natural clays work best.
Q: What does “superfat” mean?
A: Superfatting is the practice of adding extra oil to the recipe that the lye doesn’t consume. This ensures the soap is moisturizing and provides a safety buffer so the soap isn’t harsh.
My Personal Results and Insights
After tracking my batches for several years, I have gathered some data on what makes a project successful versus what makes it a learning opportunity.
| Project Type | Outcome |
|---|---|
| High Olive Oil (Castile) | Requires 6+ months cure. Result is slimy at first, but rock hard and mild after a year. |
| 100% Coconut Oil | Very bubbly but drying. Needs a 20% superfat to be comfortable on the skin. |
| Goat Milk Soap | Tricky to prevent scorching (turns orange), but offers the creamiest lather imaginable. |
| Salt Bars | Must be cut within 2 hours or they become as hard as granite. Amazing for exfoliation. |
If we put so much effort into what we eat, doesn’t it make sense to put the same care into what we put on our largest organ, our skin?

Final Thoughts and My Recommendation
Soap making is a hobby that rewards precision and patience with a practical luxury you can enjoy every day. It is not the cheapest hobby to start, nor is it the easiest, but the feeling of self-sufficiency it provides is unmatched. I have found that the ritual of formulating a recipe, mixing the emulsion, and slicing the loaf is a deeply meditative process.

The key is to respect the trace and give your soap the time it needs to cure. The secret to a long-lasting, mild bar of soap is patience during the curing phase. Once you shower with a bar of soap you made yourself, designed perfectly for your own skin type, you will find it incredibly difficult to ever go back to buying commercial bars again.


