There is a distinct, quiet magic in standing over a pot of oils and watching them transform into a solid, cleansing bar of soap. My fascination with this alchemy began over a decade ago when I realized that the “soap” I bought at the store was actually just synthetic detergent. I wanted something real, something that nourished my skin rather than stripping it, and that desire led me down a rabbit hole of chemistry and creativity that I have never wanted to leave.
- My Journey with Soap Making
- What This Craft Really Entails
- Essential Materials and Tools
- Key Techniques and Skills
- Skill Level and Time Investment
- Advantages and Challenges
- Real Project Applications
- The Learning Experience
- Comparison with Similar Crafts
- Common Questions from Fellow Crafters
- My Personal Results and Insights
- Final Thoughts and My Recommendation
My Journey with Soap Making
I still remember my very first batch of cold process soap, trembling slightly as I donned my safety goggles and gloves in my small kitchen. I had spent weeks reading about the chemistry of lye and oils, terrified that I might accidentally create a volcano on my countertop. The moment the oils and lye solution emulsified into a creamy batter was nothing short of exhilarating.
Soap making is the perfect marriage of scientific precision and artistic expression, where dangerous elements combine to create something gentle.
My early attempts were not without their disasters; I once crafted a batch of lavender soap that smelled divine but was soft as cheese because I miscalculated my liquid ratios. That failure taught me more about the importance of ingredient properties than any textbook ever could. Over the years, I have moved from simple olive oil bars to complex swirls and milk soaps, but the thrill of cutting into a fresh loaf never fades.

What This Craft Really Entails
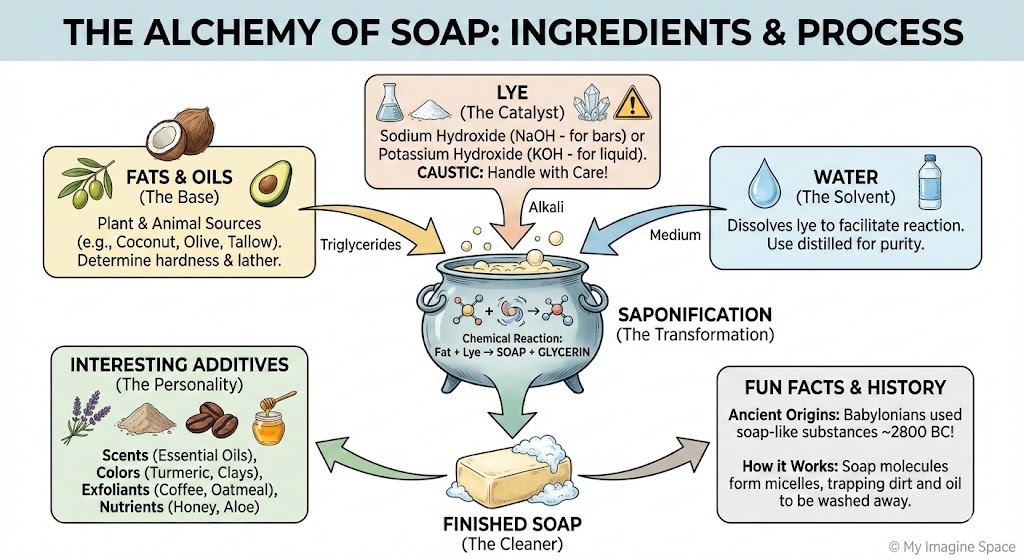
At its core, soap making is the process of saponification, a chemical reaction that occurs when fatty acids (oils or butters) come into contact with a strong alkali (sodium hydroxide or lye). While many people start with “melt and pour” bases, true soap making involves working from scratch. This allows you complete control over every single ingredient that touches your skin.
This craft is not merely about mixing things in a bowl; it requires a chef’s discipline and a chemist’s respect for safety. You are handling caustic materials that heat up rapidly, requiring focus and a calm environment. Is it dangerous? It can be if you are careless, but with proper protocols, it is as safe as deep-frying food.
Historically, our ancestors made soap using rainwater and wood ash, a method that was unpredictable and harsh. Modern soap making uses standardized lye crystals for consistent, safe results every time.
Who is this craft for? It suits the detail-oriented soul who loves to measure and track results. If you enjoy baking but wish the results lasted longer than an afternoon, soap making is likely for you. Have you ever looked at a label and wondered what “sodium tallowate” actually is? Making your own soap answers those questions instantly.
Essential Materials and Tools
The beauty of soap making is that the equipment is relatively humble, though the ingredients must be specific. You cannot substitute items loosely as you might in cooking. Here are the non-negotiables for a standard cold process batch.
| Item Category | Specifications |
|---|---|
| Alkali (The Catalyst) | 100% Sodium Hydroxide (Lye) in flake or bead form. Must be pure, not drain opener with additives. |
| Liquid Solvent | Distilled water is best to prevent minerals from interfering with the lye. Goat milk or herbal tea can also be used. |
| Base Fats (Hard) | Coconut oil (for bubbles), Palm oil or Tallow (for hardness), Shea butter (for luxury). |
| Base Fats (Soft) | Olive oil (for moisturizing), Sweet Almond oil, Castor oil (for lather stability). |
| Safety Gear | High-quality rubber gloves, tightly sealed safety goggles, and long sleeves. |
| Tools | Immersion blender (stick blender), digital kitchen scale, stainless steel or heat-safe plastic containers. |
Key Techniques and Skills
Mastering the ingredients is only half the battle; how you manipulate them defines the quality of your bar. Through years of trial and error, I have identified the skills that separate a hobbyist from an artisan.
- Precision Weighing: You must weigh everything, even water. Volume measurements are inaccurate and can lead to lye-heavy (caustic) soap.
- Lye Solution Mixing: Dissolving lye into water releases intense heat and fumes. doing this safely in a ventilated area is the first skill to master.
- Temperature Control: Bringing both your oils and your lye solution to similar temperatures (usually around 100°F-120°F) before combining ensures a smooth emulsion.
- Recognizing Trace: This is the point of no return where the oil and lye have emulsified. It looks like thin pudding.
- Superfatting: Calculated intentionally, this involves using less lye than necessary to ensure there is leftover oil in the bar for moisturizing properties.
- Pouring and Swirling: Pouring at the right consistency (light vs. thick trace) allows for designs. Pour too late, and you are spooning globs into the mold.
- Insulation: Wrapping the mold in towels to encourage the “gel phase,” which makes colors pop and the soap harder.
- Bevelling and Planing: The finishing skills of trimming the edges of your cured soap for a professional, smooth look.
Always add your lye crystals to the water, never pour water onto lye. Doing it backward can cause a dangerous volcanic eruption of caustic liquid.
Skill Level and Time Investment
Soap making is often compared to learning a musical instrument; you can play a simple tune quickly, but a symphony takes years. The “waiting game” is the hardest part for beginners. It is not an instant gratification craft.
| Skill Level | Time Investment | Key Milestones |
|---|---|---|
| Beginner | 2-3 hours active time, 4-6 weeks curing | Safely handling lye, achieving trace, making a simple uncolored batch. |
| Intermediate | 3-5 hours active time, 4-6 weeks curing | Using colorants, simple swirls, milk soaps, and understanding fatty acid profiles. |
| Advanced | Varies greatly (multi-day prep) | Complex landscape designs, transparent soap, formulating recipes from scratch without a calculator. |
Advantages and Challenges
After making hundreds of pounds of soap, I have seen the highs and lows of this process. It is rewarding, but it demands respect. Here is what you can genuinely expect.
The Joys of the Craft:
- Complete control over ingredients, making it ideal for those with eczema or sensitive skin.
- The sensory pleasure of blending essential oils and seeing colors swirl is deeply therapeutic.
- It is significantly cheaper in the long run than buying high-end artisan soaps.
- Handmade soap is a consumable gift that everyone actually uses and appreciates.
- The chemistry aspect keeps your brain sharp as you formulate new recipes.
- There is a vibrant, supportive community of soapers worldwide sharing knowledge.
The Real Struggles:
- The initial startup cost for molds, stick blenders, and bulk oils can be around $100-$200.
- Storage space becomes an issue; curing racks take up room in cool, dry areas.
- Soap needs to cure for 4 to 6 weeks to be mild and hard, requiring immense patience.
- Cleaning up greasy pots and tools is tedious and cannot be skipped.
Real Project Applications
One of my favorite go-to projects is a “Bastille” soap, which is made with 70% olive oil and roughly 30% coconut oil. It creates a hard, long-lasting bar that is gentle enough for babies but still has a decent lather. I often make these in large batches twice a year to ensure I always have cured soap on hand for showers and sinks.
Have you ever noticed how commercial “beauty bars” melt away in days? That is because the natural glycerin has been removed. Handmade soap retains it all.
Another application is the “Kitchen Scrub” bar. For this, I incorporate used coffee grounds into the batter at trace. The grounds provide aggressive exfoliation that removes garlic and onion smells from your fingers after cooking. It is a rugged, practical project that looks beautiful in its natural brown speckles and makes a fantastic housewarming gift.
I once made a mistake with a batch intended for a wedding gift; I used a floral fragrance oil that accelerated the hardening process. The soap turned into a solid brick in the pot within seconds. Instead of panicking, I chopped it up and used the chunks as “confetti” in a fresh batch of white soap. The result was a stunning terrazzo effect that looked intentional and modern.
The Learning Experience
The learning curve for cold process soap usually starts with fear—fear of the lye. Once you get past that first safe batch, the fear turns into obsession. You will find yourself looking at every oil in the grocery store and wondering, “Can I soap that?”
The best way to learn is to use a “soap calculator” online. These tools do the math for you, ensuring your oil-to-lye ratio is safe every single time.
Beginners often struggle with “false trace,” where the soap looks thick because it is cold, not because it is emulsified. This leads to the oil and water separating in the mold later. I learned to rely on temperature and the visual texture of the batter rather than just the clock. Watching videos from reputable soap makers is invaluable because you need to see what “trace” actually looks like in motion.
Comparison with Similar Crafts
Soap making sits in a unique intersection of crafts. It is often grouped with candle making or bath products, but the technical requirements are quite different.
| Aspect | Cold Process Soap | Melt & Pour Soap | Candle Making |
|---|---|---|---|
| Chemistry Knowledge | High (Must understand lye) | Low (Pre-made base) | Medium (Wax properties) |
| Danger Level | Moderate (Caustic burns) | Low (Heat burns) | Low/Med (Heat/Fire) |
| Creativity Limit | Limitless (Formulation) | Shape/Scent/Color only | Container/Scent/Color |
| Time to Finished | 4-6 Weeks | 2-4 Hours | 24-48 Hours |
Common Questions from Fellow Crafters
Q: Can I make soap without handling lye?
A: No. Soap is, by definition, the result of lye reacting with fat. If you don’t use lye, you aren’t making soap; you are melting existing soap. However, no lye remains in the finished bar after saponification is complete.
Q: Why did my soap develop a white, ashy powder on top?
A: This is called “soda ash.” It happens when unsaponified lye reacts with carbon dioxide in the air. It is purely cosmetic and washes off the first time you use the bar. You can prevent it by spraying the top with rubbing alcohol.
Q: Can I use food coloring to dye my soap?
A: Generally, no. Food coloring is water-based and often morphs or fades in the high pH environment of raw soap. Cosmetic-grade micas or natural clays are much more stable options.
Q: How do I know if my soap is safe to use?
A: The “zap test” is the old-school method: lightly touch the soap to your tongue. If it zaps like a 9-volt battery, it’s not done. Modern crafters trust their recipes and cure times.
Q: Why is my soap soft after cutting?
A: It likely contains too much water or soft oils. It will harden significantly during the cure. Give it time and airflow; patience is your most important tool.
Q: Can I sell my soap immediately?
A: Absolutely not. Selling uncured soap is unprofessional and results in a poor customer experience as the bar will dissolve rapidly. Respect the cure time.
My Personal Results and Insights
Tracking my batches has been crucial for improvement. I keep a logbook of every recipe, noting the weather, the temperature of the oils, and the final outcome.
| Project Type | Outcome |
|---|---|
| 100% Coconut Oil | Produces massive bubbles but is very drying. Needs a 20% superfat to be comfortable on skin. |
| High Olive Oil (Castile) | Takes 6 months to cure properly. The result is slimy at first but becomes rock hard and incredibly mild eventually. |
| Goat Milk Soap | Turned orange initially due to the sugars burning from lye heat, but settled into a lovely tan color. Extremely creamy lather. |
| Salt Bars | Hardens almost instantly in the mold. Must be cut within 2 hours or it becomes stone. Excellent spa-like bar. |
Pro tip: Always freeze your goat milk or other liquids into cubes before adding lye. This keeps the temperature down and prevents the sugars from scorching.

Final Thoughts and My Recommendation
Soap making is a journey that changes how you view the products in your home. It transforms a mundane daily routine—washing your hands—into a moment of appreciation for your own handiwork. It requires a specific kind of dedication; you cannot rush it, and you cannot cheat the chemistry.

There is nothing quite like gifting a bar of soap that you formulated from scratch, knowing exactly what went into it and how it was made. The secret to great soap is not just the ingredients, but the patience you put into the process. It is a deeply satisfying, practical art form that I believe is worth every minute of the wait.


