There is a specific kind of magic that happens when you take a dense, semi-solid soap base and whip it until it looks exactly like marshmallow fluff. I still remember the first time I made whipped soap sugar scrub; my kitchen looked like a bakery, smelled like a spa, and I felt like a mad scientist who had finally cracked the code to affordable luxury. For me, this craft perfectly blends the artistic piping skills of a pastry chef with the practical chemistry of skincare formulation.
- My Journey with Whipped Soap
- What This Craft Really Entails
- Essential Materials and Tools
- Key Techniques and Skills
- Skill Level and Time Investment
- Advantages and Challenges
- Real Project Applications
- Watch this video on YouTube
- The Learning Experience
- Comparison with Similar Crafts
- Common Questions from Fellow Crafters
- My Personal Results and Insights
- Final Thoughts and My Recommendation
My Journey with Whipped Soap
I didn’t start my crafting life with bath and body products; I was a knitter first. But one humid summer, I wanted a project that didn’t involve wool sitting in my lap. I ordered a tub of “foaming bath butter” and decided to try my hand at making a scrub that wouldn’t leave my shower floor dangerously slippery. I treated it exactly like heavy cream, turning my mixer to high speed immediately.

Once I learned to treat the soap base with the same delicacy as a meringue, I began producing jars that stayed fluffy, stable, and gorgeous for months.

What This Craft Really Entails
Whipped soap sugar scrub is essentially a mechanical emulsion. You are taking a specialized soap base (often called “OPC” or Foaming Bath Butter in the industry) and aerating it while suspending sugar crystals and fragrance oils within the matrix. It is a step up from simple melt-and-pour soap because it requires you to understand volume, density, and preservation.
This craft occupies a sweet spot between beginner-friendly and chemically complex. Unlike cold process soap, you don’t need to handle dangerous lye or wait weeks for a cure. Yet, unlike basic salt scrubs, you are creating a complex product that cleanses, exfoliates, and moisturizes simultaneously. It is best suited for the intermediate crafter who is ready to move beyond “mix and dump” recipes and wants to learn about product stability.
Historically, this is a modern craft, born from the availability of surfactant bases in the mid-2000s. It has evolved into an art form where the visual appeal—often piped with dual-tone swirls and biodegradable glitters—is just as important as the skin benefits. Ever wondered why high-end boutiques charge so much for this? It is the labor of getting that texture perfect and keeping it there.
Think of this craft less like soap making and more like cake decorating. If you can frost a cupcake, you already possess 50% of the skills needed to make a stunning jar of whipped scrub.
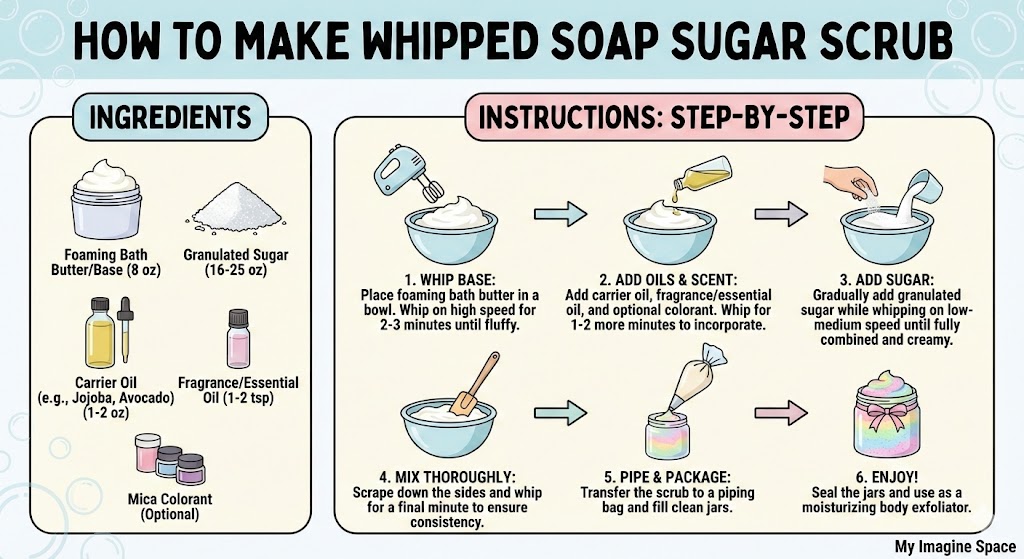
Essential Materials and Tools
You cannot use just any soap for this; bar soap will not whip. You need a base specifically formulated with surfactants that can hold air. Here is what you need to get started.
| Item Category | Specifications |
|---|---|
| Foaming Bath Butter | Stephenson Crystal OPC is the gold standard. It contains the necessary fatty acids to hold a whip. |
| Exfoliant | White granulated sugar for a standard scrub; brown sugar for a softer feel. Avoid coarse salts as they kill the lather. |
| Carrier Oil | Apricot Kernel, Grapeseed, or Sweet Almond oil. Heavy oils like Olive oil can weigh down the whip. |
| Preservative | Optiphen Plus or Phenonip. Absolutely mandatory as water will be introduced during use. |
| Fragrance | Body-safe fragrance oils. Ensure they are safe for “rinse-off” products. |
| Colorant | Mica powder. Liquid food coloring will bleed and ruin your design; stick to mica. |
| Tools | Stand mixer (preferred) or electric hand mixer, piping bags, and large star tips (1M). |
Key Techniques and Skills
Achieving that “store-bought” consistency requires specific techniques. Here is what I have found works best through trial and error:
- The Soften Cycle: Always whip the base on low for 1-2 minutes to break up lumps before adding anything.
- Temperature Check: Ensure your base is at room temperature. If it’s too cold, it won’t aerate; too hot, and it melts.
- Folding the Sugar: Do not whip on high after adding sugar. Fold it in on low speed or by hand to preserve the air bubbles you just created.
- The Piping Twist: Twist the top of your piping bag tightly to maintain pressure, allowing for smooth, continuous swirls.
- Jar Tapping: Firmly tap your filled jars on the counter to settle the product and remove large air pockets that can cause sinking later.
- Color Splitting: Divide your batch into separate bowls to color them, then carefully spoon them side-by-side into the piping bag for a multi-color swirl.
- Preservative Timing: Add your preservative only when the mixture is cool (below 120°F/50°C) to ensure it remains effective.
- Fragrance Anchoring: Pre-mix your fragrance oil with your carrier oil before adding to the base to prevent “hot spots” of scent.
Never skip the preservative. Even though you aren’t adding water to the recipe, the user will dip wet fingers into the jar, creating a perfect breeding ground for invisible mold and bacteria.
Skill Level and Time Investment
This is a satisfyingly fast project compared to other fiber or chemical arts. You can go from raw ingredients to a finished gift in an afternoon.
| Skill Level | Time Investment | Key Milestones |
|---|---|---|
| Beginner | 1.5 Hours | Understanding the base consistency; piping a single color into a jar. |
| Intermediate | 3 Hours | Mastering the oil-to-base ratio; creating dual-tone swirls; perfect piping technique. |
| Advanced | Ongoing | Formulating custom recipes with additives like clay or charcoal; consistent bulk production. |
Advantages and Challenges
Like any craft, whipped soap has its pros and cons. Here is the reality of working with these materials.
The “wow factor” is incredibly high with this craft. Because it looks like dessert, people are instantly drawn to it, making it one of the most giftable items you can create.
The Benefits:
- Instant Gratification: No cure time is required; you can use the scrub the minute you finish making it.
- Customizable Texture: You control the grit. Want a rough foot scrub? Add more sugar. Want a gentle polish? Use jojoba beads.
- Visual Appeal: It holds shape beautifully, allowing for creative piping that other bath products can’t match.
- Cost-Effective: The whipping process doubles the volume of the base, meaning your raw materials go a long way.
- Safe for Beginners: No handling of caustic chemicals or high-heat elements.
- Cleans Up Easily: Since the mess is essentially soap, cleaning your bowls and mixer is just washing dishes.
The Challenges:
- Deflation: If you over-whip or use too much liquid oil, the beautiful fluff can collapse into a dense sludge.
- Stickiness: Sugar is sticky. You will likely find sticky spots on your counter for days after a production session.
- Sensitivity to Heat: In very hot climates, the whip can melt or lose its stiffness during shipping or storage.
- Packaging Limits: You must use wide-mouth jars; pumps and squeeze bottles won’t work for this thick texture.
Real Project Applications
The versatility of whipped soap allows for distinct “product lines” within your crafting. I once created a “Morning Coffee” scrub that became a staple in my routine. I used actual coffee grounds instead of sugar for heavy exfoliation and scented it with an espresso fragrance oil. It was fantastic for scrubbing garden dirt off my hands and waking me up in the shower. The dark coffee grounds against the creamy white base looked striking.
Another favorite project was a “Unicorn Fluff” for my niece’s birthday. I split the batch into pink, blue, and purple, flavored it like cotton candy, and added biodegradable glitter. Piped into clear jars with a tall swirl, they looked exactly like fancy frozen yogurt. The look on her face when she realized she could wash with the “frosting” was priceless. It made bath time fun rather than a chore.
For a more sophisticated gift, I make “Rose Gold” whips. I use pink Himalayan salt (fine grain) mixed with sugar, colored with a rose gold mica. The texture is slightly different—more dense due to the salt—but the elegance is undeniable. I pair these with a wooden scoop and a ribbon for a high-end spa gift that costs a fraction of the store price.
Have you ever noticed how commercial scrubs often have a layer of oil floating on top? That separation is exactly what we avoid by whipping the oils into the semi-solid base.

The Learning Experience
Learning to pipe soap is a humbling experience. My first few jars looked less like elegant swirls and more like toothpaste squeezed by a toddler. I struggled with air pockets—big gaps in the jar that made the product look half-empty. I learned to pipe a ring around the bottom, tap the jar hard, and then fill the center. It sounds simple, but it changed the entire look of my finished product.
Another hurdle was understanding “fragrance load.” In my excitement, I once added way too much citrus essential oil, which thinned out the base so much it wouldn’t hold a peak. I realized that the base can only accept so much liquid before the structure fails. Reading forums and watching bakery piping tutorials (oddly enough) helped me master the physical technique, while craft blogs helped me with the chemistry.
Comparison with Similar Crafts
How does this stack up against other bath crafts? Let’s look at the differences.
| Aspect | Whipped Soap Scrub | Cold Process Soap | Sugar Scrub Cubes |
|---|---|---|---|
| Safety | High (No Lye) | Low (Caustic Lye) | High (Melt & Pour) |
| Texture | Creamy/Fluffy | Hard Bar | Solid/Crumbly |
| Equipment | Mixer + Piping Bags | Stick Blender + Molds | Microwave + Molds |
| Ready Time | Immediate | 4-6 Weeks | 2 Hours (Cooling) |
Common Questions from Fellow Crafters
Q: Why did my scrub turn hard as a rock after a week?
A: You likely added too many hard butters (like cocoa butter) or melted the base too much during mixing. When the base fully re-solidifies, it hardens. Try increasing your liquid carrier oil slightly to keep it soft.
Q: Can I use fresh ingredients like lemon juice or honey?
A: I strongly advise against it. Fresh food ingredients introduce water and bacteria that standard preservatives cannot handle. Mold in a scrub can cause serious skin infections, so stick to shelf-stable oils and extracts.
Q: How do I clean the piping bags?
A: Honestly, it is very difficult to get the grease out of reusable bags. I recommend using disposable heavy-duty bags for this craft to save your plumbing and your sanity.
Q: My whip isn’t fluffy; it’s heavy and dense. Why?
A: You probably didn’t whip the base enough before adding the sugar. The base needs to double in volume *before* you add the heavy exfoliants.
Q: Is this safe for faces?
A: Generally, no. Sugar crystals are too jagged and abrasive for delicate facial skin. Keep this as a body scrub for elbows, knees, and feet.
Pro Tip: If you are selling these or giving them as gifts, always include a “Best Used By” date. Even with preservatives, the quality is best within 6 to 9 months.
My Personal Results and Insights
I track all my batches to see what is cost-effective and what is just for fun. Here is what I’ve found over the last year.
| Project Type | Outcome |
|---|---|
| Standard Sugar Whip | Most reliable. Low cost, high volume, stays fluffy for 6+ months. |
| Salt-Based Whip | Tricky. Salt kills the lather, resulting in a denser, less foamy scrub. |
| Seasonal Scents | High demand. Pumpkin and Peppermint sell out, while florals sit on the shelf. |
| Marketability | People love the texture. It sells 3x faster than my bar soaps at markets. |
Final Thoughts and My Recommendation
After making hundreds of pounds of this product, I can honestly say that whipped soap sugar scrub is one of the most rewarding fiber and bath arts to master. It satisfies the urge to create something beautiful and functional without the steep learning curve of advanced chemistry. The texture is forgiving, and the mistakes are usually still usable (just not as pretty).
I highly recommend this for anyone who feels intimidated by cold process soap but wants to make professional-grade skincare. It is also fantastic for those who love the aesthetics of cake decorating but want a product that lasts longer than a cupcake. Just remember to respect the preservative guidelines and watch your temperatures. If you do that, you will be rewarding yourself with spa-quality showers for a fraction of the price.
“The joy of this craft is in the transformation—taking a plain white block and turning it into a jar of shimmering, fragrant clouds.”
Are you ready to turn your kitchen into a sudsy bakery? Just be warned: once you start whipping, you will want to scrub everything in sight. It is a clean, creative addiction that I wouldn’t trade for anything.


