There is something profoundly grounding about taking the remnants of a winter fire and transforming them into a cleansing agent, just as our ancestors did for centuries. I vividly remember the first time I successfully created soap from nothing but wood ash and leftover kitchen fats; it felt like I had unlocked a secret level of self-sufficiency. This ancient alchemy connects me to the past in a way that buying a plastic bottle at the store never could.
- My Journey with Wood Ash Soap
- What This Craft Really Entails
- Essential Materials and Tools
- Key Techniques and Skills
- Skill Level and Time Investment
- Advantages and Challenges
- Real Project Applications
- The Learning Experience
- Comparison with Similar Crafts
- Common Questions from Fellow Crafters
- My Personal Results and Insights
- Final Thoughts and My Recommendation
My Journey with Wood Ash Soap
My fascination with traditional soap making didn’t start in a pristine laboratory, but rather in my grandmother’s erratic vegetable garden where she told me stories of wartime scarcity. I became obsessed with the idea of the “closed loop” homestead, where nothing goes to waste. I spent months reading fragmented pioneer journals and modern chemical guides to understand how mere dust could become a powerful cleaner.
I recall my very first attempt vividly, standing in my backyard with a bucket of sludge that looked utterly unpromising. I had spent weeks collecting ash from my woodstove, terrified I would mess up the chemistry and burn my skin. When that muddy brown liquid finally cooked down and thickened into a golden, translucent gel, I felt a triumph that no craft store kit has ever given me.
“In the old days, soap wasn’t a luxury item you bought; it was a seasonal harvest of patience, ash, and saved fats.”
It wasn’t a linear path, though. I ruined several batches by using the wrong kind of wood or rushing the leaching process, resulting in a separated, oily mess that refused to saponify. Through trial and error, I learned that this craft requires a relationship with your materials that modern exact measurements can’t always replicate.

What This Craft Really Entails
Making soap with ashes is technically known as making “potash soap” or soft soap. Unlike modern cold-process soap which uses sodium hydroxide (lye) bought in a canister to create hard bars, this method utilizes potassium hydroxide leached naturally from hardwood ashes. It is the grandfather of all soap making.

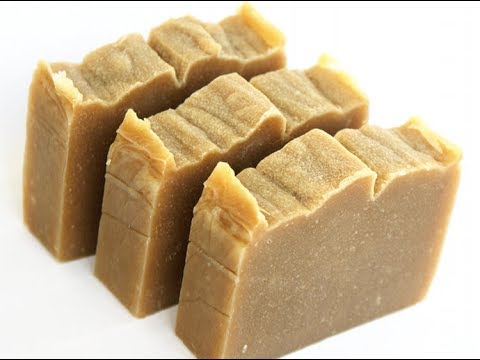
It is best suited for intermediate to advanced soap makers or homesteaders who already understand the dangers of working with lye. It is significantly more unpredictable than using commercial lye flakes. If you are looking for perfectly shaped, scented beauty bars, this might not be for you; ash soap is traditionally a soft, amber-colored gel or paste excellent for scrubbing and laundry.
While modern commercial lye (sodium hydroxide) creates hard bars, the potassium lye derived from wood ash creates a soft, gel-like soap, historically called “soft soap” or “black soap.”
The skills required are less about artistic swirling and more about observation. You need to learn how to test the pH of your lye without strips (using the egg test or feather test) and how to judge the “trace” of a hot-cooked soap. It is akin to cooking a complex stew by taste rather than following a recipe card.
Essential Materials and Tools
The beauty of this craft is that the materials are largely free if you have a woodstove, but the tools must be specific to handle the caustic nature of lye. Never use aluminum pots or utensils as the lye will react violently with the metal.
| Item Category | Specifications |
|---|---|
| Primary Materials | Hardwood ashes (oak, hickory, ash), soft water (rain or distilled), rendered fat (beef tallow or lard). |
| Leaching Equipment | Plastic 5-gallon bucket with small holes drilled in bottom, a second bucket to catch liquid, gravel/straw for filtering. |
| Cooking Vessel | Stainless steel or enamel stockpot (large capacity), stainless steel long-handled spoon. |
| Safety Gear | Heavy-duty rubber gloves, safety goggles, apron, bottle of vinegar (to neutralize spills). |
| Testing Tools | A fresh raw egg or a chicken feather (traditional density tests), pH strips (modern option). |
Key Techniques and Skills
Mastering ash soap requires learning a specific set of skills that differ from modern soaping. Here are the core techniques I have honed over the years:
- Ash Selection: Identifying and burning only hardwoods (like oak or fruitwoods) to white ash, as softwoods produce weak lye.
- Leaching: Packing the leaching barrel correctly with a gravel filter and ash to ensure a slow, steady drip of lye water.
- Density Testing: Using the “floating egg” technique to determine if your lye water is strong enough to convert fat into soap.
- Rendering: Properly cleaning and rendering animal fats (tallow or lard) so your final soap doesn’t smell like bacon.
- Concentrating: Boiling down weak lye water to increase its alkalinity before adding fats.
- Hot Processing: Cooking the lye and fat mixture over steady heat to force saponification (unlike the passive cure of cold process).
- Neutralizing: Understanding how to “cook out” the excess lye so the soap is safe for skin contact.
- Salting Out: An advanced technique using brine to separate the soap curds from glycerin if a harder consistency is desired.
Skill Level and Time Investment
This is not a weekend afternoon project; it is a seasonal rhythm. I often tell students to think of this more like farming than crafting—you are harvesting chemicals and processing them.
| Skill Level | Time Investment | Key Milestones |
|---|---|---|
| Beginner (at this craft) | 2-4 Weeks | Collecting ash, setting up the leach barrel, successfully collecting the first quart of lye. |
| Intermediate | 1-2 Days (Active) | Rendering fats, boiling down the lye, cooking the soap paste until it gels. |
| Advanced | Variable | Perfecting the “salting out” method to create firmer soap; consistent results with different wood types. |
Lye water, even when homemade, is extremely caustic and can cause blindness or severe chemical burns instantly. Keep children and pets away from your leaching station.
Advantages and Challenges
Through my years of practice and discussions with other heritage crafters, I’ve found there are distinct reasons to love this difficult art, and valid reasons to find it frustrating.
The Benefits:
- Total self-sufficiency; you are not dependent on supply chains for cleanliness.
- Zero material cost if you heat with wood and save kitchen fats.
- The resulting soap is an incredible heavy-duty degreaser and laundry scrub.
- It utilizes waste products, making it the ultimate eco-friendly project.
- A profound sense of connection to history and heritage skills.
- Biodegradable and free from synthetic fragrances or stabilizers.
- The “cool factor” of making something valuable from literal dirt is unmatched.
The Challenges:
- The strength of the lye varies wildly depending on the wood and rain, making recipes unreliable.
- It is physically dangerous; splashes are a real hazard during the boil.
- The process is smelly; boiling fat and lye has a distinct, strong odor.
- It takes a very long time compared to buying a bag of lye beads.
- The final product is usually a goo or paste, not a hard bar, which disappoints some.
Real Project Applications
When I finish a batch of ash soap, I don’t wrap it in fancy paper for a boutique. This is a working soap for working hands. One of the best applications for this paste is as a laundry stain remover. I keep a jar of the amber gel near my washing machine; a small spoonful rubbed into grass stains or grease works better than most store-bought sprays.
I also use it extensively for scrubbing floors and decks. Because potassium lye creates a highly soluble soap, it dissolves instantly in a bucket of hot water. I once cleaned an entire grimy potting shed using just a cup of my ash soap and a stiff brush, and the results were sparkling.
Another historical application I’ve used is creating a “soft scrub” for the kitchen. By mixing the finished soap paste with a little fine pumice or even baking soda, you get a scouring agent that cuts through burnt-on grease on stove tops. It is practical, rugged, and incredibly effective.
For a garden pesticide, a very dilute solution of ash soap spray is effective against aphids and soft-bodied insects, a trick I learned from an old almanac.
The Learning Experience
Learning to make ash soap is a humbling experience. Most beginners, myself included, struggle initially with the “egg test.” This is where you float a fresh egg in your lye water; if a spot the size of a quarter rises above the surface, the lye is strong enough. If it sinks, you must boil the water down or run it through fresh ashes again.
One of my early mistakes was using ash from my fire pit that had burned pine and trash. The resulting lye was weak and contaminated, and the soap never thickened—it just stayed a greasy soup. I felt defeated, thinking I lacked the “touch.”
The breakthrough came when I switched to pure oak ash from my indoor stove and truly waited for the lye to concentrate. Watching the mixture suddenly turn from watery liquid to a thick, ropy substance known as “trace” is a magical moment. It’s like watching egg whites stiffen into meringue; it happens suddenly and signals success.
Comparison with Similar Crafts
It helps to understand where ash soap fits in the wider world of soap making.
| Aspect | Ash Soap (Pioneer) | Cold Process (Modern) | Melt & Pour (Craft) |
|---|---|---|---|
| Primary Chemical | Potassium Hydroxide (Natural) | Sodium Hydroxide (Synthetic) | Pre-made Soap Base |
| Texture | Soft Gel / Paste | Hard Bar | Hard Bar |
| Difficulty | High (Unpredictable) | Medium (Precise) | Low (Easy) |
| Cost | Free / Very Low | Moderate | High |
Common Questions from Fellow Crafters
Q: Can I use ash from my charcoal grill?
A: Absolutely not. Charcoal briquettes contain additives, chemicals, and fillers that are dangerous to skin and will not produce proper lye. Only use clean wood ash.
Q: Why won’t my soap get hard like a store-bought bar?
A: Ash soap is chemically different. It uses potassium, which creates large molecules that don’t pack tightly together, resulting in a soft texture. To get a hard bar, you have to add salt to displace the potassium with sodium, a complex extra step.
Q: Is this safe to use on my face?
A: Generally, I do not recommend straight ash soap for delicate facial skin. It can be quite alkaline (high pH) if not cured perfectly. It is better suited for hands, laundry, and heavy cleaning.
Q: How long does the lye dripping process take?
A: It depends on your setup, but typically I let my barrel drip for several days. You want a slow trickle, not a gush, to ensure the water absorbs the maximum amount of salts.
Q: Can I use vegetable oil instead of lard?
A: Yes, you can use olive or coconut oil, but historically, animal fats were used because they are harder at room temperature, helping the soft soap have a bit more body.
Q: Does it smell like a campfire?
A: Surprisingly, no. Once the chemical reaction of saponification occurs, the smoky smell largely dissipates. It mostly smells like the fat used, or just “clean” soap.
My Personal Results and Insights
I track my batches to understand the variables of wood types. Here is what my typical output looks like:
| Project Type | Outcome |
|---|---|
| Oak Ash & Tallow | Thick, golden paste. Excellent cleaner. Strongest lye yield. |
| Maple Ash & Lard | Thinner, lighter gel. Good for hand soap, softer on skin. |
| Mixed Softwood Ash | Failed batch. Lye was too weak to saponify the fat fully. |
| Cost Per Batch | Approximately $0.50 (cost of heat for boiling), effectively free. |
To ensure your soap is safe to use, you can touch a tiny bit to your tongue (the “zap test”). If it zaps you like a 9-volt battery, it still has active lye and needs to cook longer. If it tastes like soapy wax, it’s done.
Final Thoughts and My Recommendation
Making soap with ashes is not the most convenient way to clean your house, and it certainly isn’t the easiest. But is it worth it? I believe the answer is a resounding yes for anyone interested in self-reliance or history. There is a deep, primal satisfaction in taking a bucket of cold ashes and turning it into a golden jar of soap.
I highly recommend this project for experienced homesteaders or crafters who have already mastered basic safety protocols. If you are a complete novice to handling chemicals, please start with a melt-and-pour kit or a standard cold process recipe to get comfortable with the concepts first.
The secret to success is patience; you cannot rush the water through the ashes, and you cannot rush the boil. It requires you to slow down and work on nature’s timeline. If you are willing to embrace the mess and the mystery, you will find that making ash soap is one of the most rewarding skills you can add to your repertoire.


I’ve made soap with ashes as gifts for my friends and family, it’s a unique and thoughtful present. The process of collecting wood ash and rendering fat is time-consuming but rewarding. I’ve found that using different types of wood ash can create varying shades and textures in the final product. Does anyone have tips on how to create consistent colors?
Regarding consistent colors, it’s great that you’re experimenting with different types of wood ash. One tip is to ensure that the ash is fully incorporated into the fat before adding any additional ingredients. You can also try adding a small amount of natural colorants like spirulina or turmeric to create unique hues. Keep in mind that the color may vary depending on the type of ash and fat used, so it’s always a good idea to do a small test batch before making a larger quantity.
Thanks for the tip, I’ll try incorporating the ash more thoroughly and see if that helps with the color consistency. Do you have any recommendations for natural colorants that are safe to use in soap-making?
Yes, there are several natural colorants that are safe to use in soap-making, including spirulina, turmeric, and indigo powder. Just be sure to use them in small amounts and test the color in a small batch before adding it to a larger quantity. You can also try using different combinations of colorants to create unique shades and hues.
Making soap with ashes is a cost-effective way to create a natural and sustainable product. I’ve found that using dollar store materials like wooden spoons and plastic containers can reduce costs. A 5-gallon bucket of ash can cost as little as $0.50, and with the right recipe, you can create a high-quality soap for under $1 per bar. Has anyone else tried using recycled materials to make soap?
That’s a great point about using recycled materials to reduce costs. In addition to using dollar store materials, you can also try repurposing old containers or utensils to create a unique and eco-friendly soap-making setup. When it comes to reducing costs, it’s all about getting creative and thinking outside the box. Have you considered using other natural ingredients like coconut oil or shea butter to create a more luxurious soap?
I tried making soap with ashes but it was a total fail. I used hardwood ash and followed the recipe, but the soap didn’t set properly and was too soft. I’m not sure what went wrong, did I not mix it enough or was the ash not suitable? Help!
Sorry to hear that your soap didn’t turn out as expected. There could be several reasons why it didn’t set properly, including the type of ash used, the ratio of ash to fat, or the temperature of the mixture. It’s possible that the ash wasn’t fully incorporated into the fat, or that the mixture was too hot or too cold. Can you tell me more about your process and the ingredients you used? I’d be happy to help you troubleshoot the issue.
I think I might have used the wrong type of ash, I’ll try using a different type and see if that makes a difference. Do you have any recommendations for where to find high-quality ash?
You can try using ash from hardwood trees like oak or maple, which tend to produce a higher quality ash. You can also try asking local woodworkers or fireplace owners if they have any ash they’d be willing to give you. Just be sure to sift the ash thoroughly to remove any debris or contaminants.