There is something deeply primal and satisfying about taking raw oils and a caustic solution and transforming them into a gentle, cleansing bar of gold. I still remember the first time I watched the chemical reaction take place, feeling like an alchemist in my own kitchen. It is a craft that perfectly balances precise science with boundless artistic expression.
- My Journey with Natural Soap Making
- What This Craft Really Entails
- Essential Materials and Tools
- Key Techniques and Skills
- Skill Level and Time Investment
- Advantages and Challenges
- Real Project Applications
- The Learning Experience
- Comparison with Similar Crafts
- Common Questions from Fellow Crafters
- My Personal Results and Insights
- Final Thoughts and My Recommendation
My Journey with Natural Soap Making
My fascination with soap making began not out of creativity, but necessity; I had terribly sensitive skin that reacted to almost every commercial bar on the shelf. I started reading about the traditional cold process soap method, where you control every single ingredient that goes into the pot. It seemed intimidating at first, involving safety goggles and precise temperatures.
I clearly recall my very first batch, hovering over my stainless steel pot with a mixture of excitement and terror. I had read so many warnings about lye that my hands were shaking as I poured the solution into my olive oil. When the mixture finally thickened to “trace” and looked like vanilla pudding, I felt a rush of absolute triumph.
Soap making is the only craft I know where you start with dangerous ingredients and end up with something soothing, harmless, and universally necessary.
Over the years, I have moved from simple Castile soaps to intricate swirls and milk-based bars. I have learned that this craft requires patience and respect for chemistry. It has taught me to slow down and pay attention to the details.

What This Craft Really Entails
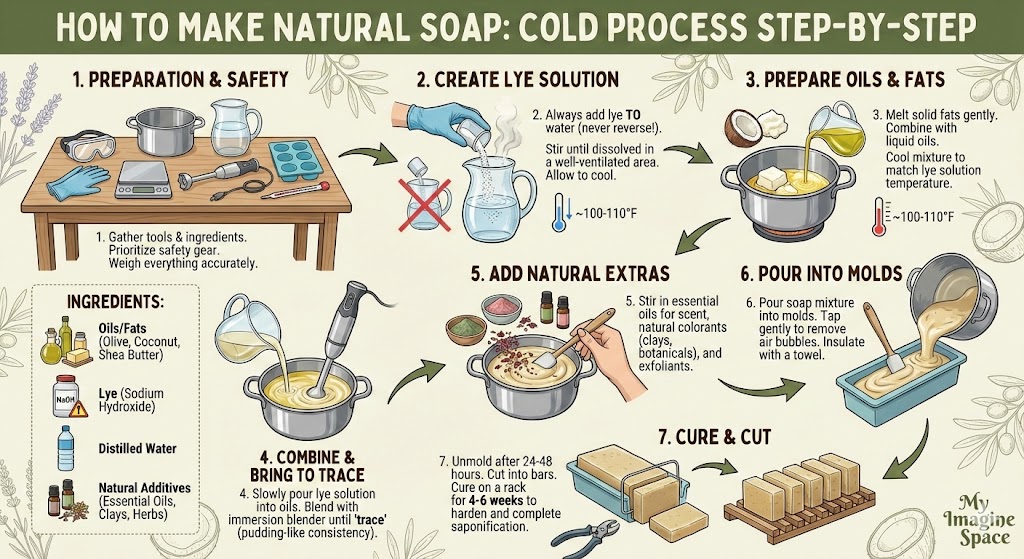
At its core, making natural soap from scratch is a chemical process called saponification. This is the reaction between fatty acids (oils or butters) and a strong alkali (sodium hydroxide, also known as lye). Unlike the “melt and pour” bases you might find at craft stores, this is creating the soap molecule itself.
Historically, our ancestors made soap using animal fats and wood ash lye, a process that was often unpredictable and harsh. Modern soap making is a refined art form. We use digital scales to measure down to the gram, ensuring the final bar is gentle and contains excess oil for moisturizing.
The term “superfatting” refers to using less lye than necessary to turn all the oil into soap, leaving roughly 5% of free oils in the bar to condition your skin.
This craft is best suited for adults who can follow strict safety protocols and have a steady hand. It is not like cooking a stew where you can throw in a pinch of this or that; it is more like high-stakes baking. One miscalculation can lead to a batch that is either too soft or unsafe to use.
Ever wondered why handmade soap feels so much heavier and creamier than store-bought bars? It is because commercial manufacturers often remove the natural glycerin—a humectant that attracts moisture—to sell separately in lotions. When you make it yourself, you keep all that goodness right in the bar.
Essential Materials and Tools
You do not need a laboratory to make soap, but you do need dedicated tools that will never be used for food again. The initial investment is moderate, but the tools last for years.
| Item Category | Specifications |
|---|---|
| Alkali | 100% Sodium Hydroxide (Lye) in microbead or flake form. |
| Base Oils | Olive oil, Coconut oil, and Sustainable Palm or Shea Butter. |
| Safety Gear | Heavy-duty rubber gloves, safety goggles (splash-proof), and long sleeves. |
| Mixing Tools | Immersion blender (stick blender) and heat-resistant plastic spatulas. |
| Containers | Stainless steel or #5 plastic pitchers (never aluminum) for mixing lye. |
| Molds | Silicone loaf molds or wooden boxes lined with freezer paper. |
| Measurement | A precise digital kitchen scale that measures in grams. |
Never use aluminum pots or utensils for soap making; the lye reacts violently with the metal, creating toxic fumes and ruining your equipment.
Key Techniques and Skills
Mastering soap making involves learning a specific sequence of steps. Here are the fundamental techniques I rely on for every batch:
- Lye Solution Preparation: Mixing sodium hydroxide into distilled water in a well-ventilated area while avoiding fumes.
- Oil Melting: Gently heating hard butters and oils until they are liquid and clear.
- Temperature Matching: bringing both the lye solution and oils to a similar temperature range (usually 100°F–120°F).
- Stick Blending: Using short bursts to emulsify the oils and lye water without creating too many air bubbles.
- Identifying Trace: Recognizing the moment the batter thickens enough to leave a trail on the surface, signaling emulsification.
- Fragrance Anchoring: Stirring in essential oils at the last moment to prevent them from evaporating or seizing the batter.
- Texturing: Using a spoon or chopstick to create peaks or swirls on the top of the soap loaf.
- Insulating: Wrapping the mold in towels to encourage the “gel phase,” which makes colors pop and the bar harder.
- Beveling and Planing: Trimming the sharp edges of cut bars for a professional, smooth feel in the hand.
Skill Level and Time Investment
Soap making has a steep initial learning curve due to the safety requirements, but once you understand the rhythm, it becomes second nature. It is a craft of waiting.
| Skill Level | Time Investment | Key Milestones |
|---|---|---|
| Beginner | 2 hours active + 4 weeks cure | Making a simple, uncolored batch that is safe to use. |
| Intermediate | 3 hours active + 4-6 weeks cure | Mastering swirls, layers, and natural colorants like clay. |
| Advanced | Varies widely | Formulating original recipes and using challenging additives like milk or honey. |
The most critical tool in your arsenal is a digital scale; volume measurements like cups and teaspoons are inaccurate and dangerous in soap making.
Advantages and Challenges
After years of making thousands of bars, I have found this craft to be incredibly rewarding, though it does come with its unique set of frustrations.
The Joys of Soap Making:
- Complete control over ingredients, allowing you to eliminate allergens and synthetics.
- The ability to customize scents using high-quality essential oils.
- It is significantly cheaper in the long run than buying high-end artisan soaps.
- The creative possibilities with colors and designs are endless.
- Handmade soap makes for a genuinely impressive and useful gift.
- The process is meditative and requires a “flow state” focus.
The Real Struggles:
- Working with lye requires constant vigilance and a distraction-free environment.
- The curing time tests your patience; you cannot use what you make immediately.
- “Soda Ash,” a white powdery film, can randomly appear on your beautiful soap tops.
- Some fragrance oils can cause the batter to seize (harden instantly) in the pot.
Real Project Applications
One of my favorite projects to recommend to beginners is a simple “Bastile” soap. This is a formula consisting of 70% olive oil, 25% coconut oil, and 5% castor oil. It produces a hard, long-lasting bar with a bubbly lather that is incredibly gentle on the skin.

Another beautiful application is creating wedding favors. I recently designed 50 mini-bars for a summer wedding, scented with lemon and rosemary and colored with yellow French clay. It added a personal touch to the event that guests actually took home and used.
Be very careful when adding floral fragrances; they accelerate trace rapidly, meaning your fluid soap batter can turn into a solid brick in your pot within seconds.
The Learning Experience
When I first started, I made the classic mistake of trying to substitute oils without running the numbers through a lye calculator. The result was a soft, greasy mess that never hardened. It was a humbling lesson in the chemistry of the craft.
Most beginners struggle with “false trace.” This happens when you think the oils and lye are mixed because it looks thick, but it’s actually just the hard butters cooling down. The mixture eventually separates in the mold. The secret to success is blending until you see a definite trail of soap batter sitting on the surface.
The community support in soap making is phenomenal. I learned most of my advanced swirling techniques from YouTube channels and forums where seasoned soapers share their “soap fails” openly. It helps you realize that even experts have batches that go wrong.

Comparison with Similar Crafts
It is helpful to understand how cold process soap making stacks up against other ways to create bath products.
| Aspect | Cold Process (CP) | Melt and Pour (M&P) | Hot Process (HP) |
|---|---|---|---|
| Creative Control | Total ingredient control | Limited to base + additives | High, but design is rustic |
| Safety | Requires handling lye | Safe for kids/beginners | Requires handling lye |
| Wait Time | 4-6 weeks cure | Ready in hours | Ready in days |
| Texture | Smooth and creamy | Slightly waxy/glycerin feel | Rough, rustic look |
Common Questions from Fellow Crafters
Q: Can I make soap without using lye?
A: No, it is chemically impossible. Soap is the result of lye reacting with oil. However, there is no lye left in the finished bar because the reaction uses it all up.
Q: How long do I really have to cure the soap?
A: While soap is safe to use after a few days, it will melt away quickly in the shower. You must let your soap cure for at least 4 to 6 weeks to allow water to evaporate and the bar to harden.
Q: Why did my soap crack on top?
A: This usually happens if the soap got too hot during the initial chemical reaction phase. Try not to insulate your mold as heavily next time.
Q: Is it expensive to get started?
A: The initial outlay for a stick blender, scale, and molds can be around $50-$80, but the per-bar cost after that is significantly lower than store-bought artisan soap.
Q: Can I use food coloring to dye my soap?
A: I would not recommend it. Food coloring often morphs into strange colors or fades completely when exposed to the high pH of raw soap batter.
Q: What if I splash raw soap on my skin?
A: Rinse it immediately with plenty of running cold water. Don’t use vinegar; water is the most effective way to flush the caustic substance away.
Have you ever considered that the temperature of your workspace might be the invisible variable affecting your final results?
My Personal Results and Insights
I keep a detailed logbook of every batch I make. This data has helped me refine my recipes to perfection over the last decade.
| Project Type | Outcome |
|---|---|
| Lavender Castile | Hard as a rock after 6 months, produces a slimy lather (typical of olive oil) but incredibly moisturizing. |
| Coconut Scrub | Cured in 3 weeks. Very cleansing but can be drying if I don’t increase the superfat percentage. |
| Goat Milk Soap | Difficult to make without scorching the milk, but the resulting creamy lather is unmatched by any water-based soap. |
| Salt Bars | Hardens almost instantly. Must be cut within 2 hours of pouring or it becomes too hard to slice. |
One of the best discoveries I made was adding a teaspoon of sodium lactate (a liquid salt) to my cooled lye water; it helps the soap release from the mold much faster.
Final Thoughts and My Recommendation
Natural soap making is one of the most fulfilling domestic arts I have ever mastered. It connects you to a lineage of makers stretching back thousands of years. The feeling of using a bar of soap that you designed, measured, and poured yourself is genuinely hard to beat.
However, I want to be realistic: this is not a casual weekend craft for everyone. It requires a dedicated space, strict adherence to safety rules, and the patience to wait weeks for your reward. If you are looking for instant gratification, “Melt and Pour” might be a better starting point.
But if you love the idea of chemistry, have a meticulous nature, and want to eliminate synthetic ingredients from your home, curing your own soap is worth every minute of effort. ALWAYS add your lye to your water, and never your water to your lye, to avoid a dangerous volcanic reaction. With common sense and creativity, you can create something truly functional and beautiful.


