For years, I admired the stacks of creamy, handmade soaps at farmer’s markets, wishing I could create something so luxurious, yet I was held back by a genuine fear of handling caustic chemicals. The idea of suiting up in safety goggles to mix lye water in my small kitchen felt too much like a dangerous science experiment.
That was until I discovered the gentle, artistic world of melt-and-pour crafting, specifically using goat’s milk bases—a method that delivers all the skin-loving benefits without the chemistry lab risks.
- My Journey with Soap Crafting
- What This Craft Really Entails
- Essential Materials and Tools
- Key Techniques and Skills
- Skill Level and Time Investment
- Advantages and Challenges
- Real Project Applications
- The Learning Experience
- Comparison with Similar Crafts
- Common Questions from Fellow Crafters
- My Personal Results and Insights
- Final Thoughts and My Recommendation
My Journey with Soap Crafting
I still remember my very first attempt at making soap. I had bought a block of goat’s milk base, convinced it would be as easy as melting butter. I threw the chunks into a glass bowl and nuked them in the microwave on high for three minutes straight. The result was a bubbling, overflowing volcano that smelled like scorched milk and dried into a rubbery, useless puck.

What This Craft Really Entails
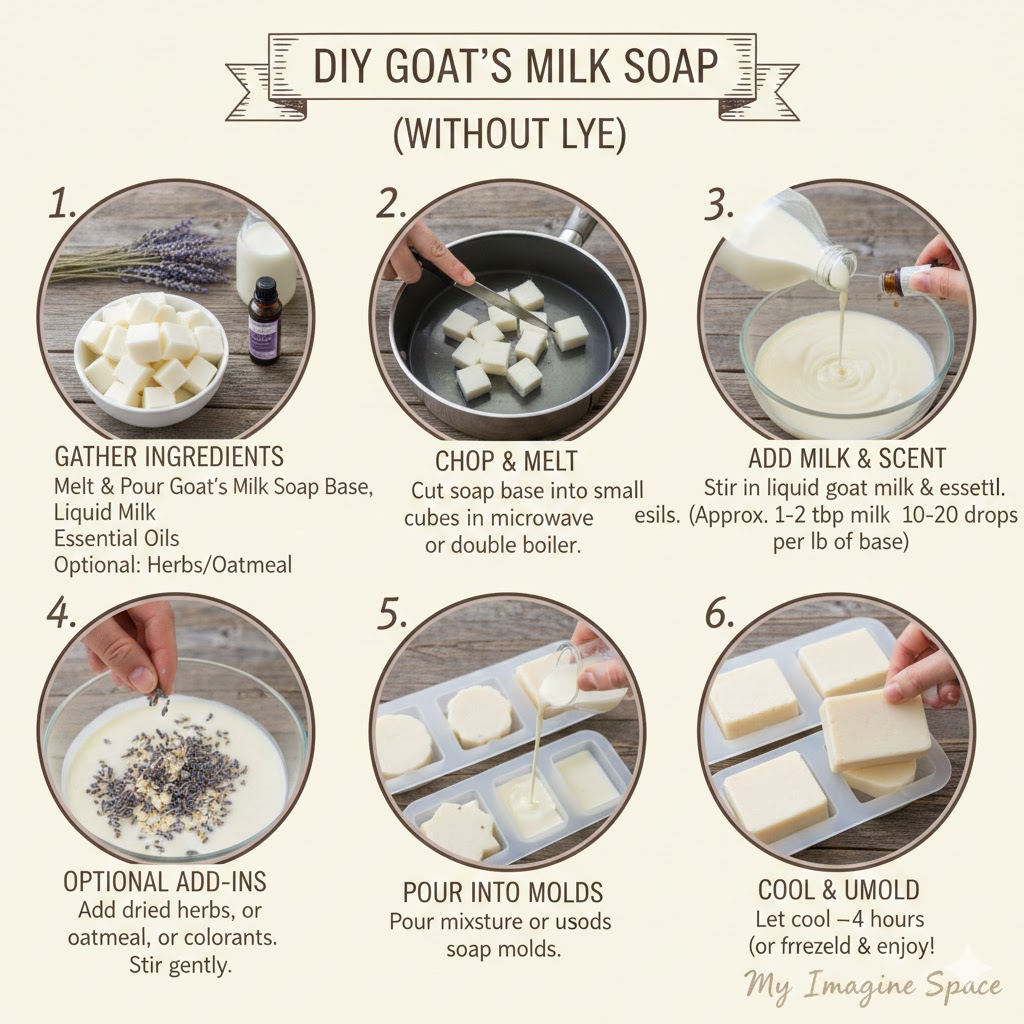
When we talk about making soap “without lye,” we are referring to the melt and pour technique. It is important to be transparent: all real soap is made with lye (sodium hydroxide) and fats. However, in this craft, the dangerous chemical reaction called saponification has already been completed by the manufacturer of the soap base. You are skipping the hazardous curing phase and moving straight to the design and customization.
Think of it like being a chocolatier. You don’t process the raw cocoa beans and sugar yourself; you buy high-quality chocolate couverture, melt it down tempered correctly, and add your own flavors, textures, and shapes. This craft is about aesthetics, fragrance blending, and skin benefits rather than chemical synthesis. It is the perfect entry point for anyone intimidated by cold process soap making.
Goat’s milk is the star ingredient here because it is naturally high in lactic acid and vitamins. This helps gently exfoliate the skin while the high fat content moisturizes. Have you ever wondered why commercial soaps leave your skin feeling tight and itchy? It’s often because the natural glycerin has been stripped away, whereas melt and pour bases retain that humectant quality.
Melt and pour soap is technically “finished” soap that has extra glycerin added to it. This allows it to melt down smoothly and solidify again without crystallizing, unlike a standard bar of store-bought soap which would just turn into a gross mush if heated.
Essential Materials and Tools
One of the best things about this craft is that the barrier to entry is low. You likely have half of these tools in your kitchen already, though I recommend keeping a separate set just for crafting.
| Item Category | Specifications |
|---|---|
| Soap Base | High-quality Goat’s Milk Melt and Pour Base (look for “detergent-free” options) |
| Heat Source | Microwave (easiest) or a double boiler setup on a stove |
| Melting Vessel | Heat-safe glass measuring cup (Pyrex style) with a pouring spout |
| Molds | Silicone molds are essential for easy release; avoid rigid plastic |
| Bubble Buster | Spray bottle filled with 99% Isopropyl (Rubbing) Alcohol |
| Stirring Tools | Silicone spatulas or stainless steel spoons (avoid wood) |
Key Techniques and Skills
While the process sounds simple, mastering the finish requires specific techniques. Here are the skills I’ve honed to get professional results:
- Temperature Management: Melting in short 30-second bursts to avoid boiling the base, which causes rubbery textures.
- Fragrance Timing: Adding scents only when the soap has cooled slightly so the heat doesn’t burn off the volatile oils.
- Surface Tension Control: Using the alcohol spray immediately after pouring to eliminate surface bubbles.
- Layering: Pouring a second color over a cooled first layer at the right temperature so they bond without melting into each other.
- Scoring: Scratching the surface of a hardened layer to help the next layer stick mechanically.
- Embedding: Suspending dried botanicals or small soap shapes inside a clear or translucent base.
- Color Mixing: Pre-dissolving mica powders in alcohol to prevent speckled clumps in the final bar.
- Storage: Wrapping finished bars airtight immediately to prevent humidity damage.

Skill Level and Time Investment
This is arguably the most accessible fiber and bath craft for beginners. You can go from raw materials to a finished gift in an afternoon.
| Skill Level | Time Investment | Key Milestones |
|---|---|---|
| Novice | 1 Hour | Melting base, adding one scent, pouring into a simple mold. |
| Intermediate | 3 Hours | Creating dual-layers, using exfoliants like oatmeal, using detailed molds. |
| Advanced | 5+ Hours | Intricate painting with mica, embedding objects, piping “soap frosting.” |
Advantages and Challenges
Like any craft, working with melt and pour base has its highs and lows. Here is what I have experienced firsthand:
Why I Love It:
- Safety: No lye means I can craft with my nieces and nephews without fear.
- Speed: There is no 4-week cure time; the soap is ready to use as soon as it hardens.
- Design Control: It’s easier to achieve bright colors and sharp lines than in cold process soap.
- Moisturizing: The high glycerin content feels amazing on dry skin.
- Aromatherapy: You can easily customize scents for specific therapeutic needs.
- Versatility: You can make tiny guest soaps or massive loafs with the same equipment.
The Frustrations:
- Sweating: In humid weather, the soap can develop beads of moisture on the surface.
- Cost: Buying pre-made base is more expensive per pound than raw oils.
- Heat Sensitivity: The soap can melt in a hot car or direct sunlight.
- Hardness: These bars tend to dissolve faster in the shower than cured cold process soap.
If you live in a humid climate, you must wrap your soaps in plastic wrap or shrink wrap immediately after unmolding. If left exposed, the glycerin will pull moisture from the air, causing the soap to “sweat” and become slippery.
Real Project Applications
I find that goat’s milk soap is particularly suited for gifts because it looks and feels expensive. One of my favorite recurring projects is “Breakfast Bars” which I make for holiday gifts. I mix ground colloidal oatmeal and a touch of local honey into the white goat milk base. The oatmeal provides gentle exfoliation while the honey increases the lather. Wrapped in burlap with a cinnamon stick, they look rustic and charming.
Another fantastic application is specialized facial bars. Because the base is so gentle, I often make small charcoal and tea tree oil bars for friends with oily skin. The goat milk buffers the drying effect of the charcoal. I pour these into small, intricate flower molds because facial soap lasts a long time, and a smaller bar is easier to handle at the sink.
I also love making “embedded” soaps for kids. You can take a clear soap base and a goat milk base to create scenes. I once made a “polar bear on ice” soap by putting a white goat milk chunk inside blue-tinted clear soap. The kids absolutely loved washing their hands to get to the “iceberg.” It turns a chore into a game.
The Learning Experience
When I started, I didn’t realize that “natural” didn’t always mean “soap-safe.” I ruined a beautiful batch of soap by adding fresh lavender buds from my garden. Inside the soap, the buds turned brown and rotted within a week, creating a halo of mold around each flower.
Never add fresh ingredients like milk, fruit purees, or fresh flowers to melt and pour soap. Because you cannot change the preservative system of the base, these fresh items will rot and grow bacteria inside your soap.
I also struggled initially with scent fading. I would add my expensive essential oils while the soap was boiling hot, and the scent would vanish. You must wait until the soap base has cooled to roughly 145°F (63°C) before adding fragrance to ensure the scent anchors into the bar. Once I learned this temperature trick, my soaps started smelling as good as they looked.
Comparison with Similar Crafts
It helps to understand where this technique fits in the soap-making hierarchy.
| Aspect | Melt & Pour (My Recommendation) | Cold Process | Hot Process |
|---|---|---|---|
| Safety | High (No Lye) | Low (Requires Gear) | Low (Requires Gear) |
| Cure Time | None (Immediate) | 4–6 Weeks | 1–3 Weeks |
| Texture | Smooth, Glossy | Creamy, Matte | Rustic, lumpy |
| Difficulty | Easy | Hard | Intermediate |
Common Questions from Fellow Crafters
Q: Can I mix different brands of soap base?
A: Generally, yes. I often mix a clear glycerin base with a white goat’s milk base to create a more translucent, milky look. Just make sure they have similar melting points.
Q: Why is my soap rubbery?
A: You likely overheated it. If the base boils, it loses moisture and the chemical structure changes. Melt it gently and stir frequently.
Q: How much fragrance should I add?
A: The general rule is about 0.5 ounces of fragrance per pound of soap base, but always check the manufacturer’s maximum usage rate.
Q: Can I use food coloring?
A: Please don’t! Food coloring will fade and “bleed” into other layers. Use cosmetic-grade micas or liquid soap colorants specifically designed for high pH environments.
Q: Does the soap expire?
A: The base usually has a shelf life of 1-2 years. If stored correctly, it lasts a long time, though the fragrance may fade.
Q: Why are my layers falling apart?
A: You probably didn’t spray alcohol between the layers. The alcohol acts as a glue by slightly melting the surface of the hardened soap to bond with the new hot soap.

My Personal Results and Insights
I keep a log of my batches to track costs and outcomes. Here is a snapshot of my recent work:
| Project Type | Outcome |
|---|---|
| Lavender Goat Milk Bars | High success. Cost approx $2.50/bar. Great lather. |
| Coffee Scrub Bars | Added too many grounds, bar was brittle. Reduced grounds by 50% for next batch. |
| Layered Rose Soap | Perfect adhesion using the alcohol spray technique. Visual stunner. |
There is nothing quite like the feeling of using a product you made with your own hands. The creamy lather of a goat milk bar feels infinitely better when you know exactly what scent and love went into it.
Final Thoughts and My Recommendation
After years of crafting, I can confidently say that making goat’s milk soap via the melt and pour method is one of the most rewarding hobbies you can start. It satisfies the creative itch without requiring a dedicated studio or dangerous chemicals. It is the perfect blend of science and art, forgiving enough for beginners but deep enough to keep you interested for years.
I highly recommend this craft for anyone who wants to control their skincare ingredients but doesn’t have the time or space for traditional soap making. It is also a fantastic way to create personalized, meaningful gifts. While it may not be “from scratch” in the purist sense, the quality of the final product is undeniable. The secret to great soap is not how you made the base, but how you customized it to fit your needs.
Is it worth the effort? Absolutely. The first time you wash your hands with a bar of creamy, lavender-scented goat milk soap that you poured yourself, you’ll wonder why you ever bought commercial bars in the first place.


