The first time I added frozen cow milk to lye and watched it transform into creamy, luxurious soap, I knew I’d found something special. There’s a deep satisfaction in crafting bars that not only cleanse but genuinely nourish the skin with nature’s own moisturizer. Making cow milk soap has become one of my most requested crafts, and I’m thrilled to share everything I’ve learned along this creamy, rewarding journey.
- My Journey with Cow Milk Soap Making
- What This Craft Really Entails
- Essential Materials and Tools
- Key Techniques and Skills
- Skill Level and Time Investment
- Advantages and Challenges
- Real Project Applications
- The Learning Experience
- Comparison with Similar Crafts
- Common Questions from Fellow Crafters
- My Personal Results and Insights
- Final Thoughts and My Recommendation
My Journey with Cow Milk Soap Making
I stumbled into milk soap making almost by accident seven years ago. A friend with a small dairy farm gifted me gallons of fresh cow milk, far more than I could drink or bake with. That’s when I remembered reading about Cleopatra’s legendary milk baths and wondered if I could capture that luxury in a bar of soap.
My first attempt was an absolute disaster. I poured room-temperature milk straight into the lye and watched in horror as it turned a murky orange-brown and smelled like burnt caramel gone wrong. The entire batch went into the trash, but I wasn’t ready to give up. After extensive research and many test batches, I discovered the secret: frozen milk changes everything.
Once I learned to freeze the milk into ice cubes before adding lye, my soap transformed from burnt-smelling disasters to creamy, white bars that customers couldn’t get enough of. This single technique made all the difference in my soap making journey.
Now, years later, I make cow milk soap weekly, and it remains my best-selling product. The process has taught me patience, precision, and the beautiful alchemy of transforming simple farm ingredients into skincare gold.
What This Craft Really Entails
Cow milk soap making is a specialized form of cold process soapmaking where fresh or store-bought cow’s milk replaces water as the liquid component. The technique combines traditional saponification with the nourishing properties of milk to create bars that are exceptionally moisturizing and gentle on the skin.
Unlike regular soap made with just water, milk soap requires careful temperature management because the natural sugars and proteins in milk react intensely with lye. The sugars can scorch if the mixture gets too hot, turning your beautiful white soap into an unappealing brown and creating an unpleasant smell.
The craft originated centuries ago when resourceful homesteaders used excess milk from their dairy animals. Historical records show milk has been valued for skincare since ancient Egypt, where royalty bathed in it for smooth, radiant skin. Today’s soap makers continue this tradition, whether using milk from backyard cows or the local grocery store.
At its core, this craft involves mixing oils and fats with a lye solution made from frozen cow milk. The chemical reaction called saponification transforms these ingredients into soap and glycerin. What makes it special is how the milk’s nutrients become part of the final bar, delivering vitamins, minerals, and natural fats that benefit the skin.
Ever wondered why commercial soaps leave your skin feeling tight and dry? It’s because most remove the natural glycerin and use harsh detergents instead of real soap. Handmade milk soap keeps all that skin-loving glycerin intact.
This technique is best suited for intermediate soap makers who already understand basic cold process methods and lye safety. Beginners can certainly try it, but I strongly recommend making at least three to five batches of regular water-based soap first. Understanding trace, gel phase, and proper safety procedures makes the milk soap journey much smoother.
Compared to regular cold process soap, milk soap requires more prep work and temperature vigilance. Compared to goat milk soap, cow milk soap is slightly less expensive and more readily available, though goat milk contains more natural fats. Both produce wonderfully creamy bars, so the choice often comes down to availability and personal preference.

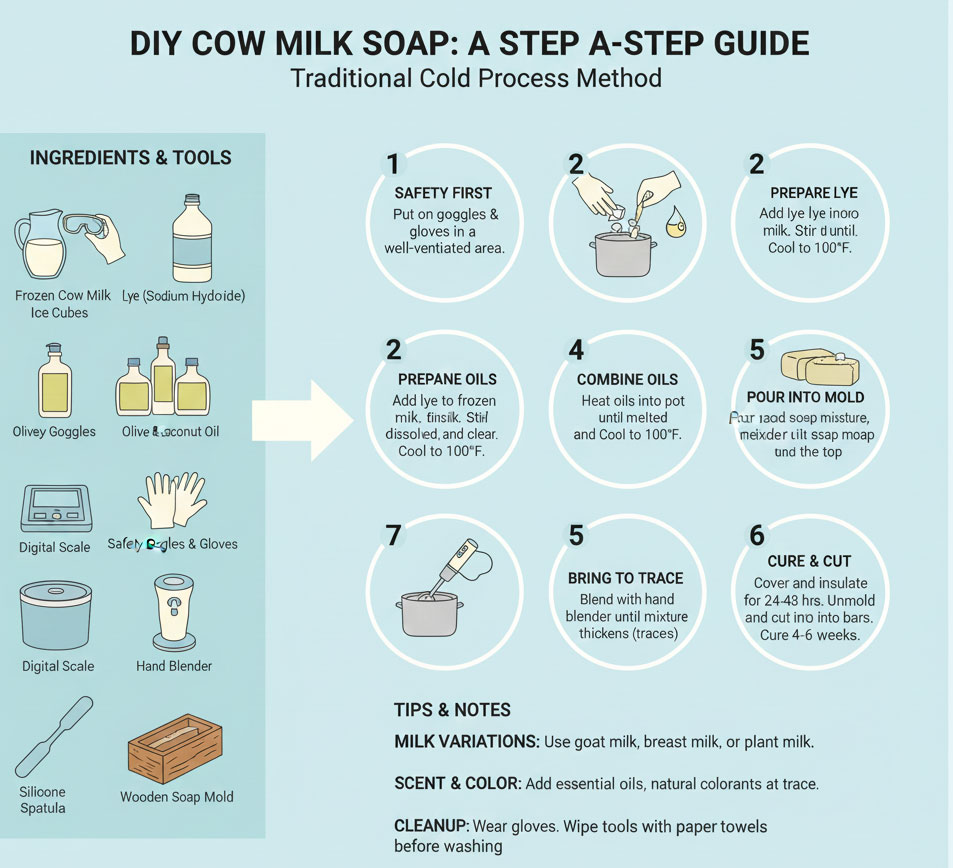
Essential Materials and Tools
| Item Category | Specifications |
|---|---|
| Cow’s Milk | Whole milk preferred for creamier lather; 2% or 1% also work. Can use raw or pasteurized, fresh or frozen. Avoid milk with added thickeners when possible. Approximately 8-9 ounces per pound of oils. |
| Sodium Hydroxide (Lye) | Pure lye crystals, food grade or higher. Never use drain cleaner. Calculate exact amount using a lye calculator for your specific recipe. Store in airtight container away from moisture. |
| Base Oils | Coconut oil (for lather), olive oil (for gentleness), palm oil or sustainable alternative, sweet almond oil, shea butter. Each contributes different properties to final bar. |
| Digital Kitchen Scale | Accurate to 0.1 ounce or 1 gram. Non-negotiable for soap making safety and success. Weight, never volume measurements. |
| Immersion Blender | Stick blender with detachable shaft for easy cleaning. Use short bursts to control trace thickness. Basic model works fine. |
| Safety Equipment | Safety goggles, rubber gloves, long sleeves. Lye is caustic and requires respect. Ventilated work area essential. |
| Ice Cube Trays | For freezing milk into manageable portions. Silicone trays release cubes easily. Pre-measure milk by weight before freezing. |
| Heat-Safe Containers | Stainless steel or heavy-duty plastic for mixing lye. Glass can shatter from temperature shock. Two large containers minimum. |
| Thermometer | Instant-read digital preferred. Monitor oil and lye temperatures. Ideal soaping range 90-110°F for milk soap. |
| Soap Molds | Silicone loaf molds, wooden molds lined with freezer paper, or individual cavity molds. Shallow molds (1-2 inches deep) prevent overheating. |
| Optional Additions | Sodium lactate (hardens bars faster), 99% isopropyl alcohol (prevents soda ash), essential oils or fragrance oils for scent, natural colorants if desired. |
Key Techniques and Skills
- Pre-freezing milk into ice cubes or slushy consistency to prevent scorching when lye is added
- Adding lye slowly to frozen milk in small increments while stirring constantly to control temperature
- Maintaining ice bath around lye-milk container to keep mixture cold during saponification
- Monitoring temperatures carefully – keeping oils around 100-120°F and lye-milk solution around 70-90°F
- Using stick blender in short bursts alternated with hand stirring to control trace speed
- Recognizing proper trace consistency – thin enough to pour but thick enough to leave patterns on surface
- Pouring soap into shallow molds (no more than 2 inches deep) to prevent gel phase overheating
- Placing finished soap in refrigerator or freezer for 24 hours to maintain lighter color
- Allowing milk soap to cure for 4-6 weeks minimum before use for proper pH balance
- Testing finished soap with pH strips or zap test to ensure safety before distribution
- Calculating recipes through lye calculator to ensure proper oil-to-lye ratios
- Working in well-ventilated area with all safety equipment properly worn throughout process
Skill Level and Time Investment
| Skill Level | Time Investment | Key Milestones |
|---|---|---|
| Beginner (with basic soap experience) | First batch: 3-4 hours including prep and cleanup. Practice batch recommended before attempting with milk. | Successfully freezing milk, safely mixing lye without scorching, pouring into molds without separation |
| Intermediate | Single batch: 90 minutes active time. Curing: 4-6 weeks hands-off. Can produce 8-12 bars per batch. | Achieving consistent light-colored bars, controlling trace for swirls or designs, understanding temperature management |
| Advanced | Multiple batches: 2-3 hours for 3-4 different recipes. Developing custom formulations: weeks of testing and refinement. | Creating signature recipes, troubleshooting problems quickly, adding complex designs and natural additives |
| Learning Curve Challenges | Common struggles: First 3-5 batches often involve color issues or overheating. Expect some failures initially. | Understanding why milk scorches, recognizing false trace from butters hardening, knowing when to freeze soap versus letting it gel |
Advantages and Challenges
Benefits of Cow Milk Soap Making:
- Creates exceptionally creamy, moisturizing bars that feel luxurious on skin compared to water-based soap
- Rich in vitamins A, D, and B12 which support skin repair and cell renewal naturally
- Contains lactic acid that gently exfoliates dead skin cells while leaving skin soft and supple
- More affordable than goat milk yet delivers similar skin-nourishing benefits and creamy texture
- Suitable for sensitive skin, eczema-prone skin, and those avoiding harsh chemical detergents
- Excellent for using excess milk from family dairy cows or supporting local creameries
- Creates stable, long-lasting bars with beautiful creamy lather that customers love
- pH balance closer to natural skin pH than most commercial soaps, maintaining skin’s protective barrier
Challenges and Frustrations:
- Requires extra preparation time for freezing milk and maintaining cold temperatures throughout process
- Easy to scorch milk if temperature isn’t carefully controlled, resulting in brown discolored soap
- Bars remain soft longer than water-based soap and need extended unmolding time
- Can overheat in mold if poured too thick or insulated, creating brown centers or separation
- Must cure full 4-6 weeks minimum, longer than some other soap varieties
- Fragrance oils can accelerate trace unexpectedly, requiring quick work and experience
Real Project Applications
Cow milk soap excels in gentle, everyday cleansing applications. I make unscented milk soap bars specifically for facial cleansing, as the natural lactic acid provides mild exfoliation without harsh scrubbing. These bars work beautifully for removing makeup and daily grime while leaving skin hydrated rather than stripped.
My customers with eczema and psoriasis consistently report that switching to cow milk soap significantly reduced their skin flare-ups and itching. The natural fats and gentle pH make it suitable where commercial soaps would aggravate sensitive conditions.
For gift-giving, I create small 2-ounce guest bars packaged in sets of three. These make perfect wedding favors, baby shower gifts, or hostess presents. I’ve also developed a “farmhouse collection” with scents like lavender, honey oat, and rosemary mint that celebrate the rural origins of this craft.
Body bars for daily showering are my most popular application. A standard 4-ounce bar lasts about three weeks with daily use, and the creamy lather means you need less product per wash. The glycerin naturally produced during saponification creates a protective layer that keeps skin from drying out, even in harsh winter weather.
Seasonal projects are particularly fun. During fall, I add pumpkin puree and warm spices to create autumn harvest soap. Winter batches feature peppermint and eucalyptus for clearing sinuses during cold season. Spring brings rose and calendula milk soap that celebrates renewal, while summer gets cucumber and aloe for cooling refreshment.
A single 2-pound batch typically yields 8-10 standard bars measuring approximately 1 inch thick by 3 inches wide by 4 inches long. Each batch uses about 16 ounces of milk and 32 ounces of oils, producing bars that cost roughly two to three dollars each in materials.
I’ve found cow milk soap works exceptionally well as shampoo bars for those transitioning away from liquid shampoos. The mild nature doesn’t strip hair oils, and the lactic acid helps clarify buildup. My recipe for this uses higher olive oil content and adds castor oil for extra conditioning.
Practical applications extend to hand soap at kitchen and bathroom sinks. Unlike commercial antibacterial soaps that destroy beneficial skin bacteria, natural cow milk soap cleanses effectively while maintaining skin’s natural microbiome. This is especially important for people who wash their hands frequently throughout the day.
The Learning Experience
Most beginners start their cow milk soap journey after mastering basic cold process soap. I always tell new milk soapers to expect their first batch to surprise them somehow, usually with unexpected color changes. That’s completely normal and part of the learning curve.
The most common early mistake is not freezing the milk adequately. Room temperature or even cold refrigerated milk will scorch when it meets lye, turning your soap tan or orange-brown. Some soapers embrace this natural color variation, but if you want white or lightly colored soap, frozen milk is absolutely essential.
Another frequent beginner error is over-insulating the soap after pouring. Regular soap benefits from being wrapped warmly to encourage gel phase, but milk soap has enough natural sugars to heat itself significantly. I learned this the hard way when an entire batch overheated, developed a brown center, and cracked open like a volcano.
Temperature control separates successful milk soap makers from frustrated ones. Invest in a reliable thermometer and check temperatures obsessively during your first ten batches until you develop an intuitive feel for the process.
Finding quality learning resources made an enormous difference in my progress. The book “Smart Soapmaking” provided solid scientific understanding of the chemistry involved. Online communities like the Soapmaking Forum became my virtual mentors, where experienced crafters answered my questions with patience and shared their own failures freely.
YouTube channels from Bramble Berry and The Nerdy Farmwife offered visual demonstrations that helped me understand what proper trace looks like and how to safely handle lye. Watching experienced soapers work through the process built my confidence before attempting expensive milk batches.
My personal breakthrough moment came during my eighth batch when I finally achieved the perfect creamy white color I’d been chasing. I’d meticulously frozen the milk, worked at cooler temperatures, and immediately placed the soap in the freezer. When I unmolded it two days later, the bars were pristine ivory with a silky texture that felt incredible. That success validated all the previous failures and cemented my commitment to this craft.
The satisfaction factor is genuinely high with cow milk soap. There’s something deeply fulfilling about transforming simple milk and oils into luxurious skincare. When customers return specifically requesting more of your soap because it transformed their dry skin, you feel the impact of your craft in a tangible, meaningful way.
Comparison with Similar Crafts
| Aspect | Cow Milk Soap | Goat Milk Soap | Water-Based Cold Process |
|---|---|---|---|
| Ease of Learning | Intermediate – requires temperature control and milk handling knowledge | Intermediate – similar challenges to cow milk with slightly higher fat content | Beginner-friendly – fewer variables to manage, more forgiving process |
| Material Cost | Moderate – whole milk averages $4-6 per gallon, widely available at grocery stores | Higher – goat milk costs $8-12 per gallon, less commonly stocked locally | Lower – distilled water costs pennies, significantly reduces per-batch expense |
| Skin Benefits | Highly moisturizing, vitamins A, D, B12, gentle lactic acid exfoliation | Exceptionally moisturizing, higher fat content, pH very close to human skin | Basic cleansing, retains glycerin but lacks additional milk nutrients |
| Final Bar Hardness | Softer initially, takes longer to unmold, eventually hardens well with proper cure | Similar to cow milk, slightly softer due to higher fat content | Generally harder, unmolds faster, ready to cut within 24-48 hours |
| Color Possibilities | Naturally ivory to cream, can achieve white with freezing method, vanilla fragrances turn brown | Similar color range, slightly more cream-colored naturally | True white possible, colors remain vibrant and stable throughout cure |
| Shelf Life | 12-18 months if stored properly in cool, dry location away from light | Similar lifespan, fats can become rancid if stored in humid conditions | Often longer lasting, 18-24 months, depending on oils used in recipe |
Common Questions from Fellow Crafters
Q: Can I use skim milk or 2% milk instead of whole milk for soap making?
A: Absolutely, though whole milk produces the creamiest lather due to higher fat content. I’ve successfully made soap with everything from skim to heavy cream. Lower fat milk creates slightly less luxurious lather but still makes wonderful gentle soap. The technique remains identical regardless of fat percentage.
Q: Why did my milk soap turn orange or brown even though I froze the milk first?
A: This usually happens when the soap goes through gel phase, which generates heat that caramelizes the milk sugars. To prevent this, place your freshly poured soap immediately into the freezer for at least 12-24 hours. Also ensure you’re adding lye very slowly to the frozen milk and keeping everything in an ice bath during mixing.
Q: How long does cow milk soap need to cure before it’s safe to use?
A: Minimum four weeks, though six weeks produces better results with harder, milder bars. The extra cure time allows excess water to evaporate and gives the saponification process time to complete fully. Test with pH strips or the zap test before using to ensure safety.
Never skip the full cure time, especially with milk soap. Using soap too early means you’re applying a product with active lye remaining, which can burn or irritate skin severely. Patience during curing protects both you and your users.
Q: Can I use canned evaporated milk or powdered milk instead of fresh milk?
A: Yes to both, with adjustments. Evaporated milk must be diluted with equal parts water before freezing since it’s concentrated. Powdered milk can be reconstituted with water at a ratio of one ounce powder per eight ounces water, then frozen. Both work well, though fresh milk provides the most reliable results.
Q: Do I need to refrigerate cow milk soap, or can it sit on the bathroom counter?
A: No refrigeration needed once fully cured. Store soap in a cool, dry place away from direct sunlight. In the bathroom, use a draining soap dish that allows air circulation so the bar dries between uses. Properly made and cured milk soap is completely shelf-stable for over a year.
Q: What’s the best way to prevent soda ash on top of my milk soap?
A: Spray the top of your freshly poured soap with 99% isopropyl alcohol immediately after smoothing. Cover lightly with plastic wrap, leaving a small gap for moisture to escape. Working at slightly warmer temperatures and reducing water content in your recipe also helps minimize soda ash formation.
Q: Can I add honey or other sugars to cow milk soap for extra bubbles?
A: Use extreme caution. Milk already contains natural sugars that react with lye, and adding more sugar increases the risk of overheating dramatically. If you want to experiment, start with just half a teaspoon per pound of oils, dissolve it in the oils before adding lye, and definitely freeze your soap immediately after pouring.
Q: Why did my soap seize up suddenly and become impossible to pour?
A: Certain fragrance oils cause acceleration or seizing in cold process soap, especially those high in vanilla or floral compounds. Always check supplier notes about how fragrances behave in cold process. Work at lower temperatures, add fragrance at thin trace, and have your mold ready before mixing fragrance in to minimize this issue.

My Personal Results and Insights
| Project Type | Outcome |
|---|---|
| Unscented Facial Bars | Reduced my own hormonal acne by 60% within two months. Gentle enough for daily use without stripping skin’s natural oils. |
| Lavender Milk Soap | Best-selling product at local farmers market. Customers report improved sleep quality from evening face washing routine with calming scent. |
| Seasonal Gift Sets | Sold over 200 three-bar gift sets during holiday season. Profit margin approximately 65% after materials and packaging costs. |
| Baby-Safe Gentle Formula | Developed unscented recipe using only olive oil, coconut oil, and milk. New parents specifically seek this out for infant skin care. |
| Gardener’s Hand Soap | Added pumice and peppermint to cow milk base for heavy-duty cleaning. Removes garden grime while preventing dry, cracked hands even with frequent washing. |
| Shampoo Bar Experiment | Required three recipe iterations to achieve proper cleansing without weighing down hair. Now have loyal customers who refuse liquid shampoo. |
| Material Cost Analysis | Average cost per bar: $2.40 in materials. Retail price: $8-10 per bar. Time investment per batch: 90 minutes active work. |
| Cure Time Optimization | Discovered that eight-week cure produces noticeably harder, longer-lasting bars than four-week cure. Worth the extra patience for premium quality. |
Final Thoughts and My Recommendation
After seven years of making cow milk soap weekly, I can honestly say this craft has enriched my life in ways I never anticipated. It transformed a simple homesteading skill into a small business that supports my family while allowing me to create something genuinely beneficial for others.
The learning curve is real, but the rewards far exceed the initial frustrations of scorched milk and brown soap disasters.
For beginners wondering if they should try this craft, my advice is simple: if you’ve successfully made three to five batches of regular cold process soap and enjoyed the process, absolutely venture into milk soap. The additional complexity teaches you so much about temperature control, ingredient interaction, and the science behind saponification. These lessons make you a better overall crafter.
I highly recommend this craft for anyone who loves the intersection of practical skill and creative expression. There’s genuine artistry in achieving that perfect creamy white bar, and deep satisfaction in knowing people are washing away their day with something you created from scratch. The therapeutic value of the craft itself shouldn’t be underestimated either – there’s something meditative about the precise measuring, careful mixing, and patient waiting.
However, be realistic about the commitment required. This isn’t a craft you can rush or do halfway. Skipping steps like freezing the milk or rushing the cure time produces inferior soap that could actually harm skin. Respect the process or don’t attempt it at all.
The financial investment is moderate but worthwhile. You’ll spend about one hundred fifty to two hundred dollars initially on equipment and safety gear, then two to three dollars per bar in ongoing material costs. If you’re crafting for personal use, you’ll save money over premium commercial soaps within the first year. If selling, the profit margins are excellent.
For those with dairy animals or access to farm-fresh milk, this craft becomes even more rewarding. You’re adding value to a raw agricultural product while supporting local food systems. I’ve built wonderful relationships with small dairy farmers who appreciate having another market for their milk.
What surprised me most was how making cow milk soap changed my relationship with everyday objects – I now see beauty and potential in simple, natural ingredients that I previously took for granted.
The environmental aspect deserves mention too. Handcrafted soap eliminates plastic bottles, avoids harmful chemicals entering waterways, and uses biodegradable ingredients. Every bar represents a small but meaningful choice toward sustainability.
My honest assessment for different skill levels: beginners should wait until they’re comfortable with basic soapmaking before attempting milk soap; intermediate crafters will find this a perfect challenge to expand their skills; advanced soapers can push creative boundaries with complex designs, natural additives, and custom formulations. There’s room for growth at every level.
Would I recommend cow milk soap making? Without hesitation, yes – but only to those willing to embrace both the science and the art, who understand that beautiful results come from patient practice rather than instant gratification.
This craft rewards attention to detail, respect for the process, and genuine curiosity about how ingredients interact. If that sounds like you, grab some frozen milk and get started. Your skin will thank you, and you might just discover a lifelong passion like I did. The journey from that first scorched batch to creating bars you’re genuinely proud of is absolutely worth taking.


