There is a primal kind of magic in taking a caustic substance like lye and simple kitchen oils, then transmuting them into a luxurious, skin-nourishing bar of soap. It’s a craft that balances precise chemistry with wild artistic expression, demanding both respect and creativity. I still remember the thrill of cutting my very first loaf—imperfect and rustic—but undeniably made by my own hands.
- My Journey with Cold Process Soap
- What This Craft Really Entails
- Essential Materials and Tools
- Key Techniques and Skills
- Skill Level and Time Investment
- Advantages and Challenges
- Real Project Applications
- The Learning Experience
- Comparison with Similar Crafts
- Common Questions from Fellow Crafters
- My Personal Results and Insights
- Final Thoughts and My Recommendation
My Journey with Cold Process Soap
My fascination with soap making began not out of necessity, but out of curiosity for the “old ways” of doing things. I started with melt-and-pour bases, but I quickly felt limited by the inability to control the actual ingredients. I wanted to choose the oils that would touch my skin.
I distinctly recall my first attempt at cold process soap in a tiny apartment kitchen. I was terrified of the lye, wearing safety goggles that fogged up and rubber gloves that went up to my elbows. When I poured the lye solution into the oils, I watched the mixture turn opaque and creamy, a transformation that felt like alchemy.
“Soap making is where science meets art; you must respect the chemistry to earn the freedom to create the design.”
That first batch was a simple lavender bar that, truth be told, had too many air bubbles and a bit of soda ash on top. But after waiting the agonizing six weeks for it to cure, the first wash was a revelation. The lather was rich and creamy, nothing like the drying commercial bars I was used to.
What This Craft Really Entails
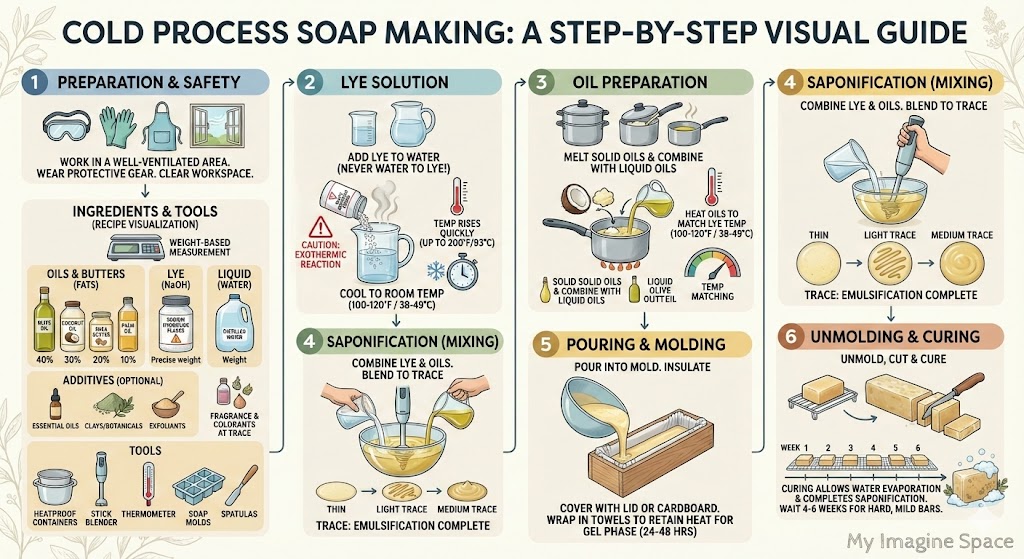
Cold process soap making (often abbreviated as CP) is the traditional method of making soap from scratch. It involves emulsifying oils and butters with a solution of sodium hydroxide (lye) and liquid (usually water) to trigger saponification. This chemical reaction turns the ingredients into soap and glycerin.

Who is this for? It is best suited for intermediate crafters or determined beginners who are comfortable following safety protocols. If you love baking or chemistry, you will likely find a natural rhythm here. It requires measuring by weight, not volume, and a willingness to handle hazardous materials responsibly.
Have you ever looked at a store-bought soap label and wondered what half those ingredients are? With cold process, you never have to guess. You are the architect of the formula, balancing coconut oil for cleansing with shea butter for moisture.
Saponification is the chemical reaction that occurs when fats (acids) mix with lye (a base). Once fully cured, no lye remains in the finished bar—only soap and moisturizing glycerin.
Essential Materials and Tools
You don’t need a laboratory to make soap, but you do need specific tools that should be dedicated solely to this craft. Never use your soap pots for cooking food.
| Item Category | Specifications |
|---|---|
| Safety Gear | Heavy-duty rubber gloves, safety goggles (not just glasses), and long sleeves. |
| Digital Scale | Must measure in grams or ounces with at least 0.1 unit precision. Vital for safety. |
| Stick Blender | Stainless steel immersion blender. Hand stirring takes hours; this takes minutes. |
| Containers | Stainless steel or heavy-duty plastic (polypropylene). Never use aluminum as it reacts violently with lye. |
| Molds | Silicone loaf molds are best for beginners. Wood molds with silicone liners work well too. |
| Ingredients | Sodium Hydroxide (Lye), Distilled Water, Oils (Olive, Coconut, Palm/Sustainable Palm). |
Key Techniques and Skills
Mastering cold process soap requires learning a vocabulary of physical cues. Here are the core techniques you will develop:
- Lye Solution Mixing: deeply understanding the safety order—always adding lye to water, never the reverse.
- Temperature Control: learning to bring both oils and lye solution to similar temperatures (usually 100°F–120°F) before combining.
- Stick Blending: using short bursts to emulsify without creating excessive air bubbles.
- Recognizing Trace: identifying the moment the batter thickens; “light trace” is best for swirls, while “thick trace” supports heavy embeds.
- Pouring techniques: mastering the “in-the-pot” swirl, drop swirl, or simple layers for visual effects.
- Insulating: wrapping the mold in towels to encourage the “gel phase” for brighter colors.
- Curing: rotating bars during the 4-6 week drying period to ensure water evaporation and a hard, long-lasting bar.
- Beveling and Planing: trimming the sharp edges of cut soap for a professional, smooth hand-feel.
Skill Level and Time Investment
Many people underestimate the time required not for the making, but for the waiting. It is a craft that teaches delayed gratification.
| Skill Level | Time Investment | Key Milestones |
|---|---|---|
| Beginner | 2-3 hours active time | Learning safety, basic single-color batches, understanding trace. |
| Intermediate | 3-5 hours active time | Formulating own recipes, simple swirls, using milk or tea instead of water. |
| Advanced | 5+ hours + planning | Complex landscape designs, piping soap frosting, intricate layering. |
Always work in a well-ventilated area. The fumes from mixing lye and water are temporary but harsh and should not be inhaled.
Advantages and Challenges
After years of making soap, I’ve found the benefits far outweigh the difficulties, but it is important to go in with eyes open.
- Total Control: You customize every aspect for your skin type (dry, oily, sensitive).
- Cost Effective: Once you have the equipment, a loaf of high-quality soap is cheaper to make than to buy.
- Creativity: The design possibilities are endless, from colors to textures and scents.
- Eco-Friendly: You can eliminate plastic packaging entirely from your bathroom.
- Therapeutic: The process of blending and pouring is deeply meditative and satisfying.
- Gifting: There is no better gift than a consumable luxury item that people actually use.
- Safety Risks: Lye causes serious chemical burns if mishandled. Focus is non-negotiable.
- Patience Required: You cannot use the product immediately; the 4-6 week cure is mandatory.
- Initial Cost: Buying the stick blender, molds, and bulk oils requires an upfront investment.
- Storage Space: You need a cool, dry place to let racks of soap cure undisturbed for weeks.

Real Project Applications
One of my favorite projects to recommend is a “Bastille” soap. This is a modification of the traditional Castile soap (100% olive oil) which can be slimy and take months to cure. A Bastille bar uses about 70% olive oil and 30% coconut oil. The coconut oil adds hardness and fluffy lather, while the olive oil keeps it incredibly gentle.
I once made a batch of this for a baby shower gift, infusing the olive oil with chamomile flowers for weeks beforehand. I didn’t add any artificial color, just the natural soft yellow from the oils. The result was a creamy, unscented bar that was a massive hit. The new parents told me it was the only soap that didn’t irritate the baby’s skin.
Another fantastic application is the “Kitchen Scrub” bar. By adding coffee grounds or poppy seeds to the batter at medium trace, you create a gritty, exfoliating soap. It is perfect for removing garlic or onion smells from your hands after cooking. I usually scent these with bright orange or lemon essential oils to cut through grease odors.
Using frozen milk (goat or coconut) instead of water makes the creamist lather imaginable. The natural sugars boost the bubbles significantly!
The Learning Experience
The learning curve for cold process soap is steep at the very beginning due to the safety aspect, but it plateaus quickly. The most common mistake beginners make is “false trace.” You think the soap is thick enough because the oils are cold and solidifying, but they haven’t actually emulsified. If you pour too soon, the oil and lye separate in the mold.
I learned this the hard way with a batch of cinnamon soap. I was impatient and poured at a very thin consistency. The next day, I found a layer of caustic liquid lye pooling at the bottom of the mold. It was a complete loss, and dangerous to clean up.
Resources like the “Soap Queen” blog and modern YouTube channels are invaluable. Seeing the texture of “trace” in a video is much easier than reading a description. Join forums like the Soap Making Forum; the community is incredibly generous with troubleshooting advice.
Never add water to lye. Always add lye crystals to the water. Doing it backward can cause a “volcano” eruption of boiling caustic fluid.
Comparison with Similar Crafts
It helps to understand where cold process fits in the wider world of soap making.
| Aspect | Cold Process (CP) | Melt & Pour (MP) | Hot Process (HP) |
|---|---|---|---|
| Creative Control | High (swirls, layers) | Medium (embeds, shapes) | Low (rustic, thick) |
| Cure Time | 4-6 Weeks | Immediate (once cool) | 1-2 Weeks |
| Texture | Smooth, creamy, hard | Glycerine-like, slick | Rough, rustic, “mashed potato” |
| Safety | Handle Lye | No Lye Handling | Handle Lye + Heat |
Common Questions from Fellow Crafters
Q: Can I use food coloring to dye my soap?
A: No, food coloring will not work. It often fades, bleeds, or morphs into brown/gray due to the high pH of the lye. Use cosmetic-grade micas, clays, or oxides instead.
Q: What happens if I get raw soap batter on my skin?
A: It will sting and eventually burn. Immediately wash the area with plenty of cool running water. Some people suggest vinegar, but water is the safest universal first aid.
Q: My soap has a white powdery film on top. Is it ruined?
A: That is called “soda ash.” It is a harmless reaction between the lye and air. You can steam it off with a garment steamer or just wash it off the first time you use the bar.
Q: Can I use essential oils from the grocery store?
A: Often those are not pure or potent enough. Soap making is a harsh chemical environment; weak oils will fade instantly. Buy from reputable soap suppliers.
Q: Why did my soap batter suddenly turn into a solid brick in the pot?
A: This is called “seizing.” It usually happens because of a specific fragrance oil (like heavy florals or spices) or adding ingredients that accelerate trace. Move fast and scoop it into the mold!
Q: How do I know the soap is safe to use?
A: If you weighed ingredients correctly, it will be safe after the cure. You can do a “zap test” (touching the tongue to the soap—it shouldn’t zap like a battery) or use pH strips, but accurate weighing is your best safety net.
My Personal Results and Insights
Tracking my batches over the years has revealed some interesting data about what actually works versus what is just a trend.
| Project Type | Outcome |
|---|---|
| High Olive Oil (Castile) | slimy at first, but after 6 months cure became the hardest, longest-lasting bar I own. |
| Salt Bars (50% salt) | Rock hard in 2 hours. Exfoliating and spa-like, but you must cut them almost immediately or they shatter. |
| Milk Soaps | Turned brown (scorched) when I didn’t freeze the milk first. Learned to soap at cooler temperatures. |
| Complex Swirls | Often “muddied” the colors by over-blending. Less stick blending gives you more time to design. |
For a harder bar that lasts longer in the shower, add 1 teaspoon of sodium lactate per pound of oils to your cooled lye water.
Final Thoughts and My Recommendation
Cold process soap making is one of the most rewarding skills I have ever learned. There is a deep satisfaction in using a product that you created from raw elements, knowing exactly what is nurturing your skin. The initial fear of lye vanishes quickly with practice and proper safety gear, replaced by a profound respect for the chemistry.
I highly recommend this craft to anyone who loves precision and isn’t in a rush. If you need instant results for a gift tomorrow, stick to melt-and-pour. But if you want to create an heirloom-quality product and enjoy the slow, meditative process of curing, cold process is for you.
Don’t be discouraged if your first batch isn’t Instagram-perfect. Even the “ugly” batches usually wash just fine. Start with a simple recipe, respect the safety rules, and give yourself the grace to learn. The feeling of that first lather from your own bar is absolutely worth the effort.


