The alchemy of turning simple fats and caustic salts into luxurious, skin-loving soap has captivated me for over a decade. There is a profound satisfaction in using a bar of soap that you designed, scented, and cured with your own hands. It transforms a mundane daily routine into a small ritual of self-care.
- My Journey with Soap Making
- What This Craft Really Entails
- Essential Materials and Tools
- Key Techniques and Skills
- Skill Level and Time Investment
- Advantages and Challenges
- Real Project Applications
- The Learning Experience
- Comparison with Similar Crafts
- Common Questions from Fellow Crafters
- My Personal Results and Insights
- Final Thoughts and My Recommendation
My Journey with Soap Making
My fascination with soap making began not in a studio, but in my grandmother’s kitchen, watching her stir a pot that smelled faintly of lavender and harsh chemicals. I was terrified of the lye she used, but mesmerized by the transformation. Years later, looking for a way to reduce plastic waste and control what touched my family’s skin, I returned to that memory.
I started with “melt and pour” bases, but they felt like cheating—I wasn’t really making soap, just decorating it. I wanted to control the oil blend, the superfat percentage, and the texture. The first time I attempted cold process soap, I was so nervous my hands shook while measuring the distilled water.
I remember vividy the “trace” moment—when the batter finally thickened to the consistency of thin pudding. It felt like magic. However, I didn’t stop there. Impatience led me to hot process soap making, where I learned that heat could accelerate the chemistry, allowing me to use the soap almost immediately.
The beauty of soap making lies in the balance between precise chemistry and wild artistic expression.

What This Craft Really Entails
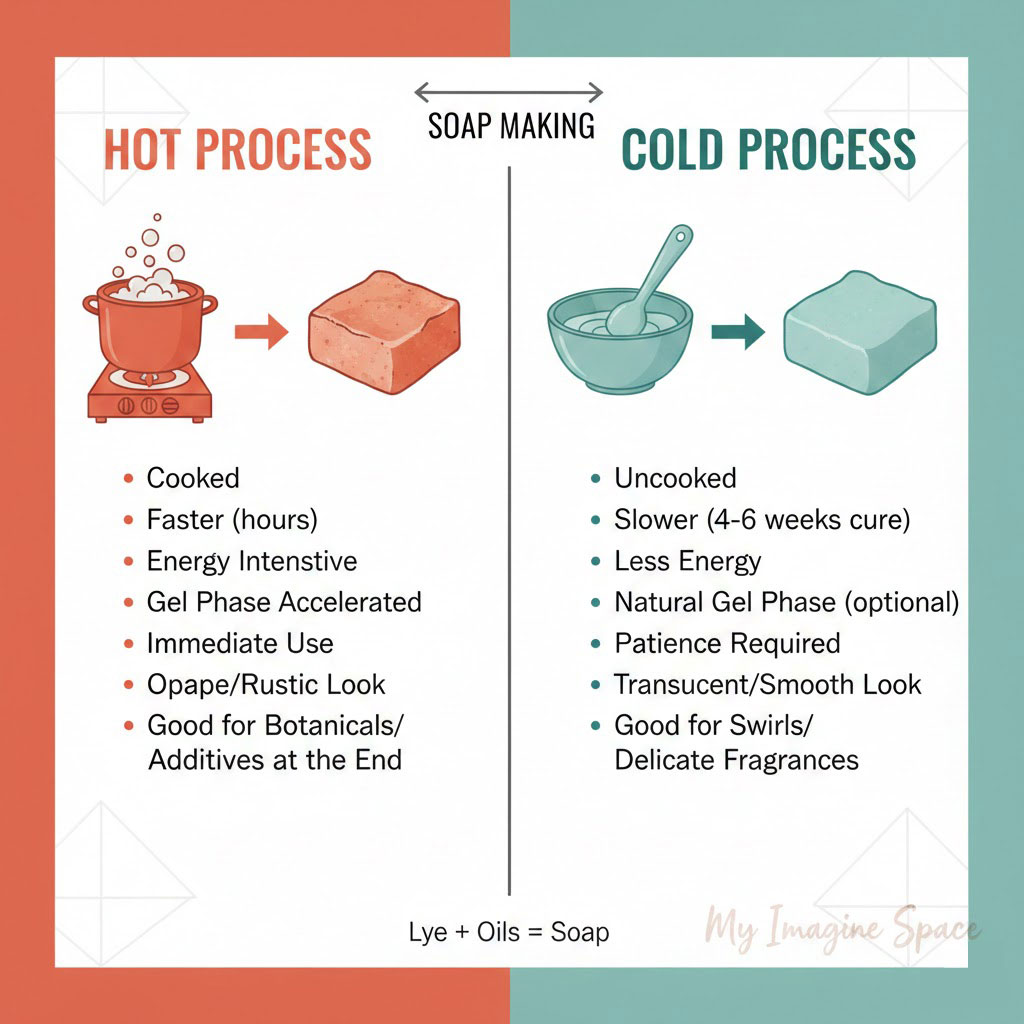
At its core, soap making is the process of saponification—a chemical reaction between triglycerides (fats/oils) and a strong alkali (lye). Whether you choose hot or cold process, the chemistry remains the same, but the methodology and results differ significantly. Have you ever wondered why handmade soap feels so much creamier than commercial bars?

Hot Process (HP), on the other hand, involves cooking the soap batter externally, usually in a slow cooker or double boiler. You force the saponification to complete before the soap even hits the mold. Think of it like the difference between slow-roasting a meal and pressure cooking it; both get you fed, but the textures are worlds apart.
This craft is best suited for intermediates who are comfortable with safety protocols, as handling sodium hydroxide requires focus and respect. It is closer to baking than knitting—measurements must be exact by weight, not volume. If you get the math wrong in knitting, you have a weird scarf; if you get it wrong in soaping, you could burn your skin.
Always run your recipe through a reliable lye calculator before starting, even if you found it in a popular book or blog.
Essential Materials and Tools
The barrier to entry is moderate, but you absolutely cannot skimp on safety gear or measurement tools. You likely have some of these in your kitchen, but once a tool touches lye, it should never be used for food again.
| Item Category | Specifications |
|---|---|
| Alkali | Sodium Hydroxide (NaOH) flakes or beads (100% pure lye) |
| Base Oils | Olive oil, Coconut oil, Palm oil (sustainable) or Shea Butter |
| Safety Gear | Heavy-duty rubber gloves, safety goggles (not just glasses), long sleeves |
| Mixing Tools | Stainless steel stick blender (immersion blender), silicone spatulas |
| Containers | Heat-safe plastic pitchers (polypropylene #5) or stainless steel pots |
| Molds | Silicone loaf molds or wooden boxes lined with freezer paper |
Key Techniques and Skills
Mastering soap making involves understanding fluid dynamics and temperature control. Here are the skills you will develop over time:
- Lye Safety Handling: Learning to pour lye into water (never the reverse) to avoid volcanic eruptions.
- Recognizing Trace: Identifying when the oil and lye have permanently emulsified to a pudding-like state.
- Temperature Management: Keeping oils and lye within 10 degrees of each other for cold process success.
- Stick Blending: Using short bursts to avoid air bubbles and bringing the batter to trace without seizing it.
- Crockpot Cooking (HP): Managing the heat so the soap “gels” without overflowing the pot.
- Molding and Insulating: Knowing when to wrap your mold in towels to force a gel phase in cold process.
- Cutting and Beveling: Slicing the loaf into uniform bars and cleaning up the edges for a professional look.
- Curing Patience: Rotating bars during the drying phase to ensure water evaporation and crystalline structure formation.
Skill Level and Time Investment
Soap making is not a “quick weekend project” if you count the curing time. It requires a commitment to the process. The actual labor is short, but the waiting game is long.
| Skill Level | Time Investment | Key Milestones |
|---|---|---|
| Beginner | 2-3 hours active time | Understanding safety and successful saponification |
| Intermediate | 3-5 hours active time | Mastering swirls, layers, and multiple colors |
| Advanced | Varies greatly | Formulating original recipes and intricate designs |
The “cure” is not just about drying; it is when the crystalline structure of the soap hardens, making the bar longer-lasting and milder on the skin.
Advantages and Challenges
Why do we go through the trouble of handling lye and waiting weeks for a bar of soap? The benefits are tangible, but the challenges are real.
Advantages:
- Total control over ingredients, avoiding detergents and synthetic foaming agents found in store brands.
- The ability to customize scents and textures for specific skin types, like eczema or dry skin.
- Cold process allows for incredibly artistic designs, swirls, and color gradients that look like marble.
- Hot process soap is ready to use much faster, making it great for last-minute gifts.
- It is significantly cheaper in the long run to make high-quality soap than to buy artisan bars.
- The therapeutic nature of the process; measuring and mixing can be a form of mindfulness.
Challenges:
- The initial cost of equipment and bulk oils can be high before you see savings.
- Sodium Hydroxide is a hazardous material that requires strict safety protocols and storage away from children/pets.
- Soaping creates a significant mess in the kitchen and requires dedicated storage space for curing racks.
- “Soda Ash”—a harmless but ugly white powder—can form on top of cold process soap if not managed correctly.
Real Project Applications
I find that different techniques suit different purposes perfectly. For my daughter’s wedding favors, I used the cold process method. I wanted a sleek, hard bar with a delicate lavender-colored swirl that matched her theme. Cold process allowed me to keep the batter fluid long enough to execute a “hanger swirl” design inside the mold.
The result was a batch of incredibly smooth, professional-looking bars that we cured for eight weeks. They were hard as rocks and lathered beautifully. On the flip side, I often make a “gardener’s scrub” soap using the hot process method. I add pumice and coffee grounds to the cooked soap right before scooping it into the mold.
Because hot process soap has a thick, mashed-potato texture, it naturally looks rustic and earthy, which fits the aesthetic of a scrubby soap perfectly. I don’t need intricate swirls there; I need utility. Plus, because the cooking process neutralizes the lye faster, I can add expensive essential oils at the end of the cook without the lye “eating” the scent.
Hot process is excellent for soaps containing heavy exfoliants like oatmeal or coffee, as the thick batter suspends them evenly without sinking.
The Learning Experience
Learning to make soap is a curve that spikes initially due to the fear factor. Most beginners, myself included, are terrified of the lye solution. I remember wearing goggles, a mask, and gloves up to my elbows, standing as far back as possible while mixing.
A common mistake early on is “false trace.” This happens when you think the batter is mixed because it looks thick, but the oils and lye are actually separating. I poured a batch into a mold once, only to find a pool of caustic oil on top the next day. If your batter looks like separated salad dressing, keep blending until it looks like cohesive mayonnaise.
Community support is vast. I learned the most from soaping forums and YouTube channels where seasoned makers show their failures. Watching a professional save a “seized” batch—where the soap hardens instantly in the pot—gave me the confidence to panic less when things go wrong.

Comparison with Similar Crafts
It helps to contextualize soap making against other fiber and home arts. It is less portable than needlework but offers a similar creative release.
| Aspect | Cold/Hot Process Soap | Melt & Pour Soap | Candle Making |
|---|---|---|---|
| Complexity | High (Chemistry involved) | Low (Melting pre-made base) | Medium (Temp control critical) |
| Danger Level | Moderate (Caustic Lye) | Low (Heat only) | Low/Med (Flammable wax) |
| Customization | 100% control of formula | Additives/Scent only | Scent/Color/Wax type |
| Wait Time | 4-6 weeks to cure | Hours to cool | Days to cure |
Common Questions from Fellow Crafters
Q: Can I use food coloring to dye my soap?
A: No, food coloring is not stable in the high-pH environment of soap. It will often morph into ugly brown or grey colors or fade completely. Use cosmetic-grade micas or natural clays instead.
Q: Why did my soap crack on top?
A: This usually happens in cold process soap when it gets too hot during the initial saponification phase. If you insulate the mold too heavily, the internal heat rises and cracks the surface.
Q: Is lye-heavy soap dangerous?
A: Yes. If you miscalculate and have too much lye, the soap will burn the skin. This is why we “superfat” (add extra oil) to ensure all lye is reacted and there is a buffer of oil left over.
Q: Can I use metal bowls?
A: Only stainless steel. Aluminum reacts violently with lye, producing hydrogen gas. Never use aluminum foil, pots, or utensils.
Q: How do I clean up the greasy mess?
A: Ironically, the mess is just raw soap. For hot process, I soak the pot in water immediately. For cold process, I let the dirty bowls sit for 24 hours until the residue turns into soap, then just wash them out.
Q: Why does my soap have a white powder on top?
A: That is soda ash, a reaction between the lye and air. It is harmless but cosmetic. You can steam it off or wash the bars, or prevent it by spraying rubbing alcohol on the wet soap.
To prevent soda ash, spray the top of your freshly poured cold process soap with 99% isopropyl alcohol and cover the mold to reduce airflow.
My Personal Results and Insights
After years of tracking my batches, I have found that the savings are real, but only if you buy in bulk. Buying small bottles of olive oil from the grocery store makes for very expensive soap.
| Project Type | Outcome |
|---|---|
| Standard CP Batch | $1.50 per bar cost (vs $8 retail). 98% success rate. |
| Complex Swirl CP | High artistic satisfaction. Occasional “muddy” colors if over-mixed. |
| Hot Process Rustics | 100% utility success. Scent retention is superior to CP. |
| Milk Soaps | Difficult. Scorched the milk twice before learning to freeze it first. |
Never attempt to make soap with drain cleaner lye from a hardware store; it often contains metal shavings or other impurities that are unsafe for skin.
Final Thoughts and My Recommendation
Making your own soap is one of the most empowering skills you can learn in the domestic arts. It shifts your perspective from being a consumer to a creator of something essential. There is a primal joy in washing with a bar you made from scratch, knowing exactly what is nourishing your skin. It connects you to a history of makers who used wood ash and tallow centuries ago.
If you are a complete novice who wants instant gratification, start with “melt and pour” to get a feel for scents and molds. However, if you crave the “real” experience and want full control, I highly recommend starting with a simple Cold Process recipe using just olive, coconut, and palm (or lard) oils.
Cold process offers the best balance of manageable workflow and artistic freedom for beginners. Hot process is fantastic for utility soaps, but the thick texture can be discouraging if you are expecting that smooth, department-store look. Be patient with yourself. Your first batch might be ugly, but it will still clean you. And that, in itself, is a beautiful success.
The secret to great soap is not the fancy swirl, but the quality of your oils and the patience to let it cure.