The scent of lavender and oatmeal curing on a wooden rack brings a sense of peace that few other things can match in my studio. Soap making is not just a utility craft; it is a profound intersection of chemistry, art, and self-care that transforms humble ingredients into everyday luxuries. I still remember the mix of trepidation and excitement I felt pouring my very first batch, wondering if the magic would actually happen.
- My Journey with Soap Making
- What This Craft Really Entails
- Essential Materials and Tools
- Key Techniques and Skills
- Skill Level and Time Investment
- Advantages and Challenges
- Real Project Applications
- The Learning Experience
- Comparison with Similar Crafts
- Common Questions from Fellow Crafters
- My Personal Results and Insights
- Final Thoughts and My Recommendation
My Journey with Soap Making
My fascination with soap making began over a decade ago when I grew tired of the harsh chemicals in store-bought cleansers that irritated my skin.

I recall vividly my first attempt at cold process soap; I was terrified of handling lye, dressed like I was entering a biohazard zone with goggles and heavy gloves. I stood over the pot, heart racing, waiting for the mixture to thicken, convincing myself I had ruined it before it even started. When I finally cut into that first loaf twenty-four hours later and saw the creamy, perfect texture, I knew I was hooked for life.
Soap making is the perfect marriage of scientific precision and artistic chaos, where dangerous elements transform into gentle cleansing.

What This Craft Really Entails
Soap making, specifically the cold process method, is the ancient art of saponification—a chemical reaction between fats (oils or butters) and an alkali (sodium hydroxide or lye). While many people start with “Melt and Pour” bases, which are pre-saponified and safer for children, true soap making involves creating the reaction from scratch. It is a craft that respects tradition, tracing back to the Babylonians, yet allows for infinite modern creativity.
This craft requires a shift in mindset; you are part chef and part chemist, measuring ingredients by weight rather than volume to ensure safety and consistency. It is not a hobby for the impatient, as the finest soaps require weeks of curing time to become mild and long-lasting. Have you ever wondered why handmade soap feels so much creamier than the commercial bars?
The difference lies in the glycerin, a humectant naturally produced during saponification that commercial manufacturers often remove to sell separately in lotions. In handmade soap, this glycerin remains, drawing moisture to your skin. It is best suited for those who appreciate detail, have a healthy respect for safety protocols, and enjoy a process that yields tangible, consumable rewards.
Comparing it to other fiber arts or needlework, soap making is much faster in the active phase but requires significantly more patience for the finished result. It is similar to baking sourdough bread; the hands-on time is intense and technical, but the magic happens during the waiting periods. It requires less dexterity than embroidery but more precision in measurement.
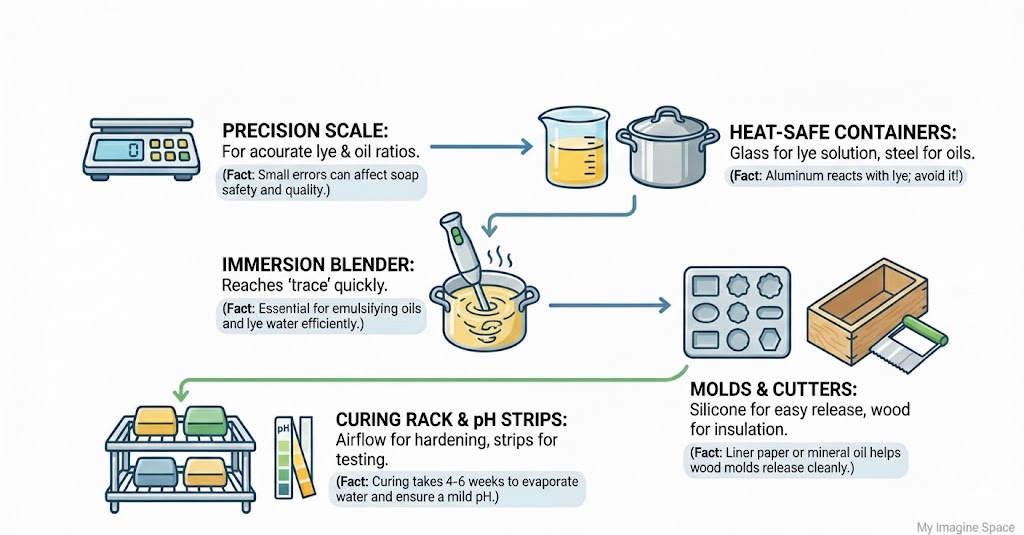
Essential Materials and Tools
When I first started, I made the mistake of thinking I could use my standard kitchen tools, but I quickly learned that dedicated equipment is crucial for safety. You don’t need the most expensive gear to start, but you do need tools that can handle the caustic nature of raw soap batter.
A reliable digital scale is your most important tool; in soap making, precision isn’t just about quality, it is about safety.
| Item Category | Specifications |
|---|---|
| Safety Gear | Heavy-duty rubber gloves, wrap-around safety goggles (not glasses), and long sleeves. |
| Digital Scale | Must weigh in grams and ounces, with a tare function. Accuracy to 0.1g is preferred for smaller batches. |
| Immersion Blender | Stainless steel shaft is essential. Plastic shafts can melt or hold scents. This is the “stick blender.” |
| Mixing Containers | Stainless steel pots or heavy-duty #5 polypropylene plastic buckets. Never use aluminum. |
| Molds | Silicone loaf molds are best for beginners. Wooden molds with silicone liners offer great insulation. |
| Spatulas | Silicone spatulas designated solely for soap making (heat resistant). |
Key Techniques and Skills
Mastering soap making involves learning a specific sequence of actions that ensure a safe and successful reaction. These are the core skills I have honed over years of practice:
- Lye Solution Mixing: Learning to dissolve sodium hydroxide into distilled water safely without splashing or inhaling fumes.
- Temperature Control: Monitoring both the oil and lye solution temperatures to ensure they are within a similar range (usually 100-120°F) before combining.
- Stick Blending: Using short bursts to emulsify oils and lye water without creating excessive air bubbles.
- Recognizing Trace: Identifying the point where the batter thickens—ranging from thin trace (for swirling) to thick trace (for sculpting).
- Superfatting: Calculating extra oils in the recipe that won’t turn into soap, providing extra moisture for the skin.
- Insulation: Wrapping the mold in towels to encourage the “gel phase,” which makes colors pop and the bar harder.
- Cutting: slicing the loaf at the precise moment it is solid enough to hold shape but soft enough to cut smoothly.
- Bevelling and Planing: Cleaning up the edges of the bars for a professional, smooth finish.
Skill Level and Time Investment
Many beginners are intimidated by the lye, but with proper respect for the chemistry, the learning curve is manageable. It is not an instant-gratification craft, but the active time is surprisingly short.
| Skill Level | Time Investment | Key Milestones |
|---|---|---|
| Beginner | 2-3 hours active time, 4-6 weeks curing | Safe handling of lye, basic uncolored batch, understanding trace. |
| Intermediate | 3-4 hours active time, 4-6 weeks curing | Adding colors, simple swirls, using milk or beer instead of water. |
| Advanced | 5+ hours active time, 6+ weeks curing | Intricate designs, piping soap flowers, formulating own recipes. |
Never use aluminum pots or utensils for soap making; the lye reacts with the metal to create hydrogen gas and ruin your batch.
Advantages and Challenges
After years of making thousands of bars, I have found that the benefits far outweigh the difficulties, though transparency is important for anyone starting out.
- Complete Control: You decide exactly what goes onto your skin, eliminating allergens and irritants.
- Cost Effective Long-term: Once equipped, a loaf of high-quality soap costs a fraction of boutique prices to make.
- Creative Expression: The possibilities for scent combinations, colors, and designs are literally endless.
- Eco-Friendly: You can eliminate plastic packaging entirely from your bathroom routine.
- Therapeutic Value: The process requires focus, which I find incredibly meditative and grounding.
- Gift Potential: Handmade soap is universally appreciated and makes for a deeply personal gift.
- Safety Risks: Storing and handling sodium hydroxide requires strict safety measures, especially with pets or kids.
- Initial Investment: Buying molds, a dedicated blender, and bulk oils requires some upfront capital.
- Storage Space: You need a dedicated, airy space for soaps to cure for dozens of days.
- Cleanup: Washing oily, raw soap batter off tools can be messy and requires care.
Real Project Applications
One of my favorite projects to recommend for beginners is a simple Castile-bastard soap (mostly olive oil with some coconut for lather). I once made a batch infused with calendula petals for a friend with sensitive skin, and the difference it made for her was incredible. Practical applications go far beyond just hand soap; I have formulated solid dish soap bars that cut through grease better than liquid detergents.
For the holidays, I love creating “Confetti Soap.” This is a fantastic way to reduce waste by taking the scraps and trimmings from previous batches, chopping them into small chunks, and embedding them into a new batch of fresh white batter. The result is a festive, terrazzo-style bar that looks incredibly high-end but actually saved me money. Have you ever thought about how much soap scrap is wasted in commercial production?
Another rewarding project is a scrub bar for gardeners. By incorporating poppy seeds or ground walnut shells into the batter at medium trace, you create a heavy-duty exfoliant that scrubs away dirt without stripping the hands. I make these every spring, and they are practically currency among my gardening neighbors.
Using silicone loaf molds makes unmolding a breeze—no lining required and the sides come out perfectly smooth every time.
The Learning Experience
Learning to make soap is like learning to drive; at first, you are hyper-aware of every single movement, but eventually, it becomes muscle memory. Most beginners struggle with “trace”—understanding exactly when the emulsion is stable. I remember frantically blending my second batch because I thought it was too thin, only to have it seize up into a solid lump in the pot within seconds.
That experience taught me that stick blenders are powerful and should be used in short bursts. The community around soap making is incredibly supportive, with forums and groups dedicated to troubleshooting “failed” batches. Often, a batch that looks ugly can still be saved through a process called “re-batching,” where you grate it down and melt it.
Resources like the “Soap Queen” blog and modern YouTube tutorials are invaluable. They help you visualize the texture of the batter, which is hard to convey in text alone. The most critical lesson I learned is that patience during the cure time is what separates good soap from great soap. Using a bar before it has fully cured results in a soft, slimy soap that dissolves quickly.
Comparison with Similar Crafts
Soap making sits in a unique space between culinary arts and chemistry. Here is how it compares to other domestic crafts I enjoy:
| Aspect | Cold Process Soap | Candle Making | Baking |
|---|---|---|---|
| Primary Skill | Chemistry & Precision | Temperature & Wicking | Chemistry & Flavor |
| Risk Factor | High (Caustic materials) | Medium (Hot wax) | Low (Heat only) |
| Time to Finished Product | 4-6 Weeks | 24 Hours | 2-4 Hours |
| Creativity Type | Visual & Olfactory | Olfactory & Ambiance | Gustatory & Visual |
Common Questions from Fellow Crafters
Q: Can I use food coloring to dye my soap?
A: No, food coloring will not work; it often morphs into brown or gray during the chemical reaction. You need stable colorants like micas, oxides, or natural clays.
Q: Is the lye still in the soap when I use it?
A: Absolutely not. Through the process of saponification, the lye and oil molecules chemically bond and transform into soap and glycerin. No lye remains in the finished bar.
Q: Why did my soap develop a white powdery layer on top?
A: That is called “soda ash.” It is harmless and cosmetic, caused by the unsaponified lye reacting with air. You can steam it off or wash it away.
Q: Can I use essential oils instead of fragrance oils?
A: Yes, but be aware that some essential oils fade quickly in the high pH environment of raw soap. Citrus scents are particularly notorious for fading without a clay anchor.
If we wash our dishes and clothes with specialized detergents, why do we often settle for generic detergents for our own skin?
My Personal Results and Insights
Over the years, I have tracked my batches to see if this hobby is actually worth the effort. The data has been surprising.
| Project Type | Outcome |
|---|---|
| Standard Bath Bar | Cost approx $1.50/bar vs $8.00 retail for similar quality. |
| Skill Progression | Took 5 batches to feel confident without checking instructions constantly. |
| Batch Consistency | 95% Success rate once I switched to a high-quality digital scale. |
| Skin Health | Noticeable reduction in winter dry skin for my entire family. |
Fragrance oils behave differently than essential oils; some can cause your soap batter to accelerate and harden instantly.

Final Thoughts and My Recommendation
Soap making is one of the most rewarding skills I have ever acquired. It demands respect and attention to detail, but the payoff is a daily luxury that you created with your own hands. There is a profound satisfaction in stepping into the shower and using a bar of soap where you selected every oil, every scent note, and every color swirl.
If you are willing to invest in the basic safety gear and have the patience to wait for the cure, you will find that store-bought soap simply cannot compare. Start with a simple, uncolored batch, breathe through the nervousness, and trust the process. The secret is consistent temperatures and accurate weighing of every single ingredient. It is a clean, creative adventure that might just take over your kitchen, and I believe it is absolutely worth it.


I recall making handmade soap gifts for friends, perfect for personalization. Wrapped in colorful paper, they’re a hit!
Regarding soap making as a gift, it’s wonderful that you’ve found a way to personalize it for your friends. For those looking to make it more special, consider adding a personalized note or a small bag of bath salts to complement the handmade soap.
Combining soap making with other crafts like embroidery or painting can create unique gifts. I’ve experimented with embedding herbs or flowers into soap for a natural, artistic look.
About combining soap making with other crafts, that’s an innovative approach. When embedding herbs or flowers, ensure they are completely dry to prevent any mold growth. Also, consider the properties of the herbs or flowers and how they might affect the skin.