There is something incredibly satisfying about taking a rough, scratchy natural fiber and transforming it into a luxurious spa tool that sits elegantly by the sink. My fascination with loofah soap began not in a craft store, but in my own backyard garden where I first grew the sprawling luffa gourd vines. Realizing I could marry my love for gardening with my passion for skincare formulation was the spark that started it all.
- My Journey with Loofah Soap Making
- What This Craft Really Entails
- Essential Materials and Tools
- Key Techniques and Skills
- Skill Level and Time Investment
- Advantages and Challenges
- Real Project Applications
- The Learning Experience
- Comparison with Similar Crafts
- Common Questions from Fellow Crafters
- My Personal Results and Insights
- Final Thoughts and My Recommendation
My Journey with Loofah Soap Making
I still remember standing in my kitchen seven years ago, staring at a massive, dried fibrous gourd I had just peeled. I had this romantic notion that I would simply slice it up and pour soap over it, creating an instant masterpiece. I grabbed a dull steak knife and tried to saw through the dry fiber, nearly taking my thumb off in the process.
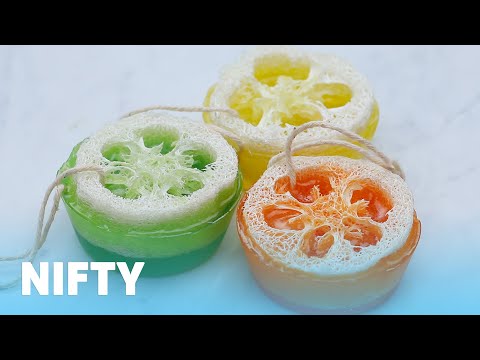
That first batch was a comedy of errors; the soap base was too hot, melting the plastic mold, and the loofah floated to the top like a stubborn raft. But when I finally sliced into a successful loaf weeks later, revealing that beautiful, intricate cross-section of natural lace embedded in creamy goat milk soap, I was hooked. It was functional art at its finest.
“The beauty of this craft lies in the balance between the rugged, exfoliating texture of nature and the soothing, creamy embrace of the soap.”

What This Craft Really Entails
Loofah soap making is primarily the art of embedding a natural exfoliating sponge—the dried fruit of the Luffa aegyptiaca plant—into a soap medium. While you can use the advanced Cold Process method, most artisans, including myself, prefer the Melt and Pour technique for this specific project. This method allows for better visual clarity and ensures the heat doesn’t degrade the natural sponge before it sets.

Have you ever tried to juggle a slippery bar of soap and a washcloth while trying to exfoliate? This craft solves that clumsy bathroom dance. It is best suited for beginners because the results are immediate, but it offers enough depth in scent blending and color design to keep intermediate crafters engaged.
Unlike knitting or pottery, which require building muscle memory over months, this form of soap making is more like baking. It relies heavily on temperature timing, mise-en-place (preparation), and a good eye for aesthetics. The barrier to entry is low, but the ceiling for creativity is surprisingly high.
Loofah is often mistaken for sea sponge or coral, but it is actually a gourd in the cucumber family that leaves behind a fibrous network when dried and peeled.
Essential Materials and Tools
To create high-quality loofah soap, you don’t need a laboratory, but you do need specific, reliable supplies. I have tested dozens of brands and tools, and I find that spending a little more on the base makes a huge difference in lather quality.
| Item Category | Specifications |
|---|---|
| Soap Base | High-quality Melt and Pour (Goat Milk, Shea Butter, or Clear Glycerin) |
| Exfoliant | Whole natural dried loofah sponges (cleaned and deseeded) |
| Molds | Silicone column mold (for round slices) or loaf mold (rectangular) |
| Cutting Tool | Serrated bread knife (crucial for cutting dry loofah) |
| Additives | Skin-safe fragrance oils and mica powder or liquid soap dye |
| Finishing | Spray bottle filled with 99% Isopropyl (Rubbing) Alcohol |
Key Techniques and Skills
Mastering this craft involves more than just melting and pouring. Through years of practice, I’ve identified the specific skills that separate a hobbyist experiment from a professional-looking product.
- Loofah Preparation: Cutting the dry gourd evenly without crushing the fibers is the most physical part of the process.
- Base Tempering: Learning to melt the soap gently to avoid “sweating” or burning the natural sugars.
- Scent Anchoring: stirring fragrance in at the correct temperature (usually around 140°F) to prevent burn-off.
- Suspension Techniques: Pouring in layers or at the right thickness to prevent the light loofah from floating.
- Bubble Elimination: Using alcohol spray effectively to remove surface tension bubbles immediately after pouring.
- Slicing Mechanics: Using a miter box or steady hand to cut finished loafs into uniform bars.
- Color Swirling: Creating gradients or transparency effects to showcase the loofah structure.
- Storage wrapping: Tightly wrapping finished soap to prevent glycerin dew in humid climates.
Be incredibly careful when cutting dry loofah with a knife; the gourds can roll unexpectedly, making them a slip hazard for your fingers.
Skill Level and Time Investment
One of the reasons I recommend this project so often is the quick turnaround time. You don’t have to wait six weeks for the soap to cure like you do with traditional methods.
| Skill Level | Time Investment | Key Milestones |
|---|---|---|
| Beginner | 1–2 Hours | Learning to melt base without overheating; basic pouring. |
| Intermediate | 3–4 Hours | Mastering color layering and scent blending; custom slicing. |
| Advanced | 5+ Hours | Growing and processing your own luffa; creating complex embedded designs. |
Advantages and Challenges
I believe in total transparency. While I love this craft, it isn’t without its sticky situations and frustrations. Here is what you can genuinely expect.
The Benefits:
- Immediate Gratification: You can use the soap the same day you make it.
- High Visual Impact: The natural texture looks expensive and artisanal.
- Cost-Effective Gifts: One pound of base and one loofah can make 4-5 generous gifts.
- Customizable Skincare: You control the ingredients, avoiding harsh detergents found in store brands.
- Eco-Friendly Options: Using biodegradable glitter and natural loofah makes it earth-conscious.
- Therapeutic Process: The melting and stirring process is meditative and calming.
- Exfoliation: It provides excellent mechanical exfoliation for feet and elbows.
The Challenges:
- Cutting Difficulty: Dry loofah is tough and can be hard to cut into uniform pucks.
- Temperature Sensitivity: If the soap is too hot, it warps the mold; too cool, and it clumps.
- Floating Inserts: The air inside the loofah often makes it want to rise out of the mold.
- Glycerin Dew: In humid weather, the soap can “sweat,” creating unattractive beads of moisture.
- Shrinkage: Over time, the soap pulls back from the loofah if not stored correctly.
To prevent the loofah from floating, pour a thin layer of soap to anchor the sponge first, let it set for five minutes, and then pour the rest.
Real Project Applications
The versatility of loofah soap is what keeps me coming back to it. One of my favorite projects was a “Gardener’s Scrub” line I created for a local market. I used a clear suspension base, added poppy seeds for extra grit, and scented it with lemon and basil.
The clear soap allowed the beautiful network of the loofah to show through, looking almost like a preserved biological specimen. It’s like freezing a moment of nature in amber, only functional. These bars were cut into thick 1-inch rounds, perfect for scrubbing dirt off hands after a day in the soil.
Another application I love is creating “pedicure pucks.” For these, I use a peppermint and tea tree oil blend and dye the soap a refreshing teal. I pour them into smaller, cylindrical molds that fit perfectly in the palm of a hand.
For weddings, I’ve made elegant favors using white goat milk base with rose gold mica and a subtle jasmine scent. The opaque white base hides the loofah slightly, so it becomes a tactile surprise when the guest uses it. Have you ever received a wedding favor that you actually wanted to use immediately? That is the reaction these soaps get.
The Learning Experience
When I started, I treated the soap base like water—I just boiled it. Never let your soap base reach a boiling point, as this breaks down the structural integrity and causes the finished soap to weep. I learned this the hard way when my first batch ended up sticky and covered in moisture droplets.
Most beginners struggle with “loofah drag.” This happens when you try to cut a loaf of soap, and the knife catches on the tough fibers, tearing the soap away from the sponge. I found that using a extremely sharp, non-serrated knife for the final cut (once the soap is solid) works best, or simply using individual round molds to avoid slicing altogether.
Community support for soap making is massive. I found my footing in online forums like the Soap Making Forum and various Facebook groups dedicated to Melt and Pour techniques. YouTube channels by experienced soapers were invaluable for seeing the texture of the melted soap, which is hard to describe in text.
The most rewarding moment is the “unmolding”—popping the soap out of the silicone to reveal a perfectly smooth, shiny surface is a dopamine hit every time.
Comparison with Similar Crafts
It helps to know where this craft sits in the wider world of bath and body DIY. Here is how it stacks up against its cousins.
| Aspect | Loofah Soap (Melt & Pour) | Cold Process Soap | Bath Bombs |
|---|---|---|---|
| Safety | High (No lye handling) | Low (Requires lye safety gear) | Medium (Citric acid dust) |
| Wait Time | Hours | 4–6 Weeks (Curing) | 24 Hours |
| Texture | Smooth & Scrubby | Creamy & Hard | Powdery & Fizzy |
| Customization | Medium (Bases are premade) | High (Full control of oils) | Medium |
Common Questions from Fellow Crafters
Q: My loofah feels too rough on my skin. How can I soften it?
A: Natural loofah varies in texture. For a softer scrub, you can boil the loofah slices in water for 5-10 minutes before drying them completely and casting them in soap. However, they must be bone dry before adding to soap to prevent mold.
Q: Why did my soap colors bleed into each other?
A: This happens if you use food coloring or non-stable dyes. You must use “non-bleeding” colorants specifically made for soap making to keep your layers crisp.
Q: Can I use fresh loofah from the garden?
A: Absolutely not. The green gourd must be fully dried, peeled, deseeded, and bleached (optional) until it is a fibrous skeleton. Any moisture or organic flesh left behind will rot inside the soap.
Q: Why are there bubbles on the back of my soap?
A: These are air bubbles trapped during the pouring process. Immediately after pouring the hot soap, spray the surface generously with rubbing alcohol to burst these bubbles instantly.
Q: How long does this soap last?
A: Melt and pour soap has a shelf life of about a year before it starts to lose moisture or scent. However, once in the shower, the loofah extends the life of the bar by acting as a structure.
Q: My soap is sweating beads of water. What did I do wrong?
A: You likely overheated the base or live in a humid climate. Glycerin draws moisture from the air. Wrap your finished soaps in airtight shrink wrap or plastic immediately after unmolding.
Never add fresh ingredients like fruit puree or milk to Melt and Pour base; without professional preservatives, they will grow bacteria and mold within days.
My Personal Results and Insights
Over the years, I’ve tracked my production to see if this hobby was actually sustainable. The data was surprisingly encouraging compared to other crafts I’ve tried.
| Project Type | Outcome |
|---|---|
| Material Cost | Approximately $2.50 per finished bar (using bulk supplies) |
| Success Rate | 95% of batches are gift-quality (up from 60% as a beginner) |
| Usage Life | One bar lasts roughly 3 weeks of daily use |
| Gift Reception | Consistently rated as the “favorite” item in holiday baskets |
Final Thoughts and My Recommendation
After years of experimenting with fibers and lathers, I can honestly say that making loofah soap is one of the most rewarding entry points into the world of personal care crafting. It satisfies the urge to create something beautiful while providing a genuinely useful household item. It removes the intimidation factor of handling dangerous chemicals like lye, making it accessible even if you have kids or pets running around.
If you are looking for a weekend project that yields professional-looking gifts without a steep learning curve, this is it. The secret to success is patience: let the soap cool completely before you try to rush the unmolding process. Whether you want to start a small business or just want better exfoliation for your morning shower, the investment is minimal and the payoff is delightful.
Does it require some practice to get the temperature just right? Yes. Will you likely spill some soap on your counter the first time? Almost certainly. But the first time you scrub with a bar you made yourself, smelling of your favorite oils, you’ll wonder why you ever bought plain soap from the store.


I’ve tried making loofah soap a few times, but I always seem to end up with air pockets or an uneven texture. Does anyone have any tips on how to get a smooth, consistent finish? I’ve tried using different types of soap base and loofah, but nothing seems to work.
Regarding air pockets and uneven texture, it’s often due to insufficient stirring or incorrect temperatures. Try using an immersion blender to ensure a smooth mix, and double-check your thermometer to ensure you’re within the ideal temperature range. Also, consider using a soap base with a higher glycerin content to help with moisture retention and texture.
Thanks for the tips! I’ll try using an immersion blender and double-checking my temperatures. Do you have any recommendations for soap bases with high glycerin content?
Yes, I recommend using a soap base from a reputable supplier like Bramble Berry or Wholesale Supplies Plus. They offer a range of glycerin-rich soap bases that are perfect for loofah soap making.
When working with loofah soap, it’s crucial to maintain the right temperature for the melt and pour technique. I recommend using a thermometer to ensure the soap base is between 120-140°F. This prevents the loofah from becoming too brittle or the soap from seizing up. For my students, I always emphasize the importance of patience and gentle stirring to achieve a uniform texture. We use a variety of molds, including silicone and plastic, to create unique shapes and designs.
For a more professional finish, I recommend investing in a good quality soap cutter and using a consistent slicing technique. This will help you achieve uniform bars and prevent waste. Additionally, make sure to use a high-quality loofah that is specifically designed for soap making. I prefer to use loofah from Midwest Grow Kits, as it is durable and has a nice texture.
I love making loofah soap because it’s a great way to reuse and recycle natural materials. Has anyone tried using loofah soap as a face wash? I’ve heard it can be gentler on the skin than traditional exfoliating products.
While loofah soap can be used as a face wash, it’s essential to consider the coarseness of the loofah and the sensitivity of your skin. Start with a small patch test to ensure you don’t experience any irritation. Additionally, you may want to add soothing ingredients like aloe vera or chamomile to your soap recipe to enhance its gentle properties.