French knots are a classic embroidery stitch that can be used to add texture and dimension to any project. They are a great way to add a bit of extra detail to your embroidery and can be used to create a variety of different designs. In this tutorial, we will go over the basics of how to do French knots in embroidery.
We will cover the supplies you need, the steps to creating the knot, and some tips and tricks to help you get the perfect French knot every time. So let’s get started!
Step-by-Step Guide to Mastering French Knots in Embroidery
Welcome to the wonderful world of French knots! French knots are a great way to add texture and dimension to your embroidery projects. They can be used to create beautiful floral designs, add texture to a landscape, or even create a unique pattern. With a few simple steps, you can master the art of French knots in no time!
Step 1: Gather Your Supplies
Before you get started, make sure you have all the supplies you need. You’ll need an embroidery hoop, embroidery floss, a needle, and scissors.
Step 2: Thread Your Needle
Cut a length of embroidery floss and thread it through the eye of the needle. Make sure the floss is long enough to make several knots.
Step 3: Make the Knot
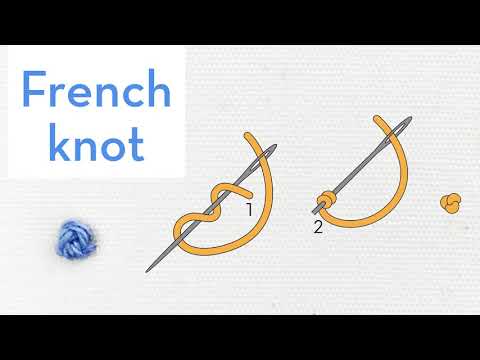
Hold the needle in your dominant hand and the floss in your other hand. Wrap the floss around the needle twice, then insert the needle back into the fabric. Pull the needle and floss through the fabric, and the knot should form.
Step 4: Secure the Knot
Once the knot is formed, pull the needle and floss tight to secure the knot.
Step 5: Repeat
Repeat steps 3 and 4 until you have the desired number of knots.
And there you have it! You’ve just mastered the art of French knots. Now you can use them to add texture and dimension to your embroidery projects. Have fun and get creative!

How to Create a Variety of French Knots for Different Embroidery Projects
Creating French knots is a great way to add texture and dimension to your embroidery projects! Whether you’re making a wall hanging, a pillow, or a piece of clothing, French knots can be used to add a unique touch. Here’s how to create a variety of French knots for different embroidery projects.
The most basic French knot is the single knot. To make this knot, start by bringing your needle up through the fabric. Wrap the thread around the needle twice, then insert the needle back into the fabric close to where it came out. Pull the thread tight to create the knot.

For a triple knot, start by bringing your needle up through the fabric. Wrap the thread around the needle four times, then insert the needle back into the fabric close to where it came out. Pull the thread tight to create the knot.
For a quadruple knot, start by bringing your needle up through the fabric. Wrap the thread around the needle five times, then insert the needle back into the fabric close to where it came out. Pull the thread tight to create the knot.
For a larger knot, start by bringing your needle up through the fabric. Wrap the thread around the needle several times, then insert the needle back into the fabric close to where it came out. Pull the thread tight to create the knot.
For a more decorative knot, start by bringing your needle up through the fabric. Wrap the thread around the needle several times, then insert the needle back into the fabric close to where it came out. Pull the thread tight to create the knot. Then, wrap the thread around the knot several times to create a spiral effect.
Creating French knots is a great way to add texture and dimension to your embroidery projects. With a little practice, you’ll be able to create a variety of French knots for different projects. Have fun and get creative!
Tips for Making Perfect French Knots Every Time
French knots are a great way to add texture and dimension to your embroidery projects. With a few simple tips, you can make perfect French knots every time!
- Start with the right thread. Choose a thread that is strong and not too thick. This will make it easier to wrap the thread around the needle.
- Make sure your needle is sharp. A sharp needle will make it easier to pull the thread through the fabric.
- Wrap the thread around the needle two or three times. This will create a nice, tight knot.
- Hold the thread taut as you pull the needle through the fabric. This will help keep the knot tight.
- Pull the thread gently but firmly. This will help keep the knot from unraveling.
- Trim the thread close to the knot. This will help keep the knot from unraveling and will give your project a neat, finished look.
With these tips, you’ll be able to make perfect French knots every time! So get stitching and have fun!
Creative Ways to Use French Knots in Embroidery
- Create a beautiful floral bouquet by stitching French knots in a variety of colors to represent the petals of the flowers.
- Create a unique pattern by stitching French knots in a circular pattern.
- Create a whimsical design by stitching French knots in a random pattern.
- Create a stunning border by stitching French knots along the edge of a piece of fabric.
- Create a beautiful starburst pattern by stitching French knots in a radiating pattern.
- Create a unique texture by stitching French knots in a grid pattern.
- Create a stunning landscape by stitching French knots in a variety of colors to represent the trees, mountains, and sky.
- Create a unique animal design by stitching French knots in a variety of colors to represent the fur or feathers.
- Create a beautiful snowflake design by stitching French knots in a radiating pattern.
- Create a unique abstract design by stitching French knots in a variety of colors and patterns.
Troubleshooting Common Problems with French Knots in Embroidery
Ah, French knots! They can be tricky little buggers, but they’re so worth it when you get them right. Here are some tips to help you troubleshoot any issues you may be having with French knots in your embroidery.
- Not enough thread: If your French knots are too small or don’t have enough definition, you may not be using enough thread. Try using a longer length of thread and wrapping it around the needle more times.
- Too much thread: If your French knots are too big or lumpy, you may be using too much thread. Try using a shorter length of thread and wrapping it around the needle fewer times.
- Not enough tension: If your French knots are too loose, you may not be pulling the thread tight enough. Try pulling the thread taut as you wrap it around the needle.
- Too much tension: If your French knots are too tight, you may be pulling the thread too tight. Try loosening your grip on the thread as you wrap it around the needle.
With a little practice and patience, you’ll be a French knot pro in no time!
Conclusion
French knots are a great way to add texture and dimension to your embroidery projects. With a little practice, you can easily master the technique and use it to create beautiful and unique designs. To make a French knot, start by bringing the needle up through the fabric and wrapping the thread around the needle two or three times. Then, while holding the thread taut, insert the needle back into the fabric close to where it came up. Finally, pull the thread tight to secure the knot. With a few simple steps, you can add a unique and beautiful touch to your embroidery projects.