Carving names into wood is a timeless tradition that has been around for centuries. It is a great way to commemorate a special occasion or to give a personalized gift. Carving names into wood can be done with a variety of tools, from a simple pocket knife to a power tool. It is a great way to express your creativity and to create something unique and special. Whether you are a beginner or an experienced carver, carving names into wood can be a fun and rewarding experience.
The History of Carving Names into Wood
Carving names into wood is a tradition that has been around for centuries. It is a way to show love and affection, to commemorate a special occasion, or to simply express yourself.
The earliest known example of carving names into wood dates back to the ancient Egyptians. They used to carve hieroglyphics into wood to commemorate important events and people. This tradition was passed down through the generations and eventually spread to other cultures.
In the Middle Ages, carving names into wood was a popular way to show affection. Couples would carve their names into a tree or a piece of furniture to symbolize their love for one another. This tradition was also used to commemorate special occasions such as weddings and anniversaries.
In the modern era, carving names into wood is still a popular way to show love and affection. Couples often carve their names into a piece of furniture or a tree to symbolize their commitment to one another. It is also a popular way to commemorate special occasions such as birthdays, anniversaries, and graduations.
Carving names into wood is a timeless tradition that has been around for centuries. It is a way to show love and affection, to commemorate a special occasion, or to simply express yourself. Whether you are carving your own name or someone else’s, it is a beautiful way to show your love and appreciation.
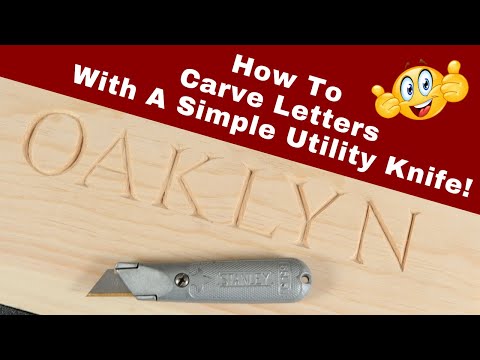
How to Carve Names into Wood
Carving names into wood is a fun and creative way to personalize a gift or make a special keepsake. Whether you’re a beginner or an experienced woodworker, carving names into wood is a great way to show someone you care. Here’s how to get started:
- Gather your supplies. You’ll need a piece of wood, a carving knife, a pencil, and a ruler.
- Measure and mark the area where you want to carve the name. Use a ruler to measure the length and width of the name and mark it with a pencil.
- Start carving. Use the carving knife to carefully carve out the letters of the name. Be sure to carve slowly and carefully to avoid mistakes.
- Sand and finish. Once you’ve finished carving the name, use sandpaper to smooth out any rough edges. Then, apply a finish to protect the wood and make it shine.
Carving names into wood is a great way to show someone you care. With a little patience and practice, you’ll be able to create a beautiful and unique gift that will be cherished for years to come.
Creative Ideas
- Spell out the name with a woodburning tool.
- Carve the name into a wooden plaque.
- Create a 3D sculpture of the name with a wood carving knife.
- Use a router to carve the name into a wooden sign.
- Paint the name onto a wooden block.
- Use a jigsaw to cut out the name from a piece of wood.
- Create a stencil of the name and use a woodburning tool to trace it onto the wood.
- Carve the name into a wooden bowl.
- Use a woodburning tool to write the name in cursive.
- Carve the name into a wooden spoon.
The Best Tools
As a passionate woodcarver, I have always found joy in adding unique and personal touches to my woodworking projects by carving names into wood. Whether it’s a nameplate for a home, a decorative sign, or even a product line for a woodworking business, knowing how to carve names into wood can be an incredibly valuable skill. In this article, I will share my thoughts and provide a detailed guide on how to carve names into wood using the best three tools.
- Craft Knife or Gouge: For small letters and intricate designs, a craft knife or gouge is an essential tool. These tools offer precision and control, allowing you to create detailed carvings. Make sure to choose a craft knife or gouge with a sharp blade to ensure clean and precise cuts. Take your time and work patiently to achieve the desired results.
- Electric Router: When it comes to carving larger letters, an electric router can be a game-changer. It makes the carving process much easier and faster. The electric router allows you to remove larger portions of wood quickly, resulting in smoother and more efficient carving. However, it’s important to practice and gain experience with the router to ensure safe and accurate carving.
- Chip Carving Knife: For smaller lettering, a chip carving knife with a flat end is a great tool to trace the shape directly onto the wood’s surface. This specialized knife is designed for intricate chip carving, allowing you to create precise and clean lines. Take your time and work with care to achieve the desired depth and details in your carvings.
Once you have your design traced onto the wood, you’re ready to start carving. Remember to secure the wood properly and work in a well-lit and well-ventilated area. Take breaks when needed and maintain a steady hand throughout the process to ensure accuracy.
In addition to the tools mentioned above, it’s crucial to choose the right wood for carving names. Hardwoods like oak and maple with tight grain patterns are ideal for achieving crisp and clean lines. Basswood and butternut are also popular choices due to their softness and ease of cutting. Always consider the characteristics of the wood and select the one that best suits your project.
When it comes to font choice for wood carving, serif fonts are typically recommended. Serif fonts, such as Times New Roman, American Typewriter, and Baskerville, make it easier to achieve sharp and crisp corners in your letters. However, don’t be afraid to experiment with different fonts and styles to add a unique touch to your carvings. Practice carving a few letters before starting the entire piece to ensure you’re comfortable with your chosen font.
To enhance the longevity of your wood carvings, finish the wood with a clear coat or stain. This step not only protects the wood but also enhances its natural beauty. Consider using a rotary tool with rounded cutting bits to add intricate details and designs to your carvings. Remember to use quality, sharp bits for smooth and accurate lines.
How to Carve Wood Letters: 2 Simple Methods
Wood carving is a rewarding craft that allows you to create personalized signs and decorations. Whether you’re a beginner or have some experience in wood carving, you can easily carve letters into wood using hand tools or a Dremel rotary tool. In this article, I will provide a detailed guide on how to carve wood letters using these two methods.
Method 1: Transferring Letters to the Wood
Materials You’ll Need:
- Softwood (e.g., basswood, butternut, or pine)
- Pencil
- Carbon paper
- Tape
- Clamp
- Right-angle chisel
- Mallet
- Flat chisel
- Sandpaper
- Vacuum
Step 1: Choose the Right Wood To ensure a smooth carving process, it’s best to start with softwoods such as basswood, butternut, or pine. These woods are easier to work with and keep your tools sharp. Avoid selecting wood with warps or defects as they may make carving more challenging. If you have previous carving experience, you can try using hardwoods like maple, cherry, or red oak. Keep in mind that hardwoods require slower carving and more force to chip pieces off.
Step 2: Draw or Trace the Letters If you want to carve unique or handwritten letters, use a pencil to draw your design directly on the wood. For precise and printed letters, you can trace them onto the wood using carbon paper. Type the letters in a text document on your computer, print them on a sheet of paper, and tape the printed letters onto the light side of the carbon paper. Place the carbon paper, dark side down, on top of the wood and trace the outlines of the letters with a pencil to transfer them.
Step 3: Secure the Wood Clamp the piece of wood to your work surface to keep it steady while carving. Use a hand clamp to tighten the wood securely, ensuring it doesn’t move during the carving process. If needed, add another clamp on the opposite side to prevent any movement.
Step 4: Carve the Letters Hold a right-angle chisel against the wood, aligning it with the outline of the letters. Tap the chisel’s handle firmly with a rubber mallet to make the initial cuts. Start with shallow cuts, following the outline to remove the wood gradually. As you carve, be careful not to put your other hand in front of the chisel blade to prevent any accidents.
You can also use a flat chisel to break off smaller pieces of wood and create more precise cuts. Tilt the chisel at the desired angle and press the edge into the wood to reach the desired depth. Work your way through the outlines, using a combination of the right-angle chisel and flat chisel, until the letters are fully carved.
Step 5: Sand the Edges After carving the letters, use 80- or 100-grit sandpaper to smooth the chisel cuts and refine the edges. Sand in the direction of the grain, wiping away any sawdust between sanding passes. Be cautious not to sand too much if your letters are shallow, as it may remove the fine details. Remove any pencil or carbon marks during the sanding process.
Method 2: Using a Rotary Tool
Materials You’ll Need:
- Rotary tool
- Rounded cutting bits
- Safety glasses
- Sandpaper
Step 1: Choose the Right Cutting Bits Select rounded cutting bits for your rotary tool. These bits resemble small flames with various cutting edges. Press the lock button on your rotary tool and insert the cutting bit, tightening it clockwise while holding down the lock button. The size of the bit will determine the width and precision of your cuts.
Step 2: Carve the Letters Plug in your rotary tool and hold it with your dominant hand. Turn it on to a moderate speed, ensuring the cord is out of the way. Hold the wood steady with your non-dominant hand. Press the tip of the rotary tool into the wood and follow the outlines of the letters to carve them out. Make shallow cuts initially, adjusting the depth and width as desired.
Feel free to hold the rotary tool at an angle or sideways to create wider lines in your wood. Keep your fingers away from the end of the tool while it’s spinning, and wear safety glasses to protect your eyes.
Step 3: Clean the Carving Area Regularly wipe away the sawdust from the carving area to maintain visibility and ensure clean lines. Every few carves, use your hands or shake the wood to remove the accumulated sawdust.
Step 4: Sand and Finish If desired, use sandpaper to smooth any rough edges or surfaces. Sand in the direction of the grain, gradually refining the carved letters. Clean off any sawdust after sanding.
The Benefits of Carving Names into Wood
Carving names into wood is a timeless way to show someone you care. Whether it’s a gift for a special occasion or a way to commemorate a special moment, carving names into wood is a unique and meaningful way to express your love.
The beauty of carving names into wood is that it’s a lasting reminder of your bond. It’s a physical representation of your relationship that will last for years to come. You can hang it on the wall, place it on a shelf, or even keep it in a special box. No matter where you put it, it will always be a reminder of your connection.

Carving names into wood is also a great way to show off your creativity. You can choose the type of wood, the font, and the design. You can even add a special message or quote to make it even more personal.
Finally, carving names into wood is a great way to make a special moment even more memorable. Whether it’s a wedding, anniversary, or birthday, carving names into wood is a unique way to commemorate the occasion. It’s a fun and creative way to show someone you care.
Carving names into wood is a timeless way to show someone you care. It’s a lasting reminder of your bond, a great way to show off your creativity, and a unique way to commemorate a special moment. So, if you’re looking for a special way to express your love, why not carve names into wood?

Conclusion
Carving names into wood is a great way to create a lasting memory. It is a timeless tradition that can be passed down from generation to generation. It is a unique way to show someone you care and to commemorate a special moment. Carving names into wood is a great way to show your love and appreciation for someone special.


